If you would like to be notified when Deb Shinder releases the next part of this article series please sign up to the WindowsNetworking.com Real time article update newsletter.
Introduction
When Tom and I used to teach MCSE classes, we always told our students “don’t let your production network be your test lab”. We told them this on a regular basis because, during our consulting careers, we’d seen far too many admins try to introduce a new product or technology without testing it out in the lab first. All too often, the result was not good. The sad thing is that it didn’t have to be that way – if they had only tested the application or service in the lab first, they would have learned about the “undocumented features” and the “gotcha’s” in a nice controlled environment that was isolated from their production networks.
On the other hand, life back in the 1990s and early 2000’s was a bit different. If you wanted to put together a test lab, you generally built it out of physical hardware. Then you had to install the operating systems and network services and applications on the test lab computers. And if something bad happened that you couldn’t explain and that you couldn’t back out of, you had to crater the lab and start all over. Sure, there was disk imaging software available, but networks were slow then and high speed USB 2.0 drives weren’t available or were very expensive and were not large enough to fulfill the purpose of saving the lab in its entirety, especially if the lab contained five, ten or even more computers.
Things are different now. You don’t need to fill a room with a bunch of physical computers to run a useful test lab. With virtualization, you can put all the computers you need to simulate your production network on a single virtual server and then create virtual networks on the virtual server to simulate the type of network segmentation you have on your production network. And with today’s high end hardware being available at commodity prices, you can easily create a virtual test lab that can support over 20 virtual machines to participate in a single application or service deployment scenario.
Of course, there are a number of server virtualization platforms available and each of them has its own advantages. For almost a decade, we preferred VMware as our virtualization solution of choice. We began with VMware Workstation 1.0 for creating simple test labs on our Windows 2000 Workstation computers. Then VMware came out with the GSX virtualization platform and we virtualized almost our entire server infrastructure on that. ESX was released and it represented a major advance in server virtualization and enabled configuration and management features that we could only dream of when GSX was released.
There are other server virtualization options available now. The two other big players in the market are Xen and Hyper-V. We’ve never been Citrix fans (not that we don’t like Citrix; we just never had the opportunity to work much with their products) so I can’t say too much about what Xen has to offer. However, with Tom joining Microsoft last year, we decided that maybe we should start to move our virtualized infrastructure over from VMware to Hyper-V. That work started this year and continues to this day.
Working on moving our core network and server infrastructure from VMware to Hyper-V gave me the opportunity to learn quite a bit about Hyper-V, although not as much as I would like to know. However, I know enough about it now so that I can put together test labs quickly and easily, and that’s what I’m going to share with you today.
A small caveat: In this article, I’m not going to talk about the stuff you can do with System Center Virtual Machine Manager (SCVMM). There are a number of things you can do with that which you can’t do with the Hyper-V server right out of the box. If you’re interested in being a SCVMM jockey, then check out the information on SCVMM here. This article is more appropriate for people who are relatively new to server virtualization and are curious about how to run a Microsoft product or technology test lab using Hyper-V.
The Base Configuration
In the past, we pretty much created virtual machines as we needed them. If there was a scenario I wanted to test, I would create a collection of virtual machines and then install the products and services that I needed to test. After I was done with the testing, I might save snapshots of the configuration in case I wanted to come back to it, or I might delete the virtual machines. This worked for me over the years, but I knew that there must be a more efficient process to use.
That more efficient process became obvious after Tom joined Microsoft. He worked with Joe Davies (who is also a Principal Writer on the Windows Server team) to put together something they call the “Base Configuration”. The Base Configuration is a set of virtual machines that form the core of servers and services that almost any test lab scenario would require. After you create and configure the virtual machines that participate in the Base Configuration, you activate them and save a snapshot of the configuration. This allows you to always return to the base configuration if that’s where you want to start. You can find the Base Configuration here.
Virtual Networks
The Base Configuration really ended up saving me quite a bit of time, since I didn’t need to recreate virtual machines and core network services configurations each time I needed to test a new scenario. The Base Configuration also includes two virtual networks: the “Corpnet” subnet and the “Internet” subnet. In a virtual environment, there are a number of ways to handle these subnets using Hyper-V. Hyper-V splits virtual networks into three types:
- External Networks. These networks have connectivity to the live network through one of the NICs connected to your virtual server.
- Internal Networks. These networks allow the VMs on the same Internal Network to communicate with one another and also communicate with the host virtual server computer
- Private Networks. These networks allow the VMs to communicate with each other, but not with any host on a live (External) network or with the host virtual server
When I create virtual labs, I prefer to use Private Networks. This protects my production environment and gives me the comforting knowledge that the test lab is entirely isolated from my production network – with the end result being that my lab is protected from my live network and my live network is protected from my test lab.
However, there are times when my virtual lab’s VMs need access to the live Internet. This means they need access to a live network connection and need to be assigned valid IP addressing information. In order to do this, an External Network needs to be created in Hyper-V and then a virtual machine can be assigned to the External Network. If the virtual machine is a mobile machine such as a Windows 7 client, you can easily configure the client to be a DHCP client and unplug it from the Private network and plug it into an External network and download the software you need. Then you can plug the VM back into the Private Network.
In the figure below, you can see where this plugging and unplugging is done. On the left side of the dialog box, you see Network Adapter External Live. The Network Adapter is the actual setting, and the current virtual network being used is the External Live network that I created, which is connected to the live network. If I wanted to move this virtual machine back to a private network, I would click the down-arrow in the Network drop down box in the right side of the dialog box and select the Private network to which I want this virtual machine to connect.
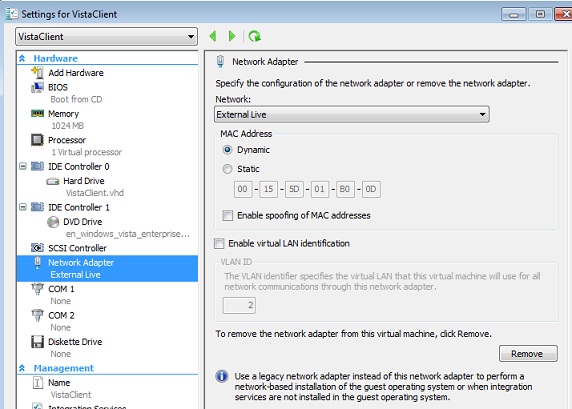
Figure 1
While this method works fine for VMs that lend themselves to being moved on and off Private and External networks, not all VMs are so mobility friendly. For example, you don’t really want to move a domain controller or an Exchange server on and off the network it was designed to use (which in a test lab environment is going to be a Private or Internal network). In this case, you’ll need to configure a dual homed virtual machine that connects the lab environment to the live network. I typically use RRAS for this, but you can use ISA or TMG or whatever software solution you like. One example of how to do this is included in Tom’s Test Lab Guide for testing UAG SP1’s new Force Tunneling feature, which you can check out here.
The figure below shows a collection of virtual networks I have set up on one of our Hyper-V virtual lab test servers. Private1, Private2 and Private3 are used in the Base Configuration, where Private1 is the Corpnet subnet, Private2 is the Internet subnet, and Private3 is the Homenet subnet (actually, the Homenet subnet is not part of the Base Configuration; it’s a subnet that’s created in the Test Lab Guide for testing Windows and UAG DirectAccess.) You can see other virtual networks here, such as the Guest Live virtual network, which is an External Network connected to a NIC that is connected to a DMZ segment on our network, so that the virtual TMG firewall on this server can be associated with this Network to control traffic between the DMZ and other networks. Notice how the External networks are associated with a specific network adapter.
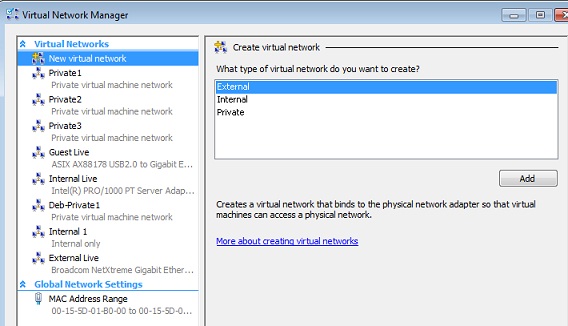
Figure 2
If you want to create a new virtual network, just click the Add button as seen in Figure 2 above. This brings you to the dialog box that you see in Figure 3 below. Here you choose what type of virtual network you want to create, and if you want to create an External network, you also choose which NIC you want to associate with that virtual network. Note that you can also take advantage of VLAN tagging on the host OS if you’re using that on your live network.
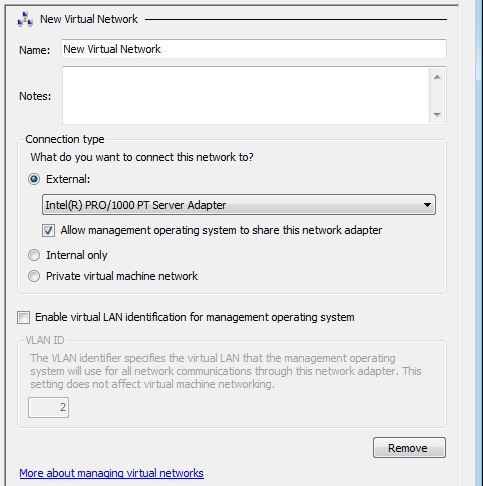
Figure 3
Planning the virtual networks you need for your test lab is the first thing you should do before you start building out the virtual machines. Make a network diagram – whether on a cocktail napkin or in Visio – and this will make it easier to keep track of your virtual networks, especially if you want to test more “interesting” networking scenarios that more closely mirror your production network. After you plan your virtual networks, the next step is to create them. After you create the Hyper-V virtual networks, then you can get to the task of building out the virtual machines, which we’ll go into in Part 2 of this article.
Summary
In this article, we discussed a bit about the history of building out test labs and how virtualization has made it much easier to create valid test labs that allow us to test software and services in a controlled environment. Then we discussed how the Base Configuration enables you to start with a more organized approach to building out virtual labs. We then finished up with a discussion of Hyper-V virtual networks and the types of virtual networks you can create, and how you would use them in a test lab environment. In the next part of this article, we’ll cover issues related to planning virtual machines that participate in the lab, snapshotting, restoring configurations, and other tips and tricks I’ve learned in my forays into the virtual lab world. See you then! – Deb.
If you would like to be notified when Deb Shinder releases the next part of this article series please sign up to the WindowsNetworking.com Real time article update newsletter.


