Creating Multiple Security Perimeters with a Multihomed ISA Firewall — Part 4:
Configuring the Web Publishing Rules Supporting
Connections to the Front-end Exchange Server on the Authenticated Access DMZ
by Thomas W Shinder MD, MVP
|
Have Questions about the article? |

In part 1 of this article series on configuring the ISA firewall as multihomed, multi-perimeter ISA firewall, we discussed the concepts and design issues related to creating multiple DMZs based on multiple security zones. In part 2 of the series we went over configuration of ISA firewall Networks and Network Rules to support the multihomed, multi-perimeter ISA firewall. In part 3 of the series we dived into the issues related to Web site certificates and key factors involved with proper certificate naming conventions.
If you missed the other articles in this series, check them out at:
- Creating Multiple Security Perimeters with a Multihomed ISA Firewall Part 1
- Creating Multiple Security Perimeters with a Multihomed ISA Firewall Part 2
- Creating Multiple Security Perimeters with a Multihomed ISA Firewall Part 3
- Creating Multiple Security Perimeters with a Multihomed ISA Firewall Part 5
- Creating Multiple Security Perimeters with a Multihomed ISA Firewall Part 6
In this, part 4 of the series, we’ll continue configure the ISA firewall with Web Publishing Rules to allow incoming connections to the front-end Exchange Server’s Web sites. In this article we’ll perform the following procedures:
- Create the OWA Web Publishing Rule
- Create the RPC/HTTP Web Publishing Rule
- Create the OMA/ActiveSync Web Publishing Rule
Before getting started, review Table 1 to confirm that you understand the naming conventions we’re using for the certificate infrastructure to support our solution. The ISA firewall will be configured with two Web listeners: one Web listener for the OWA Web Publishing Rule that will use OWA forms-based authentication and the other Web listener will use basic authentication and support RPC/HTTP, OMA and ActiveSync publishing.
The Web listener for the OWA Web Publishing Rule will use a certificate with the common/subject name owa.msfirewall.org. External users will access the published OWA site using the URL https://owa.msfirewall.org/exchange.
The Web listener for the RPC/HTTP and the OMA/ActiveSync Web Publishing Rules will use a certificate with the common/subject name rpc.msfirewall.org and client applications will be configured to use the host name rpc.msfirewall.org to connect to the RPC/HTTP, OMA and ActiveSync sites.
Exchange Server service
Common/subject name on Web Site Certificate
OWA
owa.msfirewall.org
RPC/HTTP
rpc.msfirewall.org
Front-end Exchange Server Web site
feexchange.msfirewall.org
SMTP
mail.msfirewall.org
POP3
mail.msfirewall.org
IMAP4
mail.msfirewall.org
Table 1: Common names on certificates bound to the ISA firewall Web listeners and Front-end Exchange Server’s Web services
Note that we are creating three Web Publishing Rules. The OWA rule must be separated from any rule that allows RPC/HTTP, OMA or ActiveSync connections because the clients applications for RPC/HTTP, OMA and ActiveSync do not know how to handle the FBA form returned to them and they will fail the connection.
However, you could use the same rule for the RPC/HTTP, OMA and ActiveSync connections. We will use two different rules to support this incoming RPC/HTTP, OMA and ActiveSync connections because it will allow us more granular control over the HTTP Security Filter configuration. Microsoft has published comprehensive guidance regarding HTTP Security Filter configuration for OWA and RPC/HTTP publishing.
Microsoft has no provided no guidance, at this point in time, regarding appropriate HTTP Security Filter configuration for OMA and ActiveSync. Because of this, we will create a Web Publishing Rule for RPC/HTTP publishing and configure the custom HTTP Security Filter settings for that rule. We will create another Web Publishing Rule for OMA/ActiveSync that uses generic HTTP Security Filter settings.
Create the OWA Web Publishing Rule
The OWA Web Publishing Rule will allow incoming SSL (HTTPS) connections from the Internet through the ISA firewall to the front-end Exchange Server. The figure below shows the path for the incoming connections through the ISA firewall to the front-end Exchange Server in the authenticated access DMZ segment.
Figure 1

The Web Publishing Rule will be configured to accept incoming connections to host owa.msfirewall.org. In addition, users will need to be authenticated and authorized at the ISA firewall before the connection is forwarded to the front-end Exchange Server’s OWA site. Basic delegation will be enabled so that the ISA firewall will be able to forward the user credentials to the OWA site so that the OWA site can also authenticate the user. Only after the ISA firewall pre-authenticates and authorizes the connection, and the OWA site authenticates the user, is the connection from the external user allowed to the front-end Exchange Server site.
Finally, SSL to SSL bridging is enabled on the ISA firewall so that the ISA firewall will be able to perform stateful application layer inspection on the SSL tunneled data. This is one of the major advantages of using the ISA firewall over a typical “hardware” stateful packet inspection-only firewall. The ISA firewall prevents attackers from hiding exploits in an SSL tunnel, while the ISA firewall stops these attackers in their tracks.
Name
Action
Protocols
From/Listener
To
Condition
Web Pub OWA Svr
Allow
HTTPS
OWA Listener
Feexchange.msfirewall.org
All Authenticated Users
Table 2: Description of the OWA Web Publishing Rule
Perform the following steps to create the OWA Web Publishing Rule:
- In the ISA firewall console, expand the server name and then click the Firewall Policy node.
- On the Firewall Policy node, click the Tasks tab in the Task Pane and then click the Publish a Mail Server link.
- On the Welcome to the New Mail Server Publishing Rule Wizard page, enter a name for the OWA Web Publishing Rule in the Mail Server Publishing Rule name text box. In this example we’ll name the rule Web Pub FE OWA Svr and click Next.
- On the Select Access Type page, select the Web client access: outlook Web Access (OWA), Outlook Mobile Access, Exchange Server ActiveSync option and click Next.
- On the Select Services page, select only the Outlook Web Access checkbox and leave the checkmark in the Enable high bit characters used by non-English characters sets checkbox. Click Next.
- On the Bridging Mode page, select the Secure connection to clients and mail server option and click Next.
- On the Specify the Web Mail Server page, enter the name of the front-end Exchange Server’s Web site certificate. This is the name that will ultimately end up on the To tab of the Web Publishing Rule. Remember, we need this value to equal the common/subject name on the Web site certificate bound to the front-end Exchange Server’s Web site. In this example, the common/subject name on the front-end Exchange Server’s Web site certificate is feexchange.msfirewall.org, so we will enter that value into the Web mail server text box. Click Next.
Figure 2

- On the Public Name Details page, select the This domain name (type below) option from the Accept requests for drop down list. In the Public name text box, enter the name external users will use to access the OWA Web site. This name must match the common/subject name of the Web site certificate bound to the Web Listener for this rule. The common name on the Web site certificate that will be bound to this rule’s Web Listener is owa.msfirewall.org, so we enter that value into the Public name text box and click Next.
Figure 3

- On the Select Web Listener page, click the New button.
- On the Welcome to the New Web Listener Wizard page, enter a name for the listener in the Web listener name text box. In this example we’ll name the Web listener OWA Listener and click Next.
- On the IP Addresses page, put a checkmark in the External checkbox and click Address.
- In the External network Listener IP Selection dialog box, select the Specified IP addresses on the ISA Server computer in the selected network option. Then double click the IP address that matches the IP address associated with the FQDN used on the Public Name page. In this example, our external DNS servers resolve the name owa.msfirewall.org to IP address 192.168.1.70, so we will double click on that address. The address moves to the Selected IP Addresses list. Click OK.
Figure 4

- Click Next on the IP Addresses page.
Figure 5

- On the Port Specification page, remove the checkmark from the Enable HTTP checkbox. Put a checkmark in the Enable SSL checkbox. Click the Select button.
- In the Select Certificate dialog box, select the certificate for the OWA Web site. In our example network, the ISA firewall will use the owa.msfirewall.org Web site certificate for the OWA Web Publishing Rule Web Listener. Select the certificate and click OK.
Figure 6

- Click Next on the Port Specification page.
Figure 7

- Click Finish on the Completing the New Web Publishing Rule Wizard page.
- On the Select Web Listener page, click the Edit button.
- In the OWA Listener Properties dialog box, click the Preferences tab.
- On the Preferences tab, click the Authentication button.
- In the Authentication dialog box, remove the checkmark from the Integrated checkbox. Click OK in the dialog box informing you that no authentication methods are selected.
- Put a checkmark in the OWA Forms-Based checkbox. Put a checkmark in the Require all users to authenticate checkbox. Click the Configure button.
Figure 8

- On the OWA Forms-Based Authentication page, read the description of the settings. In the current example, we’ll leave the timeouts at their defaults and put checkmarks in the Clients on public machines and Log off OWA when the user leaves OWA site checkboxes. These aren’t necessarily best practices recommendations, but settings I typically set by default when I’m not sure what the customer wants yet. Click OK.
Figure 9

-
Click OK in the Authentication dialog box.
-
Click OK in the OWA Listener Properties dialog box.
-
Click Next on the Select Web Listener page.
Figure 10

- On the User Sets page, click the All Users entry and click Remove. Click the Add button.
- In the Add Users dialog box, double click the All Authenticated Users entry and click Close.
Figure 11

- Click Next on the User Sets page.
- Click Finish on the Completing the New Mail Server Publishing Rule Wizard page.
The next step is to make a couple of changes to the Web Publishing Rule that couldn’t be configured in the Web Publishing Rule Wizard:
- Double click on the OWA Web Publishing Rule
- In the Web Pub FE OWA Svr Properties dialog box, click the Traffic tab. Put a checkmark in the Require 128-bit encryption for HTTPS traffic checkbox.
Figure 12

- Click on the Users tab. Put a checkmark in the Forward Basic authentication credentials (Basic delegation) checkbox. Click OK.
Figure 13

The final step is to configure the HTTP Security Filter to enhance the level of security the ISA firewall provides for the front-end Exchange Server Web site.
Perform the following steps to configure the HTTP Security filter for the OWA Web Publishing Rule:
- Right click the OWA Web Publishing Rule and click Configure HTTP.
- On the General tab of the Configure HTTP policy for rule dialog box, configure the following settings:
Maximum headers length 32768
Allow any payload length
Maximum URL Length 260
Maximum query length 4096
Enable Verify normalization
Disable Block high bit characters
Figure 14

- Click the Methods tab and select the Allow only specified methods option from the Specify the action taken for HTTP methods list. Click the Add button. In the Method dialog box, enter GET in the Method text box. Click OK. Repeat the procedure, enter the following methods:
GET
POST
PROPFIND
PROPPATCH
BPROPPATCH
MKCOL
DELETE
BDELETE
BCOPY
MOVE
SUBSCRIBE
BMOVE
POLL
SEARCH
Figure 15

- Your allowed methods list should look like that in the figure below.
Figure 16
Have Questions about the article?
Ask at: http://tinyurl.com/buwz2

- Click the Extensions tab. Select the Block specified extensions (allow all others) option from the Specify the action taken for file extensions list. Click the Add button. In the Extension dialog box, enter .exe in the Extension text box and click OK. Repeat the procedure and enter the following file extensions:
.exe
.bat
.cmd
.com
.htw
.ida
.idq
.htr
.idc
.shtm
.shtml
.stm
.printer
.ini
.log
.pol
.dat
Figure 17

- Your completed extensions list should look like that in the figure below.
Figure 18

- Click the Signatures tab. Click the Add button. In the Signature dialog box, enter OWA1 in the Name text box. Select the Request URL from the Search in drop down list. Enter ./ in the Signature text box. Click OK. Repeat the procedure and add the following signatures:
\
%
Figure 19

- Your final list of signature should look like that in the figure below:
Figure 20

-
Click OK in the Configure HTTP policy for rule text box.
Create the RPC/HTTP Web Publishing Rule
The next step is to create a Web Publishing Rule for the RPC/HTTP Web site. Like the OWA Web Publishing Rule, this rule allows incoming SSL (HTTPS) connection to the front-end Exchange Server RPC proxy Web site. The figure below shows the incoming path for the SSL connections to the front-end Exchange server.
Figure 21

The Web Publishing Rule will allow incoming connections to host name rpc.msfirewal.org and will be triggered only when the path in the request includes /rpc/. Like the OWA Web Publishing Rule, SSL to SSL publishing will be used to provide superior security over that which can be provided by a convention “hardware” firewall. Pre-authentication and authorization is also required at the ISA firewall before the RPC/HTTP connections are forwarded to the front-end Exchange Server’s RPC proxy Web site.
Table 3 provides a short description of the RPC/HTTP Web Publishing Rule.
Name
Action
Protocols
From/Listener
To
Condition
Web Pub RPC Proxy
Allow
HTTPS
RPC/OMA/ActiveSync Listener
feexchange.msfirewall.org
Authenticated users
Table 3: Description of the RPC over HTTP Web Publishing Rule
Perform the following steps to create the RPC/HTTP Web Publishing Rule:
- In the ISA firewall console, right click on the OWA Web Publishing Rule and click Copy.
- Right click on the OWA Web Publishing Rule again and click Paste.
- Double click on the new rule named Web Pub FE OWA Svr(1).
- On the General tab, rename the rule entering Web Pub RPC Proxy in the Name text box. Click Apply.
- Click on the Listener tab. On the Listener tab, click the New button.
- On the Welcome to the New Web Listener Wizard page, enter a name for the rule in the Web listener name text box. In this example we’ll name the Web listener RPC/OMA/ActiveSync Listener and click Next.
- On the IP Addresses page, put a checkmark in the External checkbox and click the Address button.
- In the External Network Listener IP Selection dialog box, select the Specified IP addresses on the ISA Server computer in the selected network option. Double click on the address that rpc.msfirewall.org will resolve to. That is to say, you need to select the address that the common/subject name on the Web site certificate used for this listener will resolve to. On our example network, the name rpc.msfirewall.org resolves to the IP address 192.168.1.71 so we will double click on that value. The address now appears in the Selected IP Addresses list. Click OK.
Figure 22

- Click Next on the IP Addresses page.
- On the Port Specification page, remove the checkmark from the Enable HTTP checkbox and put a checkmark in the Enable SSL checkbox. Click the Select button.
- In the Select Certificate dialog box, click on the certificate to be used for the HTTP-RPC/OMA/ActiveSync Web Publishing Rule. In this example external RPC/HTTP, OMA and ActiveSync clients will connect to the ISA firewall using the host name rpc.msfirewall.org. Select the certificate from the list and then click OK.
Figure 23

- Click Next on the Port Specification page.
Figure 24

- Click Finish on the Completing the Web Listener page.
- Notice that the new Web listener is now the selected listener on the Listener tab. Click the Properties button.
- In the RPC/OMA/ActiveSync Listener Properties dialog box, click the Preferences tab.
- On the Preferences tab, click the Authentication button.
- In the Authentication dialog box, remove the checkmark from the Integrated checkbox and click OK in the dialog box informing you that there are no authentication methods configured.
- Put a checkmark in the Basic checkbox. Also put a checkmark in the Require all users to authenticate checkbox. Click OK.
Figure 25

- Click OK in the RPC/OMA/ActiveSync Listener Properties dialog box. Your Listener tab should look like the figure below.
Figure 26

- Click on the Paths tab. Click on each of the paths in the list and click the Remove button. The list of paths should now be empty. Click the Add button. In the Path Mapping dialog box, enter the path /OMA/* in the text box. Repeat the procedure and add the following paths:
/rpc/*
Figure 27

- The entries on the Path tab should look like the figure below.
Figure 28

- Click the Public Name tab. On the Public Name tab, click the current entry owa.msfirewall.org and click the Remove button. Click the Add button.
- In the Public Name dialog box, enter the name external users will use to connection to resources through this Web Publishing Rule, which in this case is rpc.msfirewall.org. We’ll enter that value in the Public domain name or IP address text box and click OK.
Figure 29

- The new public name now appears in the list. Click OK.
Figure 30

Now we need to customize the HTTP Security Filter to enhance the security for our RPC over HTTP site on the front-end Exchange Server. Perform the following steps to make the requisite changes to the HTTP Security Filter:
- Right click the Web Pub RPC Proxy rule and click Configure HTTP.
- On the General tab in the Configure HTTP policy for rule dialog box, change the value in the Maximum URL length (bytes) text box to 16384 and the value in the Maximum query length (bytes) text box to 4096.
Figure 31

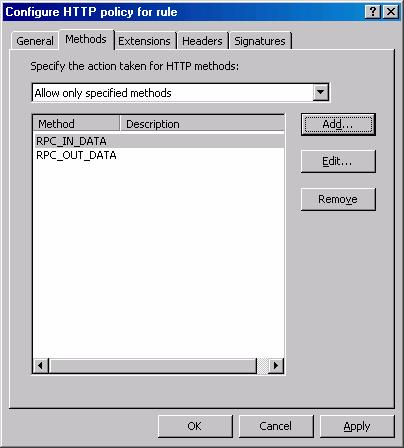
- Click on the Methods tab. On the Methods tab, select the Allow only specified methods from the Specify the action taken for HTTP methods list. Click the Add button.
- In the Method dialog box, enter RPC_IN_DATA in the Method text box. Click OK. Click the Add button again and in the Method dialog box enter RPC_OUT_DATA in the Method text box. Click OK.
Figure 32

- The entries on the Methods tab should look like those in the figure below.
Figure 33
- Click OK in the Configure HTTP policy for rule dialog box.
Create the OMA and ActiveSync Web Publishing Rule
Now we’ll create the OMA/ActiveSync Web Publishing Rule. This rule has all the same characteristics as the RPC/HTTP Web Publishing Rule except that this rule will only be triggered when the path is either /OMA/ or /Microsoft-Server-ActiveSync.
Perform the following steps to create the OWA/ActiveSync Web Publishing Rule:
- In the ISA firewall console, right click on the RPC Proxy Web Publishing Rule and click Copy.
- Right click on the RPC Proxy Web Publishing Rule again and click Paste.
- Double click on the new rule named Web Pub RPC Proxy(1).
- On the General tab, rename the rule entering Web Pub OMA/ActiveSync in the Name text box. Click Apply.
- Click Next on the IP Addresses page.
- On the Port Specification page, remove the checkmark from the Enable HTTP checkbox and put a checkmark in the Enable SSL checkbox. Click the Select button.
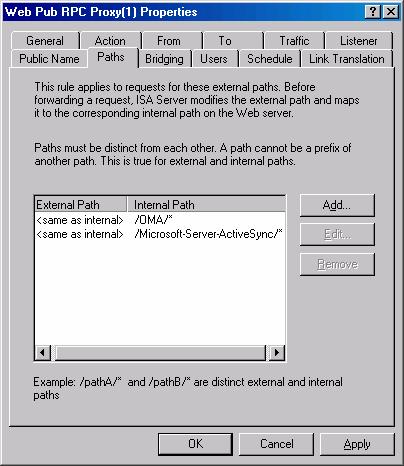
- Click on the Paths tab. Click on the /rpc/* path and click the Remove button. The list of paths should now be empty. Click the Add button. In the Path Mapping dialog box, enter the path /OMA/* in the text box. Repeat the procedure and add the /Microsoft-Server-ActiveSync/* path.
Figure 34

- The entries on the Path tab should look like the figure below.
Figure 35
- Click OK.
At the time this article was written, Microsoft has not provided any guidance regarding the proper HTTP Security Filter settings that should be used for OMA and ActiveSync protection. This article will be updated with this information if and when Microsoft makes this information available to the public.
|
Have Questions about the article? |

Summary
In this article, part 4 of our series on creating multiple perimeters using a single multihomed ISA firewall, we went over the details of configuring Web Publishing Rules to allowing incoming secure connections to the front-end Exchange Server on the authenticated access DMZ. Three Web Publishing Rules were created: one for the OWA Web site, one for the RPC/HTTP Web site, and one for the OMA/ActiveSync site. In the next article in this series we’ll create Server Publishing Rules and Access Rules that enable incoming connections from the Internet to the front-end Exchange Server and allow the front-end Exchange Server to connect to the domain controller and back-end Exchange server on the corporate network.
If you missed the other articles in this series, check them out at:
- Creating Multiple Security Perimeters with a Multihomed ISA Firewall Part 1
- Creating Multiple Security Perimeters with a Multihomed ISA Firewall Part 2
- Creating Multiple Security Perimeters with a Multihomed ISA Firewall Part 3
- Creating Multiple Security Perimeters with a Multihomed ISA Firewall Part 5
- Creating Multiple Security Perimeters with a Multihomed ISA Firewall Part 6


