Creating Multiple Security Perimeters with a Multihomed ISA Firewall — Part 6:
Creating the SMTP and Secure Exchange Server Publishing Rules
and Outbound Access Rules to the Anonymous DMZ and the Internet
by Thomas W Shinder MD, MVP
|
Have Questions about the article? |

In this, part 6 and the last part of my series on how to create multiple security perimeters using ISA firewalls, we’ll finish up by covering the following topics:
- Create the Server Publishing Rule allowing inbound SMTP from the anonymous DMZ SMTP Server to the back-end Exchange Server
- Create the Server Publishing Rule allowing Secure Exchange RPC Communications to the Back-end Exchange Server
- Create the Outbound Access Rules
If you missed the other articles in this series, check them out at:
- Creating Multiple Security Perimeters with a Multihomed ISA Firewall Part 1
- Creating Multiple Security Perimeters with a Multihomed ISA Firewall Part 2
- Creating Multiple Security Perimeters with a Multihomed ISA Firewall Part 3
- Creating Multiple Security Perimeters with a Multihomed ISA Firewall Part 4
- Creating Multiple Security Perimeters with a Multihomed ISA Firewall Part 5
Create the Server Publishing Rules allowing Inbound SMTP from the Anonymous DMZ SMTP Server to the Back-end Exchange Server and Inbound SMTP from the Internet to the Anonymous SMTP Server
We’ll begin with creating the Server Publishing Rules that allow Internet SMTP servers to forward SMTP messages to the anonymous access SMTP server on the anonymous access DMZ segment and allow the anonymous access SMTP server to forward incoming messages to our domain to the back-end Exchange Server.
I should point out that this isn’t necessarily the only or best way to allow incoming messages into the corporate network from Internet SMTP servers. For example, we could have created NAT relationship between the anonymous access DMZ and the authenticated access DMZ and then created a Server Publishing Rule that allowed the anonymous access SMTP server to forward the incoming mail to the front-end Exchange Server.
Note that this would not break our security model that strictly separates the authenticated access DMZ from the anonymous access DMZ. The connection from the anonymous access SMTP server on the anonymous access DMZ would still be an authenticated connection; all we need to do is configure a local account on the front-end Exchange Server and configure the anonymous access DMZ server to use that account when forwarding the incoming messages from Internet SMTP servers. In fact, had I thought about it when I started this article, I probably would have set up that scenario.
However, there are still advantages to our current configuration. The anonymous access SMTP server, since it’s not running the variety of Exchange Server services, will be less loaded. This enables us to install dedicated spam whacking software on the anonymous access SMTP server and have the e-mail cleaned before forwarding it to the back-end Exchange Server. Again, there are many ways you can approach the SMTP server topology and this article series selected one of the many options.
The figure below shows the direction of the traffic inbound from the Internet to the anonymous access SMTP server and from the anonymous access SMTP server to the back-end Exchange Server.
Figure 1
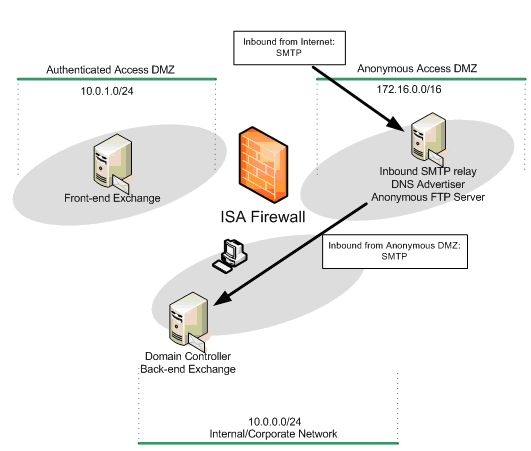
Table 1 provides details of the two Server Publishing Rules.
Name
Action
Protocols
From/Listener
To
Condition
Inbound Anonymous to Back-end EXCH
Allow
SMTP Server
Anonymous DMZ
10.0.0.2
N/A
Inbound Anonymous SMTP Server
Allow
SMTP Server
External
172.16.0.2
N/A
Table 1: Server Publishing Rules allowing inbound access from Internet SMTP servers and from the anonymous SMTP server to the back-end Exchange Server
Perform the following steps to create the SMTP Server Publishing Rule allowing the anonymous SMTP server in the anonymous access DMZ to forward e-mail to the back-end Exchange Server:
- In the ISA firewall console, expand the server name and click the Firewall Policy node.
- On the Firewall Policy node, click the Tasks tab in the Task Pane. Click the Publish a Mail Server link.
- On the Welcome to the New Mail Server Publishing Rule Wizard page, enter a name for the rule in the Mail Server Publishing Rule name text box. In this example, we’ll name the rule Inbound Anonymous. Click Next.
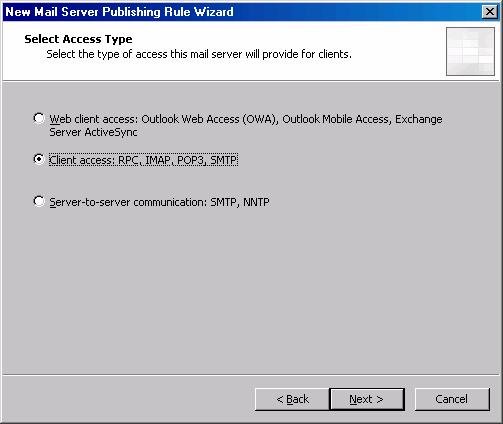
- On the Select Access Type page, select the Client access: RPC, IMAP, POP3, SMTP option and click Next.
Figure 2

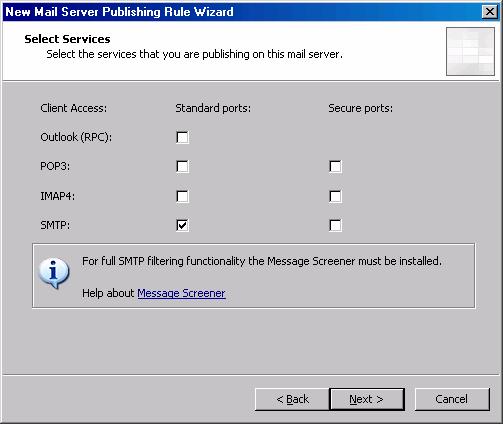
- On the Select Services page, put a checkmark in the SMTP checkbox in the Standard Ports column. Click Next.
Figure 3
- On the Select Server page, enter the IP address of the anonymous access SMTP in the Server IP address text box. In this example, the IP address of the anonymous access SMTP server is 172.16.0.2, so we’ll enter that into the text box. Click Next.
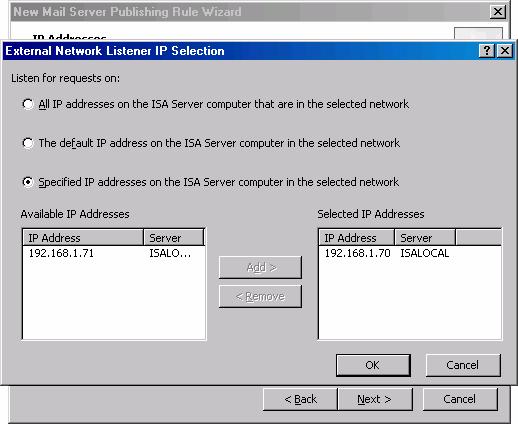
- On the IP Addresses page, put a checkmark in the External checkbox and click the Address button.
- In the External Network Listener IP Selection dialog box, select the Specified IP addresses on the ISA Server computer in the selected network option. Double click on the IP address on the IP address that resolves to the name used for your MX record. In this case, the MX record resolves to 192.168.1.70. Click OK.
Figure 4
- Click Next on the IP Addresses page.
- Click Finish on the Completing the New Mail Server Publishing Rule Wizard page.
Perform the following steps to allow inbound SMTP connections from the Internet to the Anonymous Access DMZ segment:
- In the ISA firewall console, expand the server name and click the Firewall Policy node.
- On the Firewall Policy node, click the Tasks tab in the Task Pane. Click the Publish a Mail Server link.
- On the Welcome to the New Mail Server Publishing Rule Wizard page, enter a name for the rule in the Mail Server Publishing Rule name text box. In this example, we’ll name the rule Inbound Anonymous to Back-end EXCH. Click Next.
- On the Select Access Type page, select the Client access: RPC, IMAP, POP3, SMTP option and click Next.
Figure 5
- On the Select Services page, put a checkmark in the SMTP checkbox in the Standard Ports column. Click Next.
Figure 6

- On the Select Server page, enter the IP address of the back-end Exchange Server in the Server IP address text box. In this example, the IP address of the anonymous access SMTP server is 10.0.0.2, so we’ll enter that into the text box. Click Next.
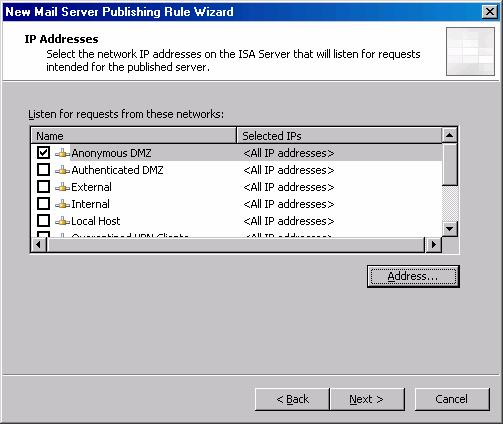
- On the IP Addresses page, put a checkmark in the Anonymous DMZ checkbox and click Next.
Figure 7
- Click Finish on the Completing the New Mail Server Publishing Rule Wizard page.
|
Have Questions about the article? |
Create the Server Publishing Rule allowing Secure Exchange RPC Communications to the Back-end Exchange Server
The front-end Exchange Server is able to handle almost all types of incoming connections to user mailboxes in our Exchange organization. However, one thing the front-end Exchange Server can’t do is accept incoming connections from the full Outlook MAPI client using the native secure Exchange RPC protocols that are used when the Outlook MAPI client is connected to the corporate network.
Outlook 2003 provides an excellent option for the full Outlook MAPI client because it is able to encapsulate the native MAPI RPC communications in an HTTP header and forward those communications to the RPC Proxy on the front-end Exchange Server. The entire communications stream is encrypted in an SSL tunnel, and the communications remain encrypted until they are detunneled by the front-end Exchange Server. At that point, the decapsulated RPC MAPI communications are forwarded from the front-end Exchange Server acting as a RPC Proxy to the back-end Exchange Server in an unencrypted format (unless the user has chosen to encrypt the RPC communications on the client side.)
However, for those Outlook 97, 98, 2000, 2002/XP clients that do not support RPC over HTTP, their only option for full Outlook MAPI client access from the Internet is via secure Exchange RPC publishing. The ISA firewall supports a sophisticated Secure Exchange RPC Security Filter that performs protocol validation and security testing on the incoming RPC communications from Outlook MAPI clients and allows only legitimate Outlook MAPI RPC communications to be passed to the Exchange mailbox servers.
One limitation of Secure Exchange RPC Publishing is that it can’t take advantage of the routing capabilities of the front-end / back-end Exchange configuration. While a single front-end Exchange Server can forward incoming connections requests to mailboxes located on any back-end Exchange Server, the incoming connections by full MAPI clients must be targeted to specific mailbox servers.
For example, if you have one front-end Exchange Server and five back-end Exchange Servers, and you want to allow inbound access from the Internet for the full Outlook MAPI client to mailboxes located on each of these servers, then you will need to configure the Outlook MAPI clients to use a specific Exchange back-end Mailbox Server and publish each of those mailbox servers using a specific IP address bound to the external interface of the ISA firewall.
Therefore, in this example, in order to enable access to all five back-end Exchange mailbox servers, you would need to bind at least five IP address to the external interface of the ISA firewall and then create five Server Publishing Rules that publish each of the back-end Exchange mailbox servers. You would then also need to create the appropriate public DNS entries so that the Outlook clients are able to correctly resolve the name of the Exchange Server it’s configured to use the IP address on the external interface of the ISA firewall that is being used by the Server Publishing Rule that publishes the Exchange mailbox server the particular client needs to access.
One thing worth mentioning before finishing the discussion on secure Exchange RPC Publishing is that you can configure the Exchange RPC inspection filter to force encrypted connections from the Outlook MAPI clients. If the Outlook MAPI client is not configured to use encrypted MAPI communications, then the Secure Exchange RPC inspection filter will drop the connection.
The figure below shows the path for the incoming Secure Exchange RPC connection from the Internet located Outlook MAPI client to the back-end Exchange Server.
Figure 8

Table 2 provides details of the Secure Exchange RPC Server Publishing Rule allowing incoming connections from Internet based clients to the back-end Exchange mailbox server.
Name
Action
Protocols
From/Listener
To
Condition
Back-end Exchange RPC Server
Allow
Exchange RPC Server
External
10.0.0.2
N/A
Table 2: Details of Secure Exchange RPC Server Publishing Rule
Perform the following steps to create the Secure Exchange Server Publishing Rule:
- In the ISA firewall console, expand the server name and click the Firewall Policy node.
- On the Firewall Policy node, click the Tasks tab in the Task Pane. Click the Publish a Mail Server link.
- On the Welcome to the New Mail Server Publishing Rule Wizard page, enter a name for the rule in the Mail Server Publishing Rule name text box. In this example, we’ll name the rule Back End. Click Next.
- On the Select Access Type page, select the Client access: RPC, IMAP, POP3, SMTP option and click Next.
Figure 9

- On the Select Services page, put a checkmark in the Outlook (RPC) checkbox in the Standard Ports column. Click Next.
Figure 10

- On the Select Server page, enter the IP address of the Back-end Exchange Server in the Server IP address text box. In this example, the IP address of the back-end Exchange Server is 10.0.0.2, so we’ll enter that into the text box. Click Next.
- On the IP Addresses page, put a checkmark in the External checkbox and click the Address button.
- In the External Network Listener IP Selection dialog box, select the Specified IP addresses on the ISA Server computer in the selected network option. Double click on the IP address on the IP address that resolves to the name used by external Outlook full MAPI clients to access the back-end Exchange Server. In this case, the full MAPI clients use a name that resolves to 192.168.1.70. Click OK.
Figure 11

- Click Next on the IP Addresses page.
- Click Finish on the Completing the New Mail Server Publishing Rule Wizard page.
Create the Outbound Access Rules
On our example network we will create a couple of Access Rules enabling outbound access to the Internet and to the anonymous access DMZ FTP server. I’m creating these rules just to round out the configuration. In a production environment you would deploy the Web proxy and Firewall client configurations are enforce granular, strong user/group based access controls over outbound access through the ISA firewall to any location.
The figure below shows the paths for the two outbound access rules.
Figure 12

Table 3 describes the two Access Rules allowing access to resources on the Internet and to the anonymous access DMZ segment.
Name
Action
Protocols
From/Listener
To
Condition
All Open to Internet
Allow
All Traffic
Internal
External
All Users
FTP to Anonymous DMZ
Allow
FTP (download only)
Internal
Anonymous DMZ FTP Server
All Users
Table 3: Outbound Access Rules allow access to resources on the anonymous access DMZ and on the Internet
Perform the following steps to create the All Open to Internet Rule for hosts on the default Internal Network:
- In the ISA firewall console, expand the server name and then click the Firewall Policy node.
- On the Firewall Policy node, click the Tasks tab in the Task Pane and click the Create a New Access Rule link.
- On the Welcome to the New Access Rule Wizard page, enter a name for the rule in the Access Rule name text box. In this example we’ll name the rule All Open to Internet. Click Next.
- Select Allow on the Rule Action page and click Next.
- On the Protocols page, select the All outbound traffic from the This rule applies to list and click Next.
- On the Access Rule Sources page, click the Add button.
- In the Add Network Entities dialog box, click the Networks folder and double click the Internal entry. Click Close.
- Click Next on the Access Rule Sources page.
- On the Access Rule Destinations click the Add button.
- In the Add Network Entities dialog box, click the Networks folder and double click External. Click Close.
- Click Next on the Access Rule Destinations page.
- Click Next on the User Sets page.
- Click Finish on the Completing the New Access Rule Wizard page.
Perform the following steps to create the FTP Access Rule to the Anonymous FTP server in the anonymous access DMZ:
- In the ISA firewall console, expand the server name and then click the Firewall Policy node.
- On the Firewall Policy node, click the Tasks tab in the Task Pane and click the Create a New Access Rule link.
- On the Welcome to the New Access Rule Wizard page, enter a name for the rule in the Access Rule name text box. In this example we’ll name the rule FTP to Anonymous DMZ. Click Next.
- Select Allow on the Rule Action page and click Next.
- On the Protocols page, select the Selected protocols option and click Add.
- In the Protocols dialog box, click the Web folder and double click the FTP protocol. Click Close.
- Click Next on the Protocols page.
Figure 13

- On the Access Rule Sources page, click the Add button.
- In the Add Network Entities dialog box, click the Networks folder and double click the Internal entry. Click Close.
- Click Next on the Access Rule Sources page.
- On the Access Rule Destinations click the Add button.
- In the Add Network Entities dialog box, click the New menu and click Computer.
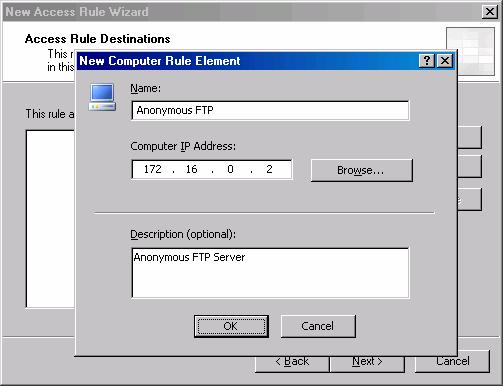
- In the New Computer Rule Element dialog box, enter a name for the anonymous FTP server in the name text box. In this example we’ll name it Anonymous FTP. Enter the IP address of the anonymous FTP server in the Computer IP Address text box. In this example, the IP address of the anonymous FTP server is 172.16.0.2, so we will enter that address. Click OK.
Figure 14
- In the Add Network Entities dialog box, click the Computers folder and double click the Anonymous FTP entry and click Close.
Figure 15

- Click Next on the Access Rule Destinations page.
- Click Next on the User Sets page.
- Click Finish on the Completing the New Access Rule Wizard page.
|
Have Questions about the article? |

Summary
In this, part 6 of our series on how to create multiple security zones using a multihomed ISA firewall, we went over the procedures required to allow incoming SMTP connections from the Internet to the anonymous access SMTP server and from the anonymous access SMTP server to the back-end Exchange Server on the corporate network. We also discussed some of the alternative topologies you can use for the path of incoming SMTP messages from Internet SMTP servers. We then created the Secure Exchange RPC Server Publishing Rule to support non-Outlook 2003 full MAPI clients and finished up with a discussion of outbound access rules enabling users on the corporate network to resources on the Internet and anonymous access DMZ.
If you missed the other articles in this series, check them out at:
- Creating Multiple Security Perimeters with a Multihomed ISA Firewall Part 1
- Creating Multiple Security Perimeters with a Multihomed ISA Firewall Part 2
- Creating Multiple Security Perimeters with a Multihomed ISA Firewall Part 3
- Creating Multiple Security Perimeters with a Multihomed ISA Firewall Part 4
- Creating Multiple Security Perimeters with a Multihomed ISA Firewall Part 5


