Windows Firewall in Service Pack 2 for Windows XP is the latest incarnation of Microsoft’s Internet Connection Firewall (ICF) that was included (but not enabled by default) in previous versions of Windows XP. Windows Firewall is a host-based stateful firewall that is enabled by default and configured to reject unsolicited incoming IP traffic unless exceptions are configured to allow such traffic for specific applications or on specific ports. While Windows Firewall represents a significant advancement in ensuring the security of Windows XP machines, it also presents a problem to enterprise administrators. Specifically, if administrators deploy Windows Firewall in its default configuration on their corporate networks, the result may be failure of business-critical applications that require specific TCP or UDP ports to be open in order to function properly.
Before deploying Windows Firewall therefore, it is essential for administrators to test their business applications on an isolated test network to determine what changes need to be made to the default Windows Firewall configuration in order for their applications to continue working properly. In addition, if a company has already deployed a host-based firewall solution from a third-party vendor on their desktop machines, it may even be appropriate to disable Windows Firewall altogether as part of the Service Pack 2 deployment process. To this end, this article outlines the various ways Windows Firewall can be configured, both during deployment and afterwards, using two sample scenarios:
- Scenario 1: Disabling Windows Firewall on all XP SP2 desktops in a networking environment where another host-based firewall is deployed according to preference.
- Scenario 2: Configuring an exception for TCP port 80 so that desktop machines can access an intranet web site running on an XP SP2 machine on a peer network.
Each of these scenarios are discussed within the context of the different methods that can be used for configuring Windows Firewall.
Manual Configuration
If your network is small, you could choose to manually configure Windows Firewall on your Windows XP machines after deploying SP2. Here are the steps for configuring Windows Firewall to satisfy the two scenarios described above:
Scenario 1
To manually disable Windows Firewall on XP SP2 machines, open Windows Firewall in Control Panel and select the Off option on the General tab:
Scenario 2
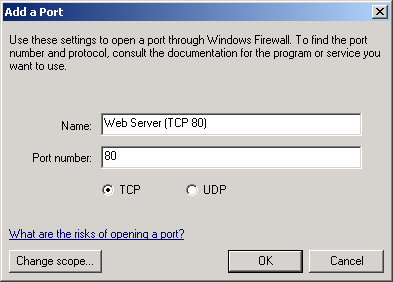
To manually allow incoming traffic on TCP port 80 for an XP SP2 machine running as an intranet web server in a workgroup environment, open Windows Firewall in Control Panel, switch to the Exceptions tab and click the Add Port button. Then type a descriptive name for the new exception and specify that TCP port 80 be statically opened for unsolicited inbound traffic:
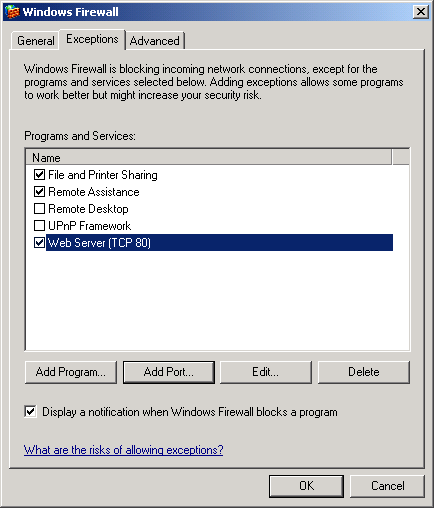
Now click OK and your new exception is displayed in the firewall exceptions list:
Tip: To temporarily disable inbound traffic, clear the checkbox for your new exception.
Using Unattend.txt
In Windows XP Service Pack 2, new sections for Windows Firewall have been added to the Unattend.txt answer file to allow administrators to configure Windows Firewall during unattended setup. These new sections are described in detail in the Ref.chm file compiled Help file that is included in the Windows XP Service Pack 2 Deployment Tools available from the Microsoft Download Center. By configuring the [WindowsFirewall] and related sections of Unattend.txt appropriately, administrators can perform unattended installs or upgrades to Windows XP Service Pack 2 from a network distribution point (using Unattended.txt) or from CD (by renaming Unattend.txt to Winnt.sif).
Tip: If you want to perform a clean install from CD of Windows XP with Service Pack 2 integrated into the operating system, see the article called Slipstream SP2 on Neowin.net.
Scenario 1
To disable Windows Firewall on new XP SP2 machines, add the following to your Unattend.txt file:
[WindowsFirewall]
Profiles = WindowsFirewall.TurnOffFirewall
[WindowsFirewall.TurnOffFirewall]
Mode = 0
How this works is that the Profiles = WindowsFirewall.TurnOffFirewall entry defines a custom profile for Windows Firewall, while the Mode = 0 entry specifies that this firewall profile is disabled (value 0). A brief word about Windows Firewall profiles–SP2 includes two default profiles for Windows Firewall:
- Standard profile: used by default in workgroup environments (computer not connected to a domain) and rejects all unsolicited inbound traffic.
- Domain profile: used by default in domain environments and allows exceptions based on installed Windows XP services and applications.
So by using the sections specified above for your Unattend.txt file, you are defining a custom profile called TurnOffFirewall that disables Windows Firewall by default regardless of whether the computer belongs to a workgroup or a domain.
Scenario 2
To allow incoming traffic on TCP port 80 for an XP SP2 machine running as an intranet web server in a workgroup environment, add the following to your Unattend.txt file:
[WindowsFirewall]
Profiles=WindowsFirewall.Standard
[WindowsFirewall.Standard]
Type = 1
Mode = 1
Exceptions = 1
PortOpenings = WindowsFirewall.WebServer
[WindowsFirewall.WebServer]
Protocol= 6
Port = 80
Name = Web Server (TCP 80)
Mode = 1
Scope = 1
Here the Type = 1 entry defines a standard (non-domain) profile, Mode = 1 means the firewall is enabled, and Exceptions = 1 allows firewall exceptions. In the [WindowsFirewall.WebServer] section, the Protocol = 6 entry specifies a TCP port, the Port = 80 entry specifies TCP port 80 for inbound HTTP traffic, the Name entry specifies a friendly name that is displayed in the exceptions list, the Mode = 1 entry adds the exception to the list, and the Scope = 1 entry restricts imbound traffic on TCP port 80 to packets coming from other computers on the local subnet.
Note: You would typically include additional sections and entries to your Unattend.txt file for configuring things like firewall logging, domain profiles, and so on. See the aforementioned Ref.chm file for more info.
Using Netfw.inf
Another approach to deploying XP SP2 with customized Windows Firewall configurations is to customize the Netfw.inf file, which defines the default configuration of Windows Firewall including both the standard and domain profiles. This can be done either after installing XP SP2 or before. If you have already installed XP SP2 on your desktops, you can customize the Netfw.inf file found in the %windir%\Inf folder on XP SP2 machines, for example as follows:
- Create your custom Netfw.inf file.
- Copy your new file over the default Netfw.inf file on each workstation.
- Open a command prompt and type netsh firewall reset.
This last step restores an XP SP2 machine to its default firewall configuration, which means the configuration specified in the machine’s Netfw.inf file.
To customize Netfw.inf prior to installing XP SP2, do the following:
- Extract the Netfw.in_ file from an XP SP2 Integrated CD image or distribution point.
- Customize the Netfw.in_ file as desired and sign it (see here for information on code signing).
- Replace Netfw.in_ on your XP SP2 Integrated CD image or distribution point with your customized version.
- Deploy XP SP2 in the desired way (e.g. unattended, Sysprep, etc.)
Here is what Netfw.inf (and Netfw.in_) contain by default:
[version]
Signature = “$Windows NT$”
DriverVer =07/01/2001,5.1.2600.2132
[DefaultInstall]
AddReg=ICF.AddReg.DomainProfile
AddReg=ICF.AddReg.StandardProfile
[ICF.AddReg.DomainProfile]
HKLM,”SYSTEM\CurrentControlSet\Services\SharedAccess\Parameters\FirewallPolicy\DomainProfile\AuthorizedApplications\List”,”%windir%\system32\sessmgr.exe”,0x00000000,”%windir%\system32\sessmgr.exe:*:enabled:@xpsp2res.dll,-22019″
[ICF.AddReg.StandardProfile]
HKLM,”SYSTEM\CurrentControlSet\Services\SharedAccess\Parameters\FirewallPolicy\StandardProfile\AuthorizedApplications\List”,”%windir%\system32\sessmgr.exe”,0x00000000,”%windir%\system32\sessmgr.exe:*:enabled:@xpsp2res.dll,-22019″
The third and fourth sections describe the domain and standard firewall profiles as described in Using Unattend.txt above. Let’s now look at how to customize Netfw.inf for our two scenarios.
Scenario 1
To disable Windows Firewall on XP SP2 machines in a domain environment, add the following entries to the [ICF.AddReg.DomainProfile]
section of Netfw.inf :
HKLM,”SYSTEM\CurrentControlSet\Services\SharedAccess\Parameters\FirewallPolicy\DomainProfile”,”DoNotAllowExceptions”,0x00010001,0
HKLM,”SYSTEM\CurrentControlSet\Services\SharedAccess\Parameters\FirewallPolicy\DomainProfile”,”EnableFirewall”,0x00010001,0
What these entries do is to add the necessary registry keys to your XP SP2 machines to disable Windows Firewall when the machines belong to a domain.
Tip: It’s a good idea to leave the [ICF.AddReg.StandardProfile] unchanged so that the default firewall configuration for your machines when not joined to a domain is to have Windows Firewall enabled. This is especially true of machines like laptops that can be removed from the network.
Scenario 2
To allow incoming traffic on TCP port 80 for an XP SP2 machine running as an intranet web server in a workgroup environment, add the following entries to the [ICF.AddReg.StandardProfile] section of Netfw.inf:
HKLM,”SYSTEM\CurrentControlSet\Services\SharedAccess\Parameters\FirewallPolicy\StandardProfile\GloballyOpenPorts\List”,”80:TCP”,0x00000000,”80:TCP:LocalSubnet:enabled:Web Server (TCP 80)”
This allows unsolicited inbound traffic on TCP port 80 from machines on the local subnet.
Using Netsh
The new netsh firewall context can also be used to configure Windows Firewall. This can be done either by opening a command prompt on an XP SP2 machine and executing the appropriate netsh commands, or by creating a batch file of netsh commands and running it from a run-once script. Here’s how to do this for each scenario:
Scenario 1
To disable Windows Firewall on XP SP2 machines in a domain environment, use the following command:
netsh firewall set opmode mode=DISABLE profile=DOMAIN
Scenario 2
To allow incoming traffic on TCP port 80 for an XP SP2 machine running as an intranet web server in a workgroup environment, use the following command:
netsh firewall add portopening protocol=TCP port=80 name=”Web Server (TCP 80)” mode=ENABLE scope=SUBNET profile=DOMAIN
Once again, this allows unsolicited inbound traffic on TCP port 80 from machines on the local subnet.
Using Group Policy
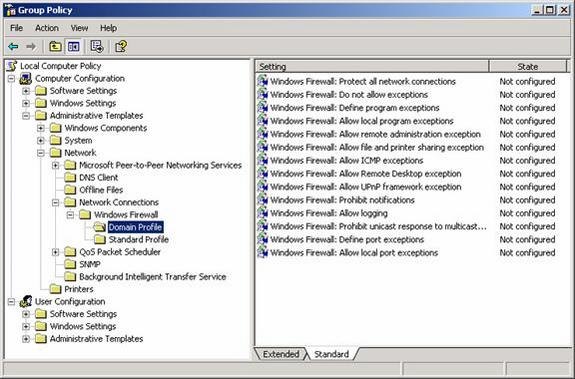
Finally, in an Active Directory environment you can use Group Policy to configure Windows Firewall on your XP SP2 desktops. This involves two steps: first, update your existing Group Policy Objects (GPOs) with the new Windows Firewall policy settings found in the updated System.adm template included in XP SP2. This adds a new Windows Firewall folder under Network Connections in the Administrative Templates portion of Computer Configuration:
Once you’ve updated your GPOs, you can then configure Windows Firewall by making changes to the policy settings under Domain Profile (for XP SP2 machines joined to a domain) and Standard Profile (for machines in a workgroup).
Scenario 1
To disable Windows Firewall on XP SP2 machines in a domain environment, set the following policy to Disabled:
Computer Configuration
\Administrative Templates
\Network
\Network Connections
\Windows Firewall
\Domain Profile
\Windows Firewall: Protect all network connections
Scenario 2
To allow incoming traffic on TCP port 80 for an XP SP2 machine running as an intranet web server in a workgroup environment, configure the following policy:
Computer Configuration
\Administrative Templates
\Network
\Network Connections
\Windows Firewall
\Standard Profile
\Windows Firewall: Define port exceptions
To configure this policy, add the following string to the Show Contents dialog box for the policy:
80:TCP:localsubnet:enabled:Web Server (TCP 80)
Summary
In this article we’ve seen how to configure Windows Firewall using two scenarios and five different methods. Depending on the needs of your business, you can choose the appropriate method to pre- or post-configure Windows Firewall so that your line of business applications continue to function properly after deploying XP SP2 on your network. For additional information on customizing Windows Firewall, see the following documents on Microsoft’s web site:
- Deploying Windows Firewall Settings for Microsoft Windows XP with Service Pack 2
- Using the Windows Firewall INF File in Microsoft Windows XP Service Pack 2
And for additional information on XP SP2 deployment issues, see the following articles written by myself:


