If you missed the other parts in this article series please read:
- Deploying IPsec Server and Domain Isolation using Windows Server 2008 Group Policy (Part 2)
- Deploying IPsec Server and Domain Isolation using Windows Server 2008 Group Policy (Part 3)
- Deploying IPsec Server and Domain Isolation using Windows Server 2008 Group Policy (Part 4)

Network Access Protection is a new technology included with Windows Server 2008 that allows you to control what machines are allowed to connect to other machines on your network. Network Access Protection (or NAP) enables you to set system health policies that must be met before a machine is allowed network access. If the machines meet the requirements in the network access policies, then they are allowed on the network. If not, then the machine may be disallowed from connecting to any machine on the network, or you might configure policies that allow the machine to connect to remediation server that allow the machine to remediate and try to connect to the network again after remediation is successful.
The are a number of ways you can enforce a NAP policy. The simplest method is to use NAP with DHCP enforcement. Unfortunately, this is also the least secure method, since a user can manually configure an IP address on a machine and bypass the NAP DHCP policy enforcement. The most secure method of NAP enforcement is IPsec. When using IPsec NAP enforcement, when a machine is compliant with NAP access policy, the machine is issued a health certificate that allows the machine to create a secure IPsec connection to other machines participating on the NAP “virtual” network. Unfortunately, NAP with IPsec enforcement is the most complex configuration.
NAP by itself is an extremely complex technology with hundreds of “moving parts”. If you misconfigured any of these hundreds of moving parts, the deployment will fail and it can take quite a while to figure out what when wrong. When using NAP with IPsec enforcement, you find that there are even more “moving parts” and troubleshooting becomes even more complex. There is also a great dependence on Group Policy, which again, adds to the complexity of the solution because you often need to troubleshoot problems with Group Policy when setting forth on a NAP deployment.
So, with all the talk of complexity and innumerable “moving parts”, it might sound like I’m trying to dissuade you from implementing NAP with IPsec policy enforcement. No! That’s no true. I just want you to know that it’s a complex setup and configuration and that you should be patient with your testing and deployment. The more time you spend test and understanding how the solution works, the better chance you’ll have at your deployment being a success.
NAP with IPsec policy enforcement is a very powerful method of deploying your NAP solution. You actually get two solutions in one: first, you get the NAP network access control that enables you to block unhealthy machines from connecting to your network and second, you get the power of IPsec domain isolation that prevents rogue machines from connecting to your network. NAP with IPsec domain isolation allows you to create a “virtual network” within the confines of your physical networks. Machines in the IPsec “virtual network” can be on the same network segment or VLAN segment, but virtually segmented from one another by IPsec. Machines without IPsec Health Certificates will be unable to communicate with healthy machines on the network.
In this article I am going to take you from start to finish in putting together a NAP solution using IPsec policy enforcement. The initial environment is very simple, as you can see in the figure below.
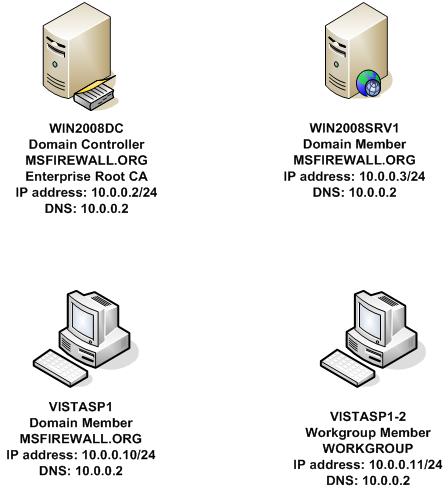
Figure 1
The machines we are using in the example network are:
WIN2008DC
This is a Windows Server 2008 Enterprise edition machine is a domain controller in the msfirewall.org domain. The only other server role installed on this machine is the Certificate Authority server role. I made this machine an Enterprise Root CA. If you want to mirror this configuration, make the machine a domain controller first, and then after the machine is promoted to domain controller, install the CA role and choose the Root CA option. If you want to mirror my enterprise CA configuration, name the CA msfirewall-WIN2008DC-CA.
WIN2008SRV1
This is a Windows Server 2008 Enterprise edition machine and is a member server in the msfirewall.org domain. No other server roles are configured on the machine. We will install the NPS server role on the machine and make the machine a subordinate CA later, but if you want to built out this lab, just install Windows Server 2008 on the machine and follow the instructions as we go through them in this article series.
VISTASP1
This is a Vista machine with service pack 1 installed. The machine is joined to the msfirewall.org domain. I used a default install of Vista and then installed SP1 on the machine afterwards. If you have an integrated SP1 installation available, that will work fine too.
VISTASP1-2
This is a Vista machine with SP1 installed, like VISTASP1. This machine is installed in a workgroup names WORKGROUP. We’ll join the machine to the domain later when testing the NAP and IPsec polices.
The major steps that we’ll carry out in this article series include the following:
- Configure the Domain Controller
- Install and Configure the Network Policy Server, Health Registration Authority and Subordinate CA
- Configure the NAP IPsec Enforcement Policy on the Network Policy Server
- Configure VISTASP1 and VISTASP1-2 for Testing
- Test the Health Certificate and Auto-remediation Configuration
- Verify NAP Policy Enforcement on VISTASP1
- Configure and Test IPsec Policies
My goal in this article series is to show you with generous screen shots how to configure the solution and show you that it actually works. When putting this article together, I’ve built on the shoulders of giants and want to thank Jeff Sigman from Microsoft for the fantastic work he’s done with making NAP available and understandable for the masses. This article builds on the step by step guide he created for setting up NAP with IPsec enforcement in a test lab. It is my hope that after you see how the configuration works, with tons of screenshots, that you’ll be excited about the NAP with IPsec enforcement solution and that you’ll be willing to get it a test in your own test lab.
Configure the Domain Controller
In this section we’ll perform the following steps:
- Confirm the Enterprise Root CA Configuration on the domain controller
- Create the NAP CLIENTS security group
- Create the NAP Exempt security group
- Create and configure a Certificate Template for NAP Exempt Computers
- Make the Certificate Template Available for Publishing through Group Policy
- Distribute the NAP Exemption Health Certificate through Group Policy Autoenrollment
The rational for each step is provided at the beginning of each section.
Confirm the Enterprise Root CA Configuration
Verify that certificate requests do not require administrator approval. Perform the following steps on the domain controller, WIN2008DC:
- Click Start, point to Administrative Tools, and then click Certification Authority.
- In the left pane of the console, right-click the name of the CA, and then click Properties.
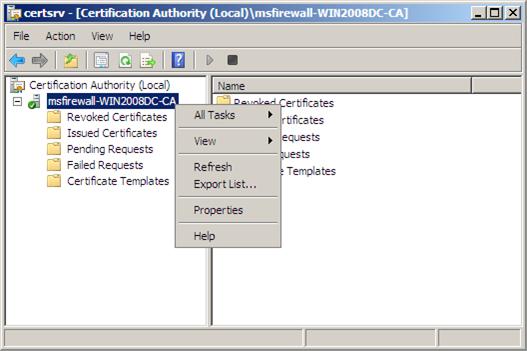
Figure 2
- Click the Policy Module tab, and then click Properties.
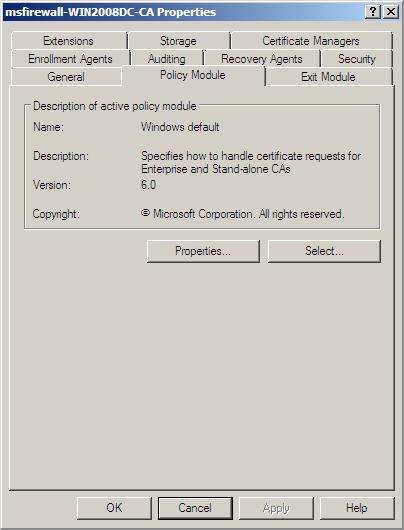
Figure 3
- Verify that Follow the settings in the certificate template, if applicable. Otherwise, automatically issue the certificate is selected.

Figure 4
- Click OK twice, and then close the Certification Authority console.
Create the NAP CLIENTS Group
Next, create a group for use with Group Policy security filtering. What we will do is create a Group Policy Object that applies to machines that NAP policy will apply to, and then configure the GPO for use only by members of this group. In this way, we don’t need to create an OU for the NAP clients. All we need to do is add the NAP clients to the security group. VISTASP1 and VISTASP1-2 will be added to this group after they are join the domain.
Perform the following steps on WIN2008DC:
- In the left pane of the Active Directory Users and Computers console, right-click msfirewall.org, point to New, and then click Group.

Figure 5
- In the New Object – Group dialog box, under Group name, type NAP Clients. Under Group scope, choose Global, under Group type, choose Security, and then click OK.
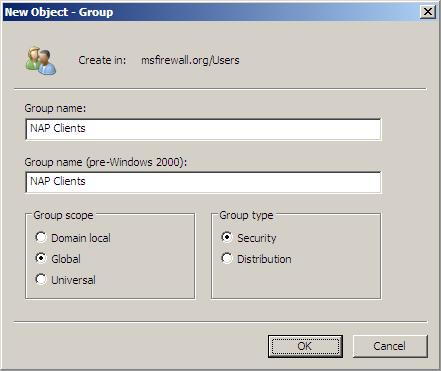
Figure 6
- Leave the Active Directory Users and Computers console open for the following procedure.
Create the NAP Exempt Group
There will be machines on your network that need to communicate with members of the secure network, but who should not be expected to meet NAP security requirements. These are typically network infrastructure machines, such as domain controllers, DHCP servers and others that need to communicate with machines on the secure network.
On our example network, WIN2008SRV1 need to be able to connect to the members of the secure network in order to give them health certificates, that will be used to establish secure IPsec communications between members in the secure network. So, we will place this machine is it’s own group, and then configure a health certificate that will be automatically deployed to this machine. The health certificate will be deployed to this machine by using autoenrollment, so that the machine issuing the Health Certificates don’t need to pass NAP policy first before receiving the certificate.
Perform the following steps on WIN2008DC:
- In the Active Directory Users and Computers console, right-click msfirewall.org, point to New, and then click Group.
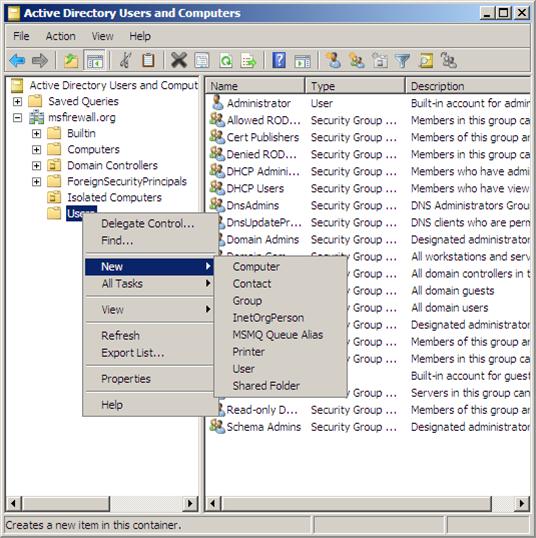
Figure 7
- In Group name, type IPsec NAP Exemption. Under Group scope, choose Global, under Group type, choose Security, and then click OK.

Figure 8
- Leave the Active Directory Users and Computers console open for a procedure that follows.
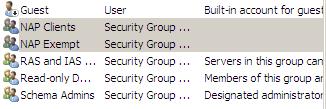
Figure 9
Create and Configure a Certificate Template for NAP Exempt Computers
A certificate template must be created for computers that are given exemptions from NAP health checks. This certificate template will be configured with two application policies: client authentication and system health authentication. This certificate template will be configured with the System Health Authentication OID so that it can be used to communicate with the NAP compliant computers on the secure network.
After we create the certificate template, we will publish the certificate template so that it’s available to the Active Directory to machines that are members of the NAP Exempt group. After publishing the certificate template to the Active Directory, we’ll configure Group Policy so that the certificate is automatically assigned to members of the NAP Exempt group using Autoenrollment.
Perform the following steps on WIN2008DC:
- Click Start, click Run, type certtmpl.msc, and then press ENTER.
- In the middle pane of the Certificate Template Console, right-click Workstation Authentication, and then click Duplicate Template. This template is used because it is already configured with the client authentication application policy.
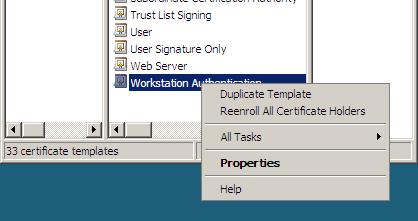
Figure 10
- In the Duplicate Template dialog box, select the Windows 2003 Server, Enterprise Edition option and click OK.
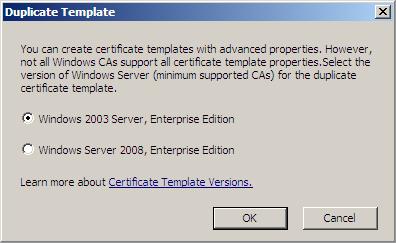
Figure 11
- Under Template display name, type System Health Authentication. Put a checkmark in the Publish certificate in Active Directory check box.
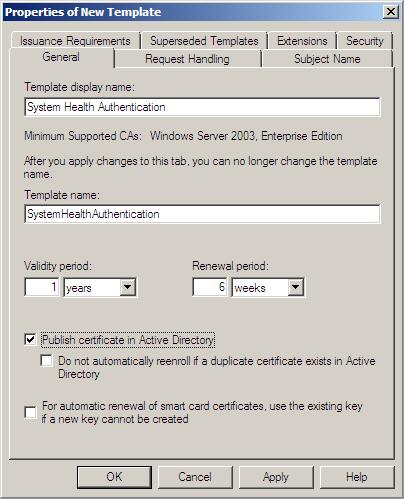
Figure 12
- Click the Extensions tab, and then click Application Policies. Then click the Edit button.
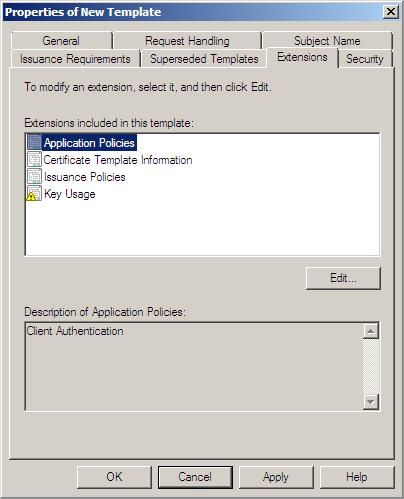
Figure 13
- In the Edit Application Policies Extension dialog box, click Add.

Figure 14
- In the Add Application Policy dialog box, select the System Health Authentication policy and click OK.
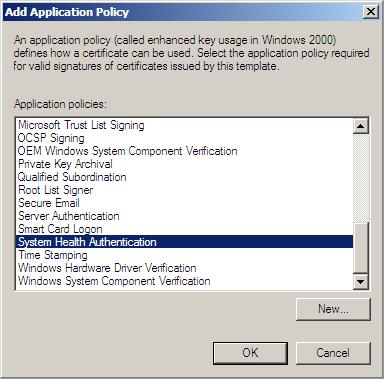
Figure 15
- Click OK in the Edit Application Policy Extension dialog box.
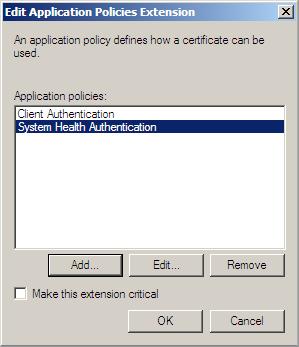
Figure 16
- Click the Security tab and click Add. In the Select Users, Computers or Groups dialog box, enter NAP Exempt in the Enter the object name to select text box and click Check Names. Then click OK.
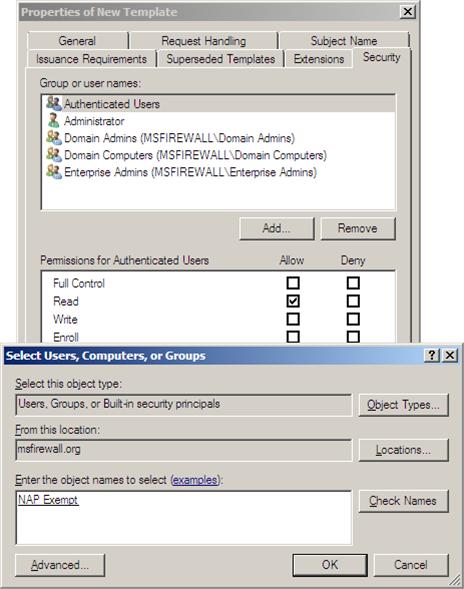
Figure 17
- Click IPsec NAP Exemption, and then click the Allow check boxes next to Enroll and Autoenroll and then click OK.
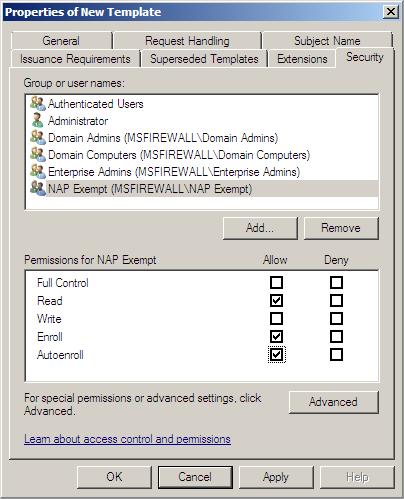
Figure 18
- Close the certificate templates console.
Make the Certificate Template Available for Publishing through Group Policy
Perform the following steps to enable the new certificate template to be available through Active Directory Group Policy. After we do this, we’ll be able to make this certificate available to members of the NAP Exempt group through autoenrollment.
Perform the following steps on WIN2008DC:
- Click Start, click Run, type certsrv.msc, and then press ENTER.
- Expand the server name in the left pane of the console, and in the console tree, right-click Certificate Templates, point to New, and then click Certificate Template to Issue.
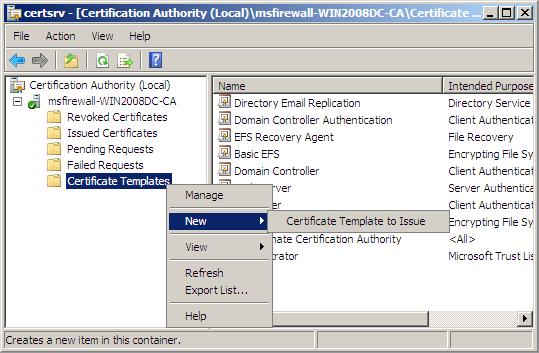
Figure 19
- Click System Health Authentication, and then click OK.

Figure 20
- In the left pane of the console, click Certificate Templates, and in the details pane under Name, verify that System Health Authentication is displayed.

Figure 21
- Close the Certification Authority console.
Distribute the NAP Exemption Health Certificate through Group Policy Autoenrollment
Now that we’ve published the certificate template, we can make it available to domain machines that belong to the NAP Exempt group. We do this by using autoenrollment.
Perform the following steps on WIN2008DC to enable autoenrollment of this certificate:.
- Click Start and then click Run. Enter gpmc.msc in the Open text box and click OK.
- In the Group Policy Management console, expand the msfirewall.org domain name and right click the Default Domain Policy and click Edit

Figure 22
- In the left pane of the Group Policy Management Editor, open Computer Configuration\Windows Settings\Security Settings\Public Key Policies. In the middle pane of the console, double-click Certificate Services Client – Auto-Enrollment.
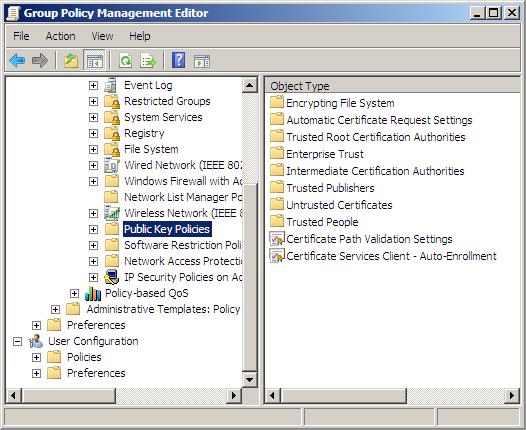
Figure 23
- In the Certificate Services Client – Auto-Enrollment Properties dialog box, select the Enable option from the Configuration Model drop down list box. Put a checkmark in the Renew Expired certificates, update pending certificates, and remove revoked certificates and Update certificates that use certificate templates checkboxes. Click OK.
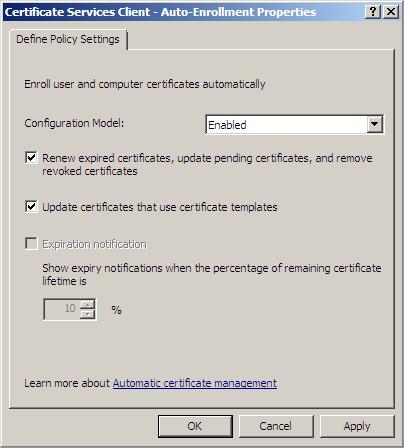
Figure 24
- Close the Group Policy Management Editor.
- Close the Group Policy Management console.
Summary
In this, part 1 of our article series on putting together a NAP solution using IPsec enforcement, we covered the configuration requirements for the domain controller computer. This included confirming the enterprise root CA configuration, creating the NAP CLIENTS and NAP Exempt security groups, creating and configuring a certificate template for NAP example computers, making the certificate template available for publishing through group policy, and distributing the NAP exemption health certificate through group policy autoenrollment. In the next article in this series, we will install the Network Policy Server and the Health Registration authorities and create a NAP policy. See you then! -Tom.
If you missed the other parts in this article series please read:
- Deploying IPsec Server and Domain Isolation using Windows Server 2008 Group Policy (Part 2)
- Deploying IPsec Server and Domain Isolation using Windows Server 2008 Group Policy (Part 3)
- Deploying IPsec Server and Domain Isolation using Windows Server 2008 Group Policy (Part 4)