
Get your copy of Windows Server Hacks!
In a previous article titled Managing Printers with Windows Server 2003 R2, we walked through how to use the new Print Management console that is part of the R2 platform. This console lets you easily manage printers and print servers from a single, central point of management and can be used to manage print servers running Windows 2000 Server, Windows Server 2003, Windows Server 2003 R2, and to a limited extent Windows NT 4.0. In that article we saw how to add print servers and network printers to this console, and how to create and use print filters to get a quick picture of what’s happening with different printers on your network. This is great, but there’s another task that many administrators would love to automate—deploying printer connections to client computers on their networks. Group Policy seems the natural way to do this, but Windows Server 2003 and earlier have no capability built into Group Policy to deploy printer connections to client. So until now, to deploy print connections using Group Policy you had to use third-party tools like AutoProf Policy Maker (note that since I wrote that article, AutoProf has since been renamed DesktopStandard and their PolicyMaker product line has been expanded). Well, with R2 the capability to deploy printer connections using Group Policy is now present, and this article walks you through an example of how to do this. Then, once you’ve deployed printers to clients you can use Group Policy to manage these printers as described in my two earlier articles here on WindowsNetworking.com, namely Managing Printers Using Group Policy (Part 1) and Managing Printers Using Group Policy (Part 2).
Preparing for Deployment
There are a couple of steps you need to do first before you can deploy printers with Group Policy. First, you need to ensure that you’ve upgraded your Active Directory schema to R2 level. If you’re not sure what level your schema is at, use the following table as a guide:
Platform
Schema Revision
Schema Version
Windows 2000
(none)
13
Windows Server 2003
9
30
Windows Server 2003 R2
9
31
Table 1
The key numbers are in the last column, and to find your current, use ADSI Edit, look under the Schema node, right-click on the object named CN=Schema,CN=Configuration,DC=forest_root_domain, select Properties and examine the value of the objectVersion attribute. You want this value to read 31 meaning your forest schema is upgraded to R2 level. If it isn’t, you’ll need to run the adprep command to raise the schema level, see this article from the Windows Server 2003 TechCenter on Microsoft TechNet for more info.
Next, you should have the Group Policy Management Console (GPMC) installed and your Group Policy infrastructure in place, with Group Policy Objects (GPOs) linked to domains and organizational units (OUs) in various ways to manage settings for users and computers across your forest. Choose the GPOs you wish to use to deploy printer connections, or create new GPOs for this purpose and link them accordingly. Note that you can deploy printer connections two ways: per-user (so that users have their printers regardless of which computers they use on the network) and per-machine (all users on the affected machines have access to the same set of printers). Note that per-machine deployment of printer connections is supported on Windows XP and later. In other words, you can only deploy printers to Windows 2000 Professional clients on a per-user basis, not per-machine.
For purposes of our walkthrough we’ll use the same setup shown in my previous article Managing Printers with Windows Server 2003 R2 where we installed the Print Management console on BOX161, an R2-level domain controller in the r2.local domain where there are two other print servers named BOX162 and BOX163. Here’s a figure to get you oriented:
Figure 1: The Print Management Console running on BOX161 shows no deployed printers
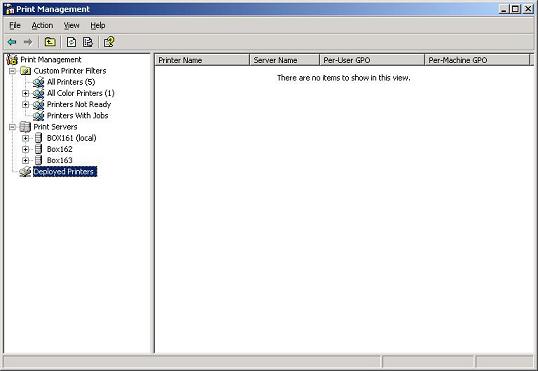
Note that nothing currently shows under the Deployed Printers node. The client computer we’re going to deploy a printer to (recall that in Microsoft terminology the word “printer” is short for “printer connection”) is a Windows XP machine named XP191, and the next figure shows the contents of the Printers and Faxes folder on this machine, which indicates no printers are currently present:
Figure 2: Client computer XP191 currently has no printers installed

Deploying Printers
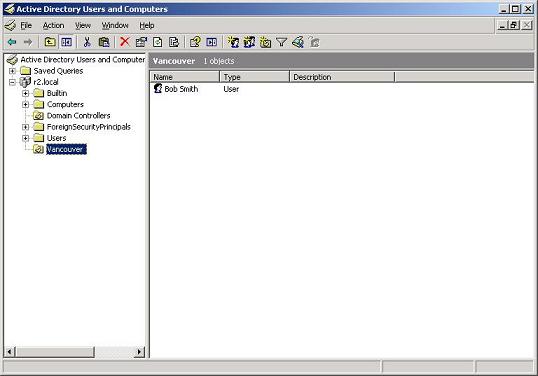
Now we’re ready to begin. Our company has its Sales Department in Vancouver, and Bob Smith is our Head of Sales there:
Figure 3: Bob Smith is in Vancouver and needs a printer
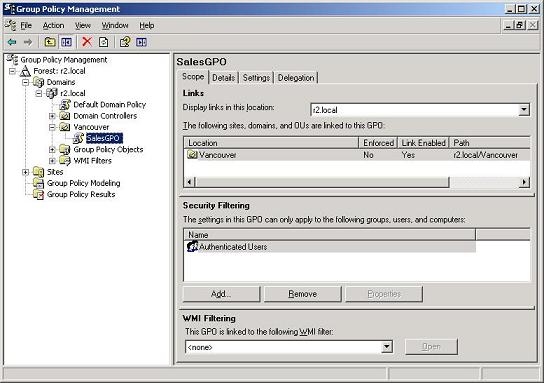
The Vancouver OU has a Group Policy Object named SalesGPO linked to it (see next figure) and we’ll use this GPO to deploy the printer connection to Bob:
Figure 4: The SalesGPO is linked to the Vancouver OU and will be used to deploy a printer
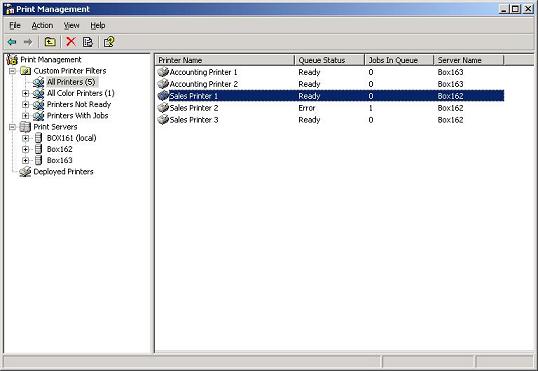
Open up the Print Management console and select the printer you wish to deploy:
Figure 5: Getting ready to deploy Sales Printer 1 to the target user
Right-click on Sales Printer 1 and select Deploy With Group Policy from the shortcut menu. This opens the Deploy With Group Policy dialog box:
Figure 6: The Deploy With Group Policy dialog box

Click the Browse button and select the GPO you plan on using to deploy the printer:
Figure 7: The printer will be deployed using the SalesGPO

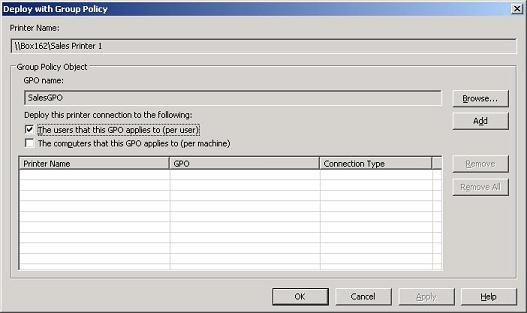
Click OK to return to the Deploy With Group Policy dialog box. Now since we only want Bob to be able to use the printer (and not anyone who might log on to his computer) we’ll deploy the printer on a per-user basis, so select the first checkbox in the dialog box:
Figure 8: Deploying a per-user printer connection
Now click the Add button to add the connection settings for Sales Printer 1 to the SalesGPO:
Figure 9: The printer connection is added to the SalesGPO

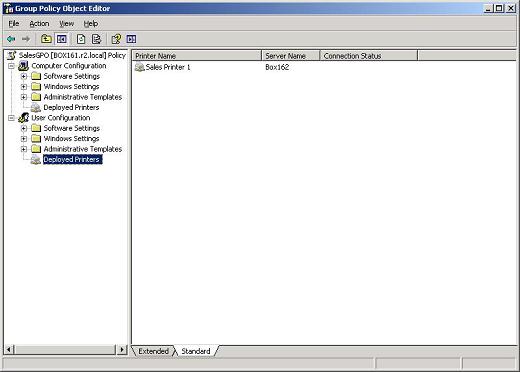
Click OK a few times and you’ll now see the printer under the list of deployed printers:
Figure 10: Sales Printer 1 shows up as deployed to the SalesGPO

Note that this may seem confusing as the printer hasn’t actually been deployed to the client yet, only deployed to the SalesGPO. We still have to do one more thing: deploy a utility called PushPrinterConnections.exe to the client computer so the client can process the printer connection settings that have been added to the SalesGPO. But before we do that, let’s make sure that the connection settings for Sales Printer 1 have been successfully added to the SalesGPO. To do this, open the SalesGPO in Group Policy Object Editor and look under User Configuration and you’ll see a new Deployed Printers node with Sales Printer 1 visible under it:
Figure 11: Connection settings for Sales Printer 1 have been added to the SalesGPO
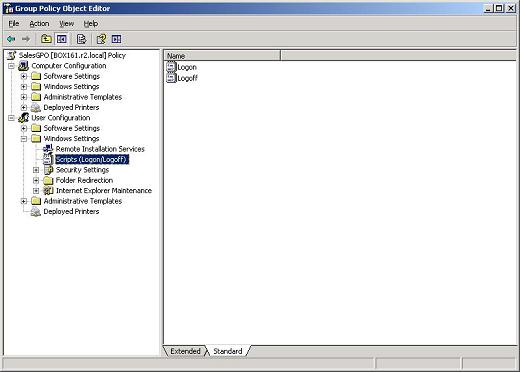
The way we’ll get the PushPrinterConnections.exe utility onto the client is to add it as a logon script (if you were deploying a per-machine printer connection you’d use a startup script instead). The easiest way to do this is using Group Policy as follows. Start by opening the SalesGPO in the Group Policy Object Editor and navigate to User Configuration, Windows Settings, Scripts (Logon/Logoff) as shown:
Figure 12: Getting ready to add a logon script to the SalesGPO
Right-click on the Logon policy in the right-hand pane and select Properties:
Figure 13: Adding a logon script

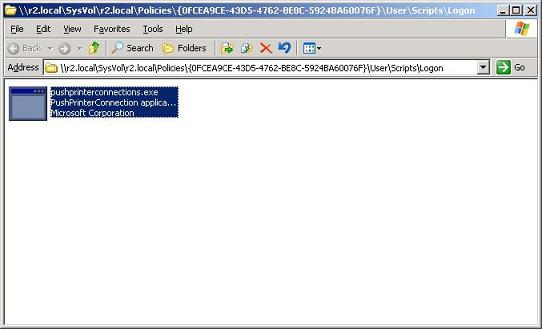
Click the Show Files button and copy the file PushPrinterConnections.exe from the %Windir%\PMCSnap folder into the open policy folder:
Figure 14: Add PushPrinterConnections.exe as a logon script
Close the policy folder and click the Add button on Logon Properties, and type PushPrinterConnections.exe into the Script Name field:
Figure 15: Add PushPrinterConnections.exe as a logon script (continued)

Click OK a couple of times. The logon script will be displayed in the policy when it has been successfully added:
Figure 16: Logon script is ready to go

Now all Bob needs to do is log off and then log on again to refresh his per-user Group Policy settings, and Sales Printer 1 will appear in his Printers and Faxes folder as expected:
Figure 17: Bob has a printer

Final Tips
If you unlink the SalesGPO or move Bob out of the Vancouver OU, the connection to Sales Printer 1 will disappear from his machine the next time he logs on. And if you want to remove the connection settings for Sales Printer 1 from the SalesGPO, you can open this GPO using the Group Policy Object Editor, right-click on Sales Printer 1, and select Remove. It’s also useful to know that in Figure 15 above, if you add the parameter –log to the Script Parameters field, you can enable logging of printer connection deployment to help you troubleshoot when things go wrong. The log files that are created are %temp%\PpcUser.log for per-user connections and %Windir%\temp\PpcMachine.log for per-machine connections and are stored on the computer where the printer connection is being deployed.


