Readers interested in understanding how to perform image-based unattended installs of Windows Vista using Windows Automated Installation Kit (Windows AIK) tools such as Windows System Image Manager (Windows SIM), the Windows Preinstallation Environment (WinPE), the System Preparation Tool (Sysprep) and ImageX are referred to articles 1 through 13 of my Deploying Vista series here on WindowsNetworking.com.
Readers interested in understanding how to use Windows Deployment Services (Windows DS) for server-based unattended installs of Windows Vista are referred to articles 14 through 23 of my Deploying Vista series.
For more information on using Microsoft Deployment Toolkit for deploying Windows Vista, see the following articles in this series:

This present article and the next one dig deeper into this topic by examining how to configure and manage servers running the Windows Deployment Services (Windows DS) server role.
Note: Readers interested in understanding the basics of deploying Vista using the Windows Automated Installation Kit (Windows AIK) are referred to the first 13 articles of this series, which are listed on the author’s home page on WindowsNetworking.com.
Adding and Removing Servers
The Windows DS administration console can be used to manage multiple Windows DS servers remotely from a single location. To add a server to the console, right-click on the Servers node and select Add Server as shown in Figure 1:

Figure 1: Adding a server to the Windows DS console
In the Add Servers dialog box that appears, type the name of or browse Active Directory to locate the server you want to add to the console. To remove a server that was previously added, right-click the server and select Remove Server.
Managing Windows DS Services
To stop, start, or restart Windows DS services on a server, right-click on the server node, select All Tasks, and choose from the shortcut menu as shown in Figure 2:

Figure 2: Stopping and starting Windows DS services
You can also use the WDSUTIL command to stop and start Windows DS services from the command-line as follows:
WDSUTIL /Stop-Server /Server:<servername>
WDSUTIL /Start-Server /Server:<servername>
Here <servername> can be the FQDN or NetBIOS name of the Windows DS server you are managing. You can omit the /Server switch if you are running WDSUTIL on the Windows DS server itself.
Configuring Server Properties
You can manage various aspects of a Windows DS server by configuring its properties. You can do this in two ways:
-
By right-clicking a server’s node in the Windows DS console and selecting Properties to bring up the properties sheet for the server with its various tabs.
-
From the command-line by using the WDSUTIL command, especially the /get and /set switches of this command.
Let’s look at both of these methods.
First, you can use the /get-Server switch of WDSUTIL to retrieve the configuration of a Windows DS server. For example, the following command displays the configuration of a server named SEA-WDS:
C:/>WDSUTIL /get-Server /server:SEA-WDS /show:Config
Windows Deployment Services Management Utility [Version 6.0.6001.18000]
Copyright (C) Microsoft Corporation. All rights reserved.
SETUP INFORMATION FOR SERVER SEA-WDS
[—————————————————————————–]
Server State:
OS version: 6.0
WDS operational mode: Native
Installation State:
REMINST location: W:\Images
REMINST share up-to-date: Yes
Boot files installed:
x86 – Yes
x64 – No
ia64 – No
[—————————————————————————–]
CONFIGURATION INFORMATION FOR SERVER SEA-WDS
[—————————————————————————–]
Server Authorization:
Authorization state: Not Authorized
Answer Policy:
Answer clients: Yes
Answer only known clients: No
Response delay: 0 seconds
Directory Services Use Policy:
Preferred DC:
Preferred GC:
Prestage devices using MAC: No
New machine naming policy: %61Username%#
Domain search order: Global Catalog Only
New machines join domain: Yes
New Machine OU:
OU type: Server Domain
OU: CN=Computers,DC=contoso,DC=com
DHCP Configuration:
DHCP service status: Not Installed
DHCP option 60 configured: <Not Applicable>
Pxe Bind Policy:
Use DHCP ports: Yes
Rogue detection: Disabled
RPC port: 5040
Interface Bind Policy:
Policy: Exclude Registered
Registered interfaces:
Boot Program Policy:
Allow N12 for new clients: No
Architecture discovery: Enabled
Reset boot program: No
Default boot programs:
x86 – boot\x86\pxeboot.com
x64 – boot\x64\pxeboot.com
ia64 – boot\ia64\bootmgfw.efi
Default N12 boot programs:
x86 – boot\x86\pxeboot.n12
x64 – boot\x64\pxeboot.n12
ia64 – boot\ia64\bootmgfw.efi
Banned GUIDs List:
Boot Image Policy:
Default image type for x64 clients: Both
Default boot images:
x86 –
x64 –
ia64 –
WDS Client Policy:
Logging policy:
Enabled: No
Logging level: Info
Unattend policy:
Enabled: No
Command-line precedence: No
WDS unattend files:
x86 –
x64 –
ia64 –
OSChooser Policy:
Menu name:
Server Auto-Refresh Policy:
Refresh period: 900 seconds
BCD Refresh Policy:
Enabled: No
Refresh period: 60 minutes
Auto-Add Policy:
Policy: Disabled
Poll interval: 10 seconds
Max retry count: 2160 times
Message:
Retention period:
Approved devices: 30 days
Other devices: 1 days
Defaults for x86:
Referral server:
Boot program path:
WDS client unattend file path:
Boot image path:
User: Domain Admins
Join rights: Full
Join domain: Yes
Defaults for x64:
Referral server:
Boot program path:
WDS client unattend file path:
Boot image path:
User: Domain Admins
Join rights: Full
Join domain: Yes
Defaults for ia64:
Referral server:
Boot program path:
WDS client unattend file path:
Boot image path:
User: Domain Admins
Join rights: Full
Join domain: Yes
WDS PXE Providers:
Name: BINLSVC
Path: C:\Windows\system32\binlsvc.dll
Order: 1
Critical: Yes
WDS Transport Server Policy:
IPv4 Source: Range
Start IP: 239.0.0.1
End IP: 239.0.0.254
Start Port: 64001
End Port: 65000
Network Profile: 100Mbps
[—————————————————————————–]
The command completed successfully.
Now let’s look at each of the tabs on a server’s properties sheet and what the various configuration options mean. As we do this we’ll also correlate the GUI configuration settings with sections of the command output shown above.
Tip: You can also display the configuration settings for all Windows DS servers in your forest by using the following command:
WDSUTIL /get-AllServers /show:Config /Forest:Yes
General Tab
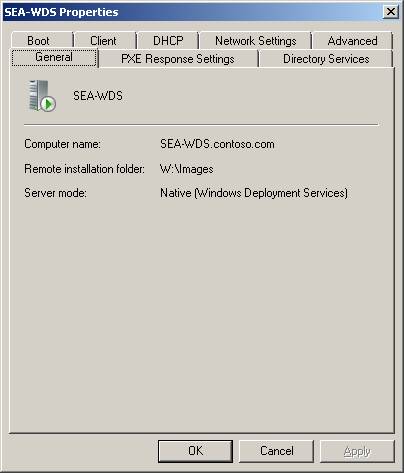
Figure 3: Settings on the General Tab
The General tab displays the FQDN of the server, the location of the remote installation folder where the images are stored, and the mode of the server. The information on this tab can be found in the following portion of the output of the WDSUTIL /get-Server /show:Config command:
SETUP INFORMATION FOR SERVER SEA-WDS
[—————————————————————————–]
Server State:
OS version: 6.0
WDS operational mode: Native
Installation State:
REMINST location: W:\Images
REMINST share up-to-date: Yes
Boot files installed:
x86 – Yes
x64 – No
ia64 – No
[—————————————————————————–]
PXE Response Settings Tab

Figure 4: Settings on the PXE Response Settings Tab
The settings on the PXE Response Settings tab were discussed earlier in the article Deploying Vista Part 16: Configuring Windows Deployment Services in this series. That’s because these settings can be configured when you perform the initial configuration of your Windows DS server using the Windows Deployment Services Configuration Wizard. The settings on this tab can also be found in the following portion of the output of the WDSUTIL /get-Server /show:Config command:
Answer Policy:
Answer clients: Yes
Answer only known clients: No
Response delay: 0 seconds
In addition, the settings for notifying administrators can be found here in the command output:
Auto-Add Policy:
Policy: Disabled
You can use the /set-Server switch of the WDSUTIL command to configure these settings from the command line. For example, the following command will change the PXE response policy from responding to all clients to responding to none:
WDSUTIL /set-Server /Server:<servername> /AnswerClients:None
Use this command to change the response policy back to responding to all clients:
WDSUTIL /set-Server /Server:<servername> /AnswerClients:All
To change the response delay (the amount of time a PXE Server has to wait before answering a booting client) from 0 seconds to 60 seconds, use this command:
WDSUTIL /set-Server /Server:<servername> /ResponseDelay:60
To configure your Windows DS server to only respond to known clients, use this command:
WDSUTIL /set-Server /Server:<servername> /AnswerClients:Known
Known clients are ones whose computer accounts must be prestaged before the PXE server will respond to them to initiate Vista deployment on these computers. To prestage a client computer, you can use the /add-Device switch of WDSUTIL. For example, to prestage a computer named DESK123 that has MAC address 00-17-31-C5-D2-8E, use the following command:
WDSUTIL /Add-Device /Device:DESK123 /ID:00000000000000000000001731C5D28E
Note the twenty leading zeros before the 12-byte MAC address in the above command. When you run this command, it creates a computer account in Active Directory for the computer you are going to install Vista on. To see this, open Active Directory Users and Computers and select the Computers container and you should see an object named DESK123 in the container. Now enable Advanced Features under the View menu and double-click on the DESK123 object, then select the Attribute Editor and scroll to display the netbootGUID attribute as shown in Figure 5:

Figure 5: Computer account for DESK123 showing the netbootGUID attribute
If your computer has a tag on it listing the GUID of the machine, you can also use this in the /ID switch in the above command instead of the MAC address. The /add-Device switch also takes additional options for prestaging clients. For example, the following command prestages a computer account for computer DESK123, specifies server SEA-WDS as the server from which the client will download the Windows DS network boot program and boot image using TFTP, specifies the name and relative path of the network boot program, specifies the name and relative path of the XML answer file used to automate the installation screens of the Windows DS client, gives domain user Tony Allen (CONTOSO\tallen) full access to the computer including permission to join the computer to the domain, specifies the name and relative path of the boot image to be used during deployment, and specifies the organizational unit in which the computer account will be created in the domain:
WDSUTIL /add-Device /Device:DESK123 /ID:00000000000000000000001731C5D28E /ReferralServer:SEA-WDS /BootProgram:boot\x86\pxeboot.com /WDSClientUnattend:WDSClientUnattend\unattend.xml /User:CONTOSO\tallen /JoinRights:Full /BootImagePath:boot\x86\images\boot.wim /OU:”OU=Seattle Computers,OU=Seattle,DC=contoso,DC=com”
Tip: If you make a mistake using the WDSUTIL /add-Device command, you can modify the attributes of the computer account you created by using the /set-Device switch of WDSUTIL. You can also modify attributes of the account directly using the Attribute Editor tab of the advanced properties of the o object in the Active Directory User and Computers console.
To be continued in the next article of this series…
Readers interested in understanding how to perform image-based unattended installs of Windows Vista using Windows Automated Installation Kit (Windows AIK) tools such as Windows System Image Manager (Windows SIM), the Windows Preinstallation Environment (WinPE), the System Preparation Tool (Sysprep) and ImageX are referred to articles 1 through 13 of my Deploying Vista series here on WindowsNetworking.com.
Readers interested in understanding how to use Windows Deployment Services (Windows DS) for server-based unattended installs of Windows Vista are referred to articles 14 through 23 of my Deploying Vista series.
For more information on using Microsoft Deployment Toolkit for deploying Windows Vista, see the following articles in this series:


