If you would like to read the other parts in this article series please go to:
- Deploying Vista – Part 1: Understanding the Windows AIK
- Deploying Vista – Part 2: Understanding Windows Setup and the Windows Imaging File Format
- Deploying Vista – Part 3: Understanding Configuration Passes
- Deploying Vista – Part 4: Understanding Deployment Scenarios
- Deploying Vista – Part 6: Using Windows SIM
- Deploying Vista – Part 7: Creating a Minimal Answer File
- Deploying Vista – Part 8: Unattended Install from DVD Method
- Deploying Vista – Part 9: Automating the Machine OOBE
- Deploying Vista – Part 10: Understanding the Windows Preinstallation Environment
- Deploying Vista – Part 11: Working with Windows PE
- Deploying Vista – Part 12: Understanding Image-Based Deployment
- Deploying Vista – Part 13: Performing Image-Based Deployment
- Deploying Vista – Part 14: Understanding Windows Deployment Services
- Deploying Vista – Part 15: Implementing Windows Deployment Services
- Deploying Vista – Part 16: Configuring Windows Deployment Services
- Deploying Vista – Part 17: Working With the Windows DS Image Store
- Deploying Vista – Part 18: Managing Windows Deployment Services
- Deploying Vista – Part 19: Managing Windows Deployment Services (Continued)
- Deploying Vista – Part 20: Working With Discover Images
- Deploying Vista – Part 21: Working With Capture Images
- Deploying Vista – Part 22: Deploying Images using Windows Deployment Services
- Deploying Vista – Part 23: Unattended Image Deployment Using Windows Deployment Services
- Deploying Vista – Part 24: Understanding Microsoft Deployment Toolkit
- Deploying Vista – Part 25: Preparing Microsoft Deployment Toolkit for Deploying Vista
- Deploying Vista – Part 26: Deploying Vista Using Microsoft Deployment Toolkit
- Deploying Vista – Part 27: Automating a Light Touch Installation
- Deploying Vista – Part 28: Configuring Distribution Shares
- Deploying Vista – Part 29: Configuring Distribution Shares (Continued)
In the previous article in this series, we examined several common deployment scenarios enterprises can use to deploy Windows Vista. During the discussion of these scenarios, use of the Sysprep tool was brought up, so let’s use this present article to examine what this tool is for, what it does, and how you should use it.

Sysprep, which stands for System Preparation, is a tool that you use together with other deployment tools for several purposes. These purposes can include:
- Generalizing a Windows installation by removing machine-specific information from it such as security identifiers (SIDs), the contents of event logs, any system restore points, installed Plug and Play drivers, and so on, so that you can then deploy the installation to other machines by using disk imaging (disk duplication) tools like ImageX in order to capture an image of your generalized machine and then apply this image to other machines.
- Boot a Windows installation into audit mode so you can customize your installation by adding additional device drivers and installing additional applications on it and then testing your installation to make sure it is customized properly for its intended users.
- Preparing a Windows installation for delivery to a user or customer by making sure Windows Welcome (the machine out-of-box-experience or OOBE) will run when the user or customer boots the machine for the first time.
- Transfer an existing Windows installation from your old computer to a new one if your old computer is on its last legs and before it bites the dust.
Running Sysprep
Sysprep can be run using three different methods:
- From the command line
- From the UI
- From an answer file
To run Sysprep from the command line, open an admin-level command prompt by pressing Windows Key+R, type cmd, and click OK. Then type cd sysprep to change to the %SYSTEMROOT%\system32\sysprep folder and then type sysprep followed by one or more of the command-line parameters listed in Table 1 below.
|
Parameter |
Description |
|
/audit |
Forces the computer to start in audit mode the next time you boot it. In addition, if an answer file is being used with Sysprep then any settings configured for the auditSystem and auditUser passes will be processed. |
|
/oobe |
Forces the computer to launch Windows Welcome the next time you boot it. In addition, if an answer file is being used with Sysprep then any settings configured for the oobeSystem pass will be processed before Windows Welcome starts. |
|
/generalize |
Removes all machine-specific information from your system in order to prepare the Windows installation for deployment onto other machines using disk imaging tools like ImageX. |
|
/shutdown |
Forces the computer to shut down once Sysprep is finished running. |
|
/reboot |
Forces the computer to reboot once Sysprep is finished running. |
|
/unattend:answerfile |
Applies the configured settings in the specified answer file when Sysprep runs. Only settings specified in the oobeSystem, auditSystem and/or auditUser passes can be applied during Sysprep. |
|
/quiet |
Suppresses the display of on-screen confirmation messages. Use this parameter when automating the operation of Sysprep using the /unattend parameter. |
|
/quit |
Simply quit after Sysprep runs i.e. don’t shutdown or reboot. |
Table 1: Command-line parameters for running Sysprep
To run Sysprep from the UI, open an admin-level command prompt as described above, change to the %SYSTEMROOT%\system32\sysprep folder and then type sysprep without any command-line parameters. This will open the System Preparation Tool window as shown in Figure 1:
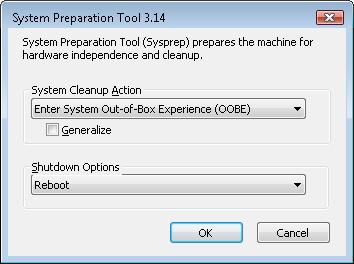
Figure 1: Sysprep UI
The combination of options you can select from the UI correspond to the command-line options as follows:
(oobe OR audit) [REQUIRED] AND generalize [OPTIONAL] AND (shutdown OR reboot OR quit) [REQUIRED]
The best way of learning how Sysprep works is to try using it. The next sections show a couple of examples.
Example 1: Generalizing a system and then rebooting into Windows Welcome
Figure 2 shows the UI choices for this scenario:

Figure 2: Configuring Sysprep to generalize a system and then reboot into Windows Welcome
The corresponding command-line version for this would be:
sysprep /generalize /oobe /reboot
Here’s what happens when you run the above Sysprep command on a Windows Vista installation. First, a status box appears indicating that Sysprep has begun doing its work (Figure 3):
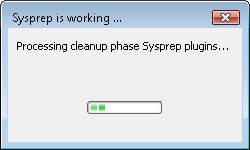
Figure 3: Sysprep beginning its work
The system then reboots several times while Sysprep continues its work (see Figures 4 and 5):

Figure 4: Sysprep doing its job
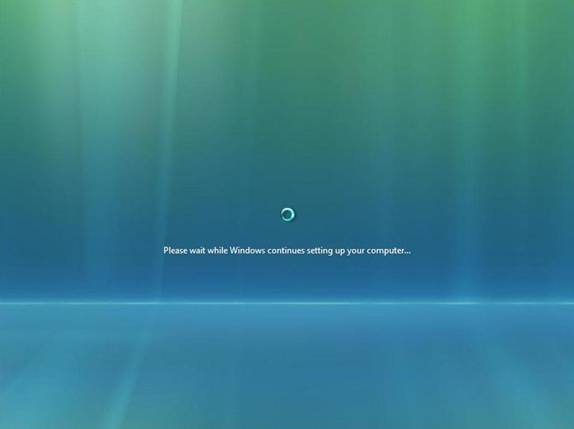
Figure 5: Sysprep continues to do its job
Once Sysprep is finished, the Windows Welcome (Machine OOBE) begins (Figure 6):

Figure 6: Windows Welcome starts
At this point the various screens of Windows Welcome are displayed in the following order (assuming you’re using volume-licensed media like Windows Vista Enterprise:
- Specify regional settings i.e. country/region, time/currency, and keyboard layout
- Accept the EULA
- Type a user name, password, and select a picture to associate with the user
- Type a computer name and select a desktop background
- Specify automatic update settings
- Specify date and time settings
- Specify location (home, work or public)
- Click Start to complete the Windows Welcome process
Example 2: Generalizing a system and then rebooting into Audit mode
Figure 7 shows the UI choices for this scenario:
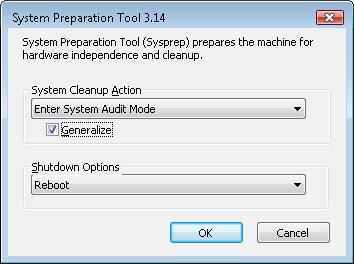
Figure 7: Configuring Sysprep to generalize a system and then reboot into Audit mode
The corresponding command-line version for this would be:
sysprep /audit /generalize /reboot
Here’s what happens when you run the above Sysprep command on a Windows Vista installation. First, Sysprep does its magic (see Figure 3, 4 and 5 previously). Then Windows starts to create the desktop for the built-in Administrator account (Figure 8):
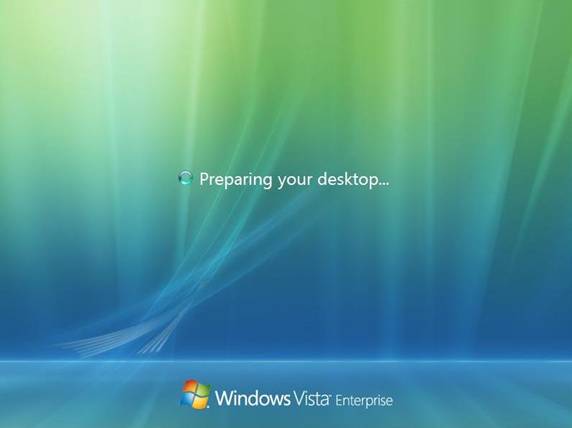
Figure 8: Desktop for Administrator is being created
Then you are automatically logged on as Administrator (even though the built-in Administrator account is still disabled—remember, this is Audit mode not normal Windows) and the Sysprep UI is displayed again (Figure 9):
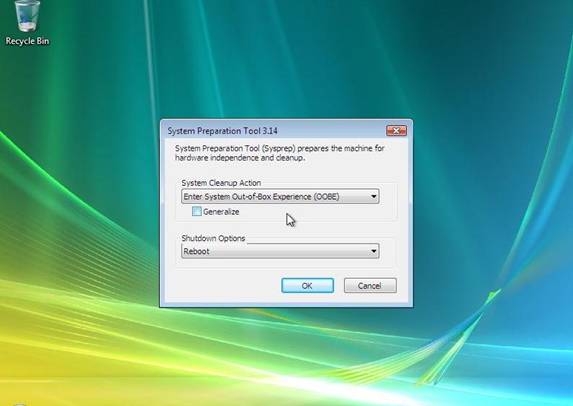
Figure 9: Sysprep UI is displayed again.
The Sysprep UI is displayed again as a reminder that you must run Sysprep one more time once you’ve completed any customizations you want to perform during Audit mode. You can either run Sysprep this last time from the UI or by running sysprep /oobe /shutdown from the command line. This last running of Sysprep is essential so that when the user receives her computer and runs it for the first time, the Windows Welcome (Machine OOBE) experience runs so that the user can set up her computer properly. Of course, that’s the kind of scenario you would have if you were an OEM delivering a Vista computer to a customer; in enterprise environments, you’re more likely to want to automate the Windows Welcome process using answer files, and that’s what we’ll look at in the next article of this series: using Windows SIM to create answer files for deploying Vista.
If you would like to read the other parts in this article series please go to:
- Deploying Vista – Part 1: Understanding the Windows AIK
- Deploying Vista – Part 2: Understanding Windows Setup and the Windows Imaging File Format
- Deploying Vista – Part 3: Understanding Configuration Passes
- Deploying Vista – Part 4: Understanding Deployment Scenarios
- Deploying Vista – Part 6: Using Windows SIM
- Deploying Vista – Part 7: Creating a Minimal Answer File
- Deploying Vista – Part 8: Unattended Install from DVD Method
- Deploying Vista – Part 9: Automating the Machine OOBE
- Deploying Vista – Part 10: Understanding the Windows Preinstallation Environment
- Deploying Vista – Part 11: Working with Windows PE
- Deploying Vista – Part 12: Understanding Image-Based Deployment
- Deploying Vista – Part 13: Performing Image-Based Deployment
- Deploying Vista – Part 14: Understanding Windows Deployment Services
- Deploying Vista – Part 15: Implementing Windows Deployment Services
- Deploying Vista – Part 16: Configuring Windows Deployment Services
- Deploying Vista – Part 17: Working With the Windows DS Image Store
- Deploying Vista – Part 18: Managing Windows Deployment Services
- Deploying Vista – Part 19: Managing Windows Deployment Services (Continued)
- Deploying Vista – Part 20: Working With Discover Images
- Deploying Vista – Part 21: Working With Capture Images
- Deploying Vista – Part 22: Deploying Images using Windows Deployment Services
- Deploying Vista – Part 23: Unattended Image Deployment Using Windows Deployment Services
- Deploying Vista – Part 24: Understanding Microsoft Deployment Toolkit
- Deploying Vista – Part 25: Preparing Microsoft Deployment Toolkit for Deploying Vista
- Deploying Vista – Part 26: Deploying Vista Using Microsoft Deployment Toolkit
- Deploying Vista – Part 27: Automating a Light Touch Installation
- Deploying Vista – Part 28: Configuring Distribution Shares
- Deploying Vista – Part 29: Configuring Distribution Shares (Continued)


