Introduction
If you’re planning an Exchange infra-structure or even if you have already implemented it, one of the must-reads is undoubtably Optimizing Storage for Exchange Server 2003. In this fine document you can read:
“Disk subsystem bottlenecks cause more performance problems than server-side CPU or RAM deficiencies, and a poorly designed disk subsystem can leave your organization vulnerable to hardware malfunctions.“
This is so true! As memory chips become cheaper and consolidation dictates more users per server, the disk subsystem turns into the main cause of performance problems. The key to a system without problems is proper planning and design. Of course there’s always some tweaking you can do, preferably before going live with the system. Realigning the hard disk is one of these things, which can lead to a significant performance improvement.
Hard Disk Basics
Hard disks are organized as a concentric stack of platters. The data is stored on concentric circles on the surfaces known as tracks. Sections within each track are called sectors. A sector is the smallest physical storage unit on a disk and typically it will hold 512 bytes of data. The disk itself can’t handle smaller amounts of data than one sector.
Figure 1: Hard disk schematic

Electromagnetic read/write heads are positioned above and below each platter. As the platters spin, the drive heads move in toward the center surface and out toward the edge. In this way, the drive heads can reach the entire surface of each platter. Reading from 2 tracks implies a realignment of the reading heads, thus it takes longer than reading a single track.
Simple, right? Well, it gets more complicated than this, but we’ll discuss that later.
The Theory
Microsoft provides a tool, DiskPar, which allows aligning the disk tracks with sector tracks. For partitions created by Windows 2000 and Windows Server 2003, the default starting sector for disks that have more than 63 sectors per track is the 64th sector. Because Windows will read blocks of 4 KB (8 sectors), one out of every eight blocks of data written to your disk will span two disk tracks (assuming 64 sectors per track). DiskPar can increase disk performance as much as 20 percent, but you should always consult your hardware vendor before using this tool (I’ll discuss why next). Some disk configurations will have no benefit from the tool.
There is also another tool that can perform the same job, DiskPart (notice the extra “t”), but you’ll have to install Windows 2003 Service Pack 1 in order to get this functionality.
The Real World
Now that you know what’s inside your hard disk and how the data is stored, it’s time to add some complexity.
If you imagine the surface of a disk platter, considering a constant number of sectors per track and knowing that track lengths increase the farther a track resides from the center of the disk (they are concentric circles), it’s not hard to conclude that the outer data sectors are longer than the inner data sectors.
This means that the outer tracks are greatly underutilized, because in theory they can hold many more sectors given the same linear bit density. In order to increase capacity and eliminate this wasted space, a technique called zone bit recording (ZBR) is employed on modern hard disks. With this technique, tracks are grouped into zones based on their distance from the center of the disk, and each zone is assigned a number of sectors per track. As you move from the innermost part of the disk to the outer edge, you move through different zones, each containing more sectors per track than the one before. This allows for more efficient use of the larger tracks on the outside of the disk.
Figure 2: Zoned Bit Recording (ZBR)

Nowadays, disks use many complex internal structures, so there’s no simple way of knowing the real geometry of a disk. Indeed, the number of sectors per track is variable, because of zone bit recording, so there is no real number of sectors per track.
By now you may be confused, wondering if there’s a point in aligning disk tracks. I can assure you there is, but you should definitely consult your hardware vendor. He should provide you with pertinent information regarding the use of an alignment tool. One fine example of information provided by the storage vendor is HP. Just take a look at this document: HP StorageWorks Enterprise Virtual Array 5000 and Microsoft® Exchange Server 2003: storage performance and configuration — white paper.
And even if you can’t get the information from the vendor, you can make your own performance testing using a tool like JetStress and varying the starting disk offset with DiskPar or DiskPart. A good value to start is probably 64 sectors (or 32 KB).
There is also a KB article about how Windows handles the complex geometry of modern hard disks: Q161563: How Windows NT Handles Drive Translation.
Using DiskPar
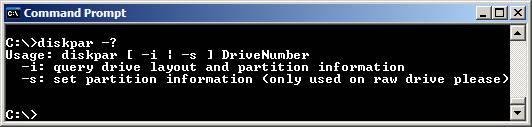
The DiskPar utility is a command-line tool that finds and modifies the starting sector on a disk to improve performance and it can be found in the Windows 2000 Server Resource Kit. DiskPar only has 2 command line options, one for querying disk geometry and the other one for effectively changing that disk configuration. You can check the tool’s usage by executing DiskPar -?.
- Check disk information before using DiskPar.

(Did you notice the spelling errors? Infomation and StatringOffset. Remember, this is a Resource Kit tool, so it’s not supposed to have the quality control that other Microsoft products have)
- Start Disk Management.
- Delete all partitions on the disk making it a raw drive. Backup any data you don’t want to lose before removing partitions. Notice the number of the disk you want to change (we’ll use Disk 1).
Figure 3: Disk Management snap-in

- Run DiskPar to set the starting offset and create the first partition on the disk you want to align: diskpar -s 1
- Enter the new starting offset (in sectors), and the partition length (in MB). This writes the new starting sector information to the Master Boot Record (MBR) for that disk, and creates the first partition.

- Using Disk Manager, create and format all other desired partitions on that disk. When you format the hard disks remember not to use quick format. Configure the partition to use NTFS and to use an allocation unit size of 4096 (4 KB). By default Windows will use a 4KB allocation unit, even if you don’t explicitly specify it.
Figure 4: Creating the partition

Figure 5: Formatting the partition

You should have present that the information reported by this tool isn’t always accurate, because the track information reported by disks doesn’t always reflect reality (as we seen before) and most disks have different numbers of sectors on different tracks.
Using DiskPart
With the release of Service Pack 1 for Windows 2003, the ability to align disk tracks has been included in DiskPart. The original DiskPart that shipped with Windows Server 2003 has the version 5.2.3790, while the new one is 5.2.3790.1830.
The new syntax for creating partitions with DiskPart is:
create partition primary [size=N] [offset=N] [ID={Byte | GUID}] [align=N] [noerr]
For more information about DiskPart usage, read the command line reference.
The main difference between DiskPar and DiskPart is that in the latest you specify the offset in Kilobytes, not sectors.
- The first steps for using DiskPart are the same as the ones for DiskPar. Start Disk Management and delete all partitions on the disk making it a raw drive.
- Run DiskPart from a command prompt. From the DiskPart prompt, select the disk you want to align: select disk 1
- Issue the command to create the aligned partition: create partition primary align=32

- You can then check disk information to confirm that the partition is in fact aligned.

Conclusion
Because the disk subsystem is the main cause of performance bottlenecks on an Exchange infra-structure you should use all means to plan and design a proper solution. By using one of the available tools (DiskPar or DiskPart) to create aligned partitions (as compared with non-aligned partitions that are created by Windows), you can increase disk performance by 20 percent, but you should always check with your hardware vendor if it’s a recommended procedure.
After you finish aligning the disks, you can (and should) validate the potential performance improvement by running some performance tools, such as JetStress.