If you would like to read the other parts in this article series please go to:
- Exchange 2003 Mobile Messaging Part 1 – A look at the Microsoft DirectPush technology
- Exchange 2003 Mobile Messaging Part 2 – Uncovering the Device Security Policies
- Exchange 2003 Mobile Messaging Part 3 – Installing, Administering, and Using the Microsoft Exchange Server ActiveSync Web Administration tool
We’ve reached part 4 of this series covering Mobile Messaging using Exchange 2003 Server with SP2 applied and Windows Mobile 5.0 devices with the Messaging and Security Feature Pack installed. In the previous article I talked about how you installed, configured as well as used the Exchange Server ActiveSync Web Administration tool. In this article we’ll take a closer look at the GAL lookup feature.
Introduction
With the new GAL Lookup feature included in the Messaging and Security Feature Pack, you can now lookup contacts in the Global Address List (GAL) on your corporate Exchange Server 2003 SP2 Server(s). Those of you who own a Windows Mobile device which doesn’t have the MSFP installed know that you can only look up contacts in your personal contacts list stored locally on your device. Well actually this statement isn’t completely true, as you can get access to the Global Address Book (GAL) by installing the free Microsoft Global Contact Access add-on on the device. Of course the Microsoft Global Contact Access add-on is not as integrated in the Windows Mobile 5.0 OS as the GAL Lookup, but it’s definitely worth checking out while you wait for a build with the MSFP included for your particular device.
How It Works
GAL Lookup is embedded into the same contact chooser interface as the one used for looking up contacts in the personal contacts list. This means that you can look up contacts in the corporate GAL from within the messaging, phone, calendar and speed-dial menus. This makes it possible for your users to send e-mail messages, meeting requests/invitations, SMS messages to contacts in the corporate GAL. They can even call contacts stored in the corporate GAL.
When you have looked up a contact in the GAL, you also have the option of seeing additional details for the contact, things such as the his title, company etc. (see Figure 1).
Figure 1: Looking up a contact in the corporate GAL
GAL Lookup works by using a new SEARCH verb included in the latest version of the AirSync protocol (version 2.5). This version is, at the time of this writing, only to be found in the Messaging and Security Feature Pack (MSFP). The SEARCH verb makes it possible to look up mail-enabled objects in Active Directory. You can search for these objects by specifying their alias, first name etc. in your query string.
Note:
GAL Lookup is currently limited to searches in the GAL store. My guess is that this limitation will be gone with Exchange Server 2007 and Windows Mobile 6.0 (code-named Crossbow), but as I cannot predict what will happen in future releases, only time will tell.
Below is a list of the properties that can/will be returned when issuing a search request for an Active Directory object using GAL Lookup.
-
Alias
-
Display Name
-
First Name
-
Last Name
-
Email Address
-
Phone
-
Title
-
Office
-
Company
-
Mobile Phone
GAL Lookup has been designed in such a way that a property will only be returned if the matching attribute is specified for the user in AD. I think this is very thought through and will eliminate charges for any unnecessary data synchronized over the air.
Sending an E-mail Message to a Contact in the Corporate GAL
Sending an e-mail message to a contact in the GAL can be done in several ways. Here I’ll show you the typical way of doing so.
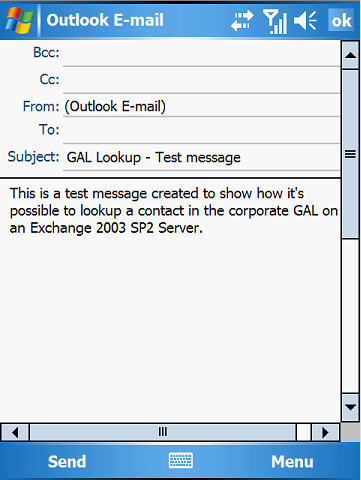
Open Outlook on your device and then click New in the lower left corner. When you have entered a Subject and typed some text in the message body just as shown in Figure 2 below, click the Menu button in the lower right corner.
Figure 2: Composing a Message
Now choose Find Online (Figure 3) and the device will issue a search request in the GAL on the respective Exchange 2003 SP2 Server .
Figure 3: Finding the respective contact in the GAL

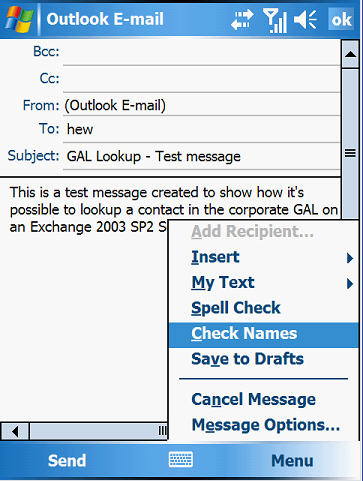
If you know the alias or username of the contact you want to sent the message to, you can also type this in the To: line and click Menu, then Check Names in the context menu (see Figure 4).
Figure 4: Resolving the entered alias or name
When you have found the contact in the GAL, click Select button as shown in Figure 5.
Figure 5

You should now be back in the composing window again. Notice the name as well as e-mail address has been populated in the To: line (Figure 6).
Figure 6: Contact name and e-mail address in the To: line

You can now send the e-mail message, and if you have enabled the DirectPush feature (for more info on the DirectPush technology see part 1 of this articles series), the message will arrive in the recipients mailbox a few seconds later.
Sending a Meeting Request to a Contact in the Corporate GAL
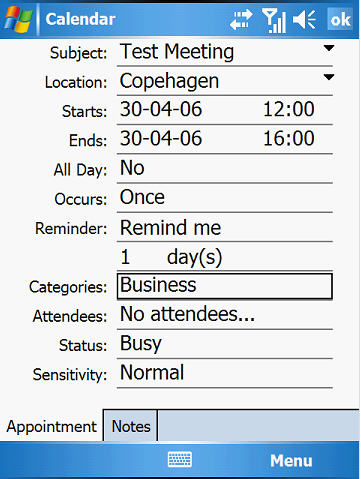
As mentioned earlier in this article it’s also possible to send a meeting request/invitation to one or more contacts in the GAL. This is done by opening the Calendar application and clicking Menu, then select New Appointment in the context menu. When you have filled out the required fields, click Attendees (Figure 7).
Figure 7: Composing a new appointment
You should now be familiar with the user interface, as this is pretty much identical to the one used when finding an e-mail recipient in the GAL. Add the contacts you want to send the meeting request/invitation to, and then click OK (see Figure 8).
Figure 8: Adding the required attendees to the appointment

The Attendees line will now be populated with the contacts you chose in the GAL, as can be seen in Figure 9.
Figure 9: Appointment with Attendees

If you want you can also type in any necessary notes for the meeting by clicking the Notes tab.
Note:
Since a meeting/conference room is nothing else but a mail-enabled user object in Active Directory, you can also book the conference/meeting room when creating the appointment on your device.
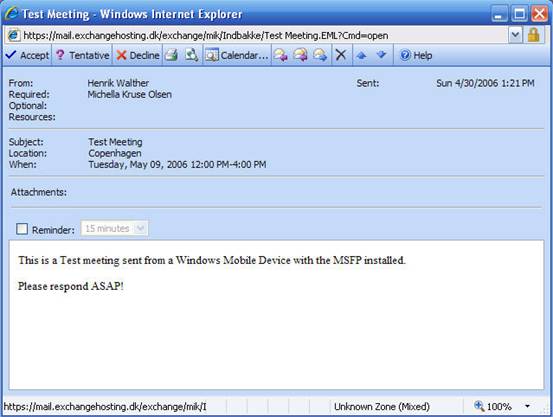
When you have sent the meeting request/invitation, it will arrive in the Inbox of the specified attendees within seconds. They will then be able to accept or decline it (see Figure 10), just like it’s possible with a request that has been sent from either Office Outlook 2003 or Outlook Web Access 2003 (OWA).
Figure 10: Meeting request received from a Mobile Device
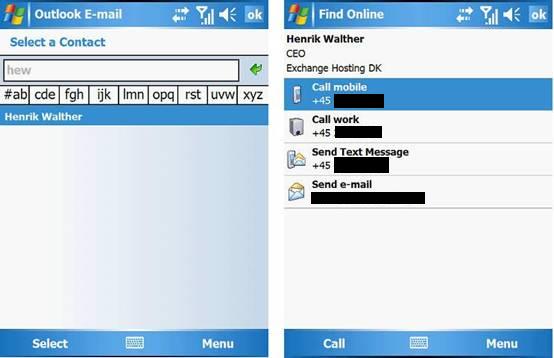
Dialing a Contact in the Corporate GAL
If you need to call a colleague or another employee in your company, and this person isn’t stored in your personal contacts list, fear not because you can also look up the number of the person in the GAL, or even better call him directly via the GAL Lookup user interface. One way of doing so is to click Contacts in the lower right corner of the Today screen, then click Menu -> Find Online as shown in Figure 11.
Figure 11: Calling a contact not stored in your Personal Contacts List

When you have found the respective contact simply select Call Work or Call Mobile like shown in Figure 12.
Figure 12: Calling a contact in the GAL

Sending an SMS Message to a Contact in the Corporate GAL
I know SMS messages aren’t widely used in the US, but SMS messages are used heavily in Europe, not only among teenagers and for private purposes, but also as a form of communication between colleagues in an organization. If you ask me, an SMS message is a brilliant way of giving a colleague a quick status when you’re attending a meeting or some kind of conference session.
GAL Lookup of course also allows you to send an SMS message to a contact in the GAL. T he method to do this is very similar to what we already went through in this article. You can do it in several ways, but one way is to open the Text Messages application, then clicking New in the screen shown in Figure 13 below.
Figure 13: Composing a new text message

Now lookup the contact in the GAL, then choose Send Text Message as shown back in Figure 12. You should now be back at the text message composing window (Figure 14).
Figure 14: Sending an SMS message to a contact in the GAL

Now send the SMS message. You can of course do the same with MMS messages, but we won’t go through the exact steps in this article.
Adding a contact in the GAL to the Personal Contacts List
If you find out that you’ll need to communicate further with someone you just looked up in the GAL in the future, you can add that contact to the personal contacts list stored locally on your device. You do this by clicking Menu -> Add to contacts after you have looked up the respective contact in the GAL (see Figure 15).
Figure 15: Adding a contact in the GAL to your personal contacts list

Conclusion
In addition to their stored contacts, the users in your organization can now access the corporate Global Address List (GAL) over the air from any mobile device that supports version 2.5 of the AirSync protocol (currently only devices with the MSFP installed). Users can search for additional contact details not stored on their device, send e-mail messages, meeting requests/invitations as well as SMS messages to contacts in the corporate GAL. They can even add contacts stored in the GAL to the personal contacts list on their device.
If you would like to read the other parts in this article series please go to:
- Exchange 2003 Mobile Messaging Part 1 – A look at the Microsoft DirectPush technology
- Exchange 2003 Mobile Messaging Part 2 – Uncovering the Device Security Policies
- Exchange 2003 Mobile Messaging Part 3 – Installing, Administering, and Using the Microsoft Exchange Server ActiveSync Web Administration tool