If you would like to read the other parts in this article series please go to:
- Getting Used to Using Windows Storage Spaces (Part 1)
- Getting Used to Using Windows Storage Spaces (Part 3)
In the previous article in this series, I discussed the concept of storage pools as they exist in Windows Server 2012. In this article, I want to continue the discussion by talking about how virtual disks are created within storage pools.
As I explained in the previous article, storage pools are a collection of physical disks. As such, making use of a storage pool means using logical storage rather than directly accessing a physical disk. This is accomplished by creating one or more virtual disks on top of the storage pool.
Creating a virtual disk is a simple process. To do so, open the Server Manager and click on the File and Storage Services link. If this link does not exist then the File and Storage Services have not been installed on the server. When the File and Storage Services console opens, click on the Storage Pools link. When you do, you should see a screen similar to the one shown in Figure A.

Figure A: This is the Storage Pools view in the File and Storage Services console.
This view displays three main pieces of information. The console’s top pane displays any storage pools that have been created. You will notice in the figure that one storage pool exists and that it is selected.
The lower, right pane displays the physical disks that are included in the selected storage pool. The lower left pane lists the virtual disks that have been created within the storage pool. It is this pane that we are interested in for the purposes of this article.
As you can see in the figure, I have created a virtual disk ahead of time. The console displays the name of the virtual disk and also indicates that the virtual disk is protected using parity. We can also see that the virtual disk is thinly provisioned. It has a total capacity of 1.35 TB, but right now only 42 GB of storage space is actually being used.
So with that in mind, let’s go ahead and create a virtual disk. To do so, click on the Tasks drop down that appears above the list of virtual disks, and choose the New Virtual Disk option from the drop down menu. When you do, Windows will launch the New Virtual Disk Wizard. Click Next to bypass the wizard’s Welcome screen and you will be taken to the Storage Pool screen, which you can see in Figure B.

Figure B: Virtual disks must be created within a storage pool.
As you can see in the figure above, the wizard asks you to select a storage pool. The reason for this is that the virtual disk is being created within the storage pool as opposed to being created directly on a physical disk.
Click Next and you will be prompted to enter a name and an optional description for the virtual disk that you are creating. You can call the virtual disk anything that you want, but my advice is to use a descriptive name and to enter a meaningful description of the virtual disk’s purpose. Servers can accumulate a surprising number of virtual disks over time, and it can become difficult to remember what an individual virtual disk is being used for. Rather than struggling with trying to figure out what a virtual disk does later on, it is better to enter a description up front.
Click Next, and you will be taken to the screen shown in Figure C. This screen asks you to select the storage layout to be used by the virtual disk that you are creating. Windows gives you three different storage layout choices.
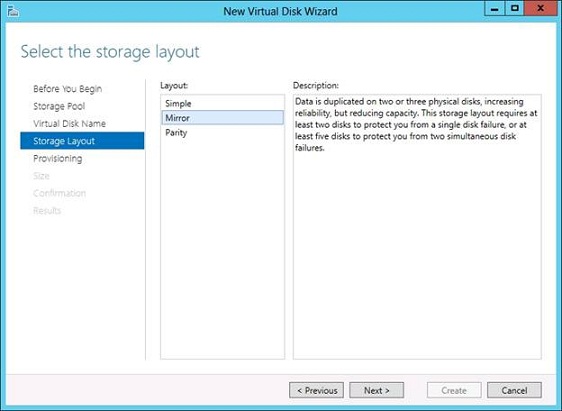
Figure C: You must select the virtual disk’s storage layout.
The first choice on the list is to use a simple layout. It might at first seem as if a simple layout which consists of creating the virtual disk directly on to one of the physical disks within the storage pool. However, a simple virtual disk is actually striped across all of the virtual disks that make up the storage pool. This has the effect of maximizing the virtual disk’s throughput and capacity, but it does so at the cost of sacrificing the reliability. Simple virtual disks are vulnerable to physical disk failure. If any one of the physical disks in the storage pool were to fail, then any simple virtual disks that you have created will be destroyed because unrecoverable data exist on the failed physical disk.
Your second choice for creating a storage layout is to create a mirrored virtual disk. A mirrored virtual disk is a virtual disk that is replicated in its entirety across multiple physical disks. A mirrored virtual disk is much more reliable than a simple disk, but creating a mirrored virtual disk requires a high degree of physical disk space consumption.
At a bare minimum, a mirrored virtual disk requires the storage pool to have at least two physical disks. The mirrored virtual disk is written to both of the physical disks, and the replica virtual disks are kept in sync at all times. This type of configuration results in a high degree of disk capacity consumption because every write operation occurs twice, on two separate disks.
It is worth noting that mirrored disk can take advantage of more than two physical disks. For example, a storage pool containing three physical disks will result in three copies of a mirrored virtual disk. With enough physical disks, a mirror set can protect against the failure of multiple physical disks. For example, a mirrored the virtual hard disk that uses at least five physical disks can survive the failure of up to two physical disks.
The third type of storage layout that you can use is known as parity. Parity delivers performance near that of a simple disk, but with a degree of reliability. If you want to use a parity layout, then the storage pool must have at least three physical disks. The total capacity of the virtual hard disk that you are creating is less than the physical capacity of the underlying physical hard drives because parity information must be stored alongside the data. This parity information is used to recover from a failure of a physical disk.
Click Next, and you will be taken to the wizard’s Provisioning screen, which you can see in Figure D.
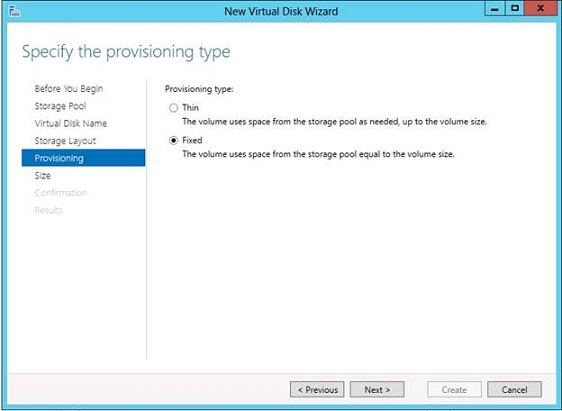
Figure D: Windows gives you the option of thinly provisioning virtual hard disks.
As you can see in the figure, Windows gives you the option of creating a virtual disk that is either thin provision or a fixed length. Fixed length virtual hard disks provide better performance, but do so with the cost of disk capacity. When a fixed length virtual hard disk is created, the specified amount of space is immediately allocated to that virtual hard disk and is not available for other virtual hard disks to use. Thinly provisioned virtual hard disks on the other hand, offer slightly degraded performance but only claim as much physical storage space as is needed.
Click Next and you will be prompted to specify the size of the virtual hard disk. You can create a virtual disk that is as large as the amount of free space within the storage pool. This holds true even if there are already thinly provisioned disks that have already laid claim (but not actually used) the storage space.
Click Next and you will see a confirmation screen. Assuming that everything looks good, click the Create button to create the virtual hard disk.
Conclusion
As you can see, it is relatively easy to create a new virtual hard disk, but you do have to do a bit of planning first, especially with regard to the storage layout. In Part 3 I will talk about what to do with your virtual hard disks once they have been created.
If you would like to read the other parts in this article series please go to:


