Installing ISA Server 2006 Enterprise Edition (beta) in a Unihomed Workgroup Configuration – Post Installation Tasks
By Thomas W Shinder MD, MVP
|
Have Questions about the article? |

If you would like to read the other parts in this article series, then check them out at:
ISA Server 2006: Installing ISA 2006 Enterprise Edition (beta) in a Unihomed Workgroup Configuration
There are a number of basic administration tasks you should take care of immediately after installing the ISA 2006 firewall. These basic firewall administration tasks are independent of the firewall policy you configure later. At this point you’re setting up the basic firewall Web proxy platform to meet the needs of your organization. The post-installation tasks vary with the type of installation (Web proxy mode versus full firewall deployment), the version of ISA firewall installed (Standard Edition or Enterprise Edition) and if Enterprise Edition, the array configuration (single member array, multi-member array, workgroup array, domain member array).
In this article we’ll follow up on the previous article Installing ISA Server 2006 Enterprise Edition (beta) in a Unihomed Workgroup Configuration by providing a post-installation task list. Every ISA firewall administrator installing a single array member, unihomed Web proxy only ISA firewall should perform the following tasks:
- Back up basic configuration
- Assign Enterprise Roles
- Configure CSS Policy Update Interval
- Assign Array Roles
- Configure Alert Definitions
- Change Column Order in the Sessions Monitor
- Configure Recurring Report Jobs
- Customize Reports
- Configure Log Summary and Report Preferences
- Configure Connectivity Monitors
- Configure Firewall and Web Proxy Logging
- Create and Export Frequently Used Filter Definitions
- Enter IP Addresses of Remote Management Computers
- Configure Direct Access List
- Configure Web Chaining Rules
- Enable and Configure the Web Cache
- Disable Unused Application and Web Filters
- Configure Compression Preferences
- Specify Certificate Revocation Settings
- Specify Diffserv Preferences
- Define LDAP and RADIUS Servers
- Configure Intrusion Detection and DNS Attack Detection
- Define IP Preferences
- Configure Flood Mitigation Settings
- System Hardening (optional)
- Back Up the Configuration Again
In the following sections I’ll provide some basic insight into each of these post-installation configuration options. However, because some of these topics are somewhat complex, I’ll limit my discussion to a basic overview with some occasional hard-coded recommendations. For other topics, you’ll need to get our ISA 2006 book (coming up later this year), or read the Help file before making a final decision on some of these configuration options.
Back up Basic Configuration
Just as backing up file servers, mail servers, and Web servers guarantee a good nights sleep, so does backing up the ISA firewall configuration before you make any changes. This is the first thing you should do before you perform your post installation tweaking. Although it would be relatively easy to get back to where you are right now, why worry about it? Just back up the baseline configuration and it’ll be easy to get back there.
Perform the following steps to back up the ISA firewall configuration:
- In the ISA firewall console, right click the top node and click Export (Back Up).
Figure 1

- Click Next on the Welcome to the Export Wizard page.
- On the Export Preferences page, put a checkmark in the Export confidential information and Export user permissions checkbox. Enter and confirm a password to protect this file. Click Next.
Figure 2

- On the Export File Location page, enter a name for the backup file in the text box, then click Next.
Figure 3

- Click Finish on the Completing the Export Wizard page.
- Click OK in the dialog box informing you that the export was successful.
Assign Enterprise Roles
Although there is only a single machine in this ISA firewall Enterprise, you should still configure Enterprise roles. This is where you configure users and groups that are allowed to access the CSS and monitor arrays.
To assign Enterprise roles, right click the Enterprise node in the left pane of the ISA firewall console and click Properties. In the Enterprise Properties dialog box, click the Assign Roles tab. You’ll see what appears in the figure below.
Figure 4

By default, the local administrator of the machine is set as an ISA Server Enterprise Administrator. You can add other users as Enterprise administrators, but keep in mind that since the ISA firewall is not a domain member, those user accounts must exist on the ISA firewall itself. The other Enterprise role is ISA Server Enterprise Auditor. This role enables the user assign to this role to view the configuration of the entire enterprise, as well as perform all monitoring tasks, including configuring the ISA firewall’s log files, configuring Alert Definitions, and monitoring all aspects of the enterprise and arrays in that enterprise.
Configure CSS Policy Update Interval
ISA firewall policy and configuration for ISA Enterprise Edition isn’t stored in the local registry – its stored in the Configuration Storage Server (CSS). The CSS is polled on a periodic basis for changes to firewall policy and configuration and changes are applied to the array. This polling interval is configurable. You can configure the polling interval by right clicking on the name of the array in the left pane of the ISA firewall console and clicking the Properties command. In the array’s Properties dialog box, click the Configuration Storage tab. This tab will look like what you see in the figure below.
Figure 5

On the Configuration Storage tab you can set the polling interval. The default value is 15 seconds. You can change the value to 10 minutes, 60 minutes or a Custom (seconds) interval where you set the number of seconds manually. Keep in mind that the longer the interval, the longer it will take for the changes you make to distribute themselves from the CSS to the active firewall policy.
Assign Array Roles
Array roles are different than enterprise roles. Users assigned enterprise roles are able to exercise the privileges of their roles to all arrays in the enterprise. In contrast, roles assigned at the array level apply only to the specific array to which those users are assigned the specific role. The array role options are slightly different than what you see at the enterprise level. Click the Assign Roles tab in the array’s Properties dialog box to assign array roles.
Figure 6

Note that there are no default users assigned any type of role at the array level. There are three array roles: ISA Server Array Administrator, which is similar to the role of enterprise administrator, ISA Server Array Auditor, which allows the user to view the ISA Server traffic logs for their array, and ISA Server Array Monitoring Auditor, which gives the user viewing privileges over the entirety of their array, including enterprise and firewall policy rules.
Configure Alert Definitions
The ISA firewall includes dozens of pre-built alerts. These alerts are triggered when the ISA firewall detects the parameters of the alert are met. The behavior of the alerts can be customized to meet your specific requirements.
To configure the Alert Definitions, click the Monitoring node in the left pane of the ISA firewall console and then click the Alerts tab in the middle pane of the console. Click the Tasks tab in the Task Pane and then click the Configure Alert Definitions link. You’ll see what appears in the figure below.
Figure 7

The Alerts properties dialog box includes a list of all the available alerts on the ISA firewall. Each of these alerts has a default configuration that you can use right out of the box, or you can customize the default configuration. You can also create new alerts which are based on the built-in alerts, but trigger on different event parameters or have different actions.
Double click on one of the alerts and you’ll see something like what appears in the figure below. On the General tab of the alert’s Properties dialog box, you’ll see a description for the alert, the category to which the alert belongs, and the default severity of that alert. The Enable checkbox determines whether the alert is enabled or not.
Figure 8

Click the Events tab and you’ll see the default parameters that must be met in order to trigger the alert. You can change the trigger parameters here. You can also specify if you want the alert triggered only if a specific server in the array is affected.
Figure 9

Click the Actions tab. Here you can configure the alert to send an email message, run a program, or stop or start Windows services if the alert is triggered based on the settings configured on the Events tab.
Figure 10

Detailed coverage of all the ISA firewall alerts and details of how to configure them and create new alerts are beyond the scope of this article. I may do a future article on this subject, and detailed coverage will definitely be included in our ISA Server 2006 book, due out later this year.
|
Have Questions about the article? |
Change Column Order in the Sessions Monitor
The ISA firewall’s session monitor allows you to see what machines have active sessions with the ISA firewall in real time. By default, the column ordering is a little out of whack, and makes it harder to “eyeball” the information than it should be. You can fix this problem by reordering the columns. In addition, you can add a column that provides you a significant amount of valuable information.
Click the Sessions tab and then click the Add/Remove Columns entry.
Figure 11

In the Add/Remove Columns dialog box, click the Application Name entry in the Available columns list and click Add. This column provides valuable information about what application the user is using to access a resource through the ISA firewall. You can view this information to check for suspicious applications used to connect to Internet resources. You can then disconnect that session in real time. Note that this option is available only if you have correctly deployed the Firewall client in your organization (an ISA firewall best practice, but not an option in a unihomed Web proxy only ISA firewall configuration).
You can use the Move Up and Move Down buttons to change the order of the columns. Use these to change the order of the columns so that they appear as in the figure below. Click OK after making the changes.
Figure 12

Configure Recurring Report Jobs
If there’s one thing to boss likes, its reports. ISA firewall reports provide objective information about what the ISA firewall has been doing to protect and manage network traffic for the organization. For this reason you should schedule report jobs to run on a regular basis and make these reports easily accessible to management.
Click on the Reports tab in the middle pane of the console. Click the Tasks tab in the Task Pane and you’ll see a number of options available to creating and configuring reports. Perform the following steps to create a recurring report job:
- In the Tasks tab of the Task Pane, click the Create and Configure Report Jobs link. This link allows you to create a recurring report job. The Generate a New Report link enables you to create an Ad Hoc report.
Figure 13

- On the Welcome to the New Report Job Wizard page, enter a name for the report in the Report Job name text box. In this example we’ll create a report that runs once a week, so we’ll name the report Weekly Report. Click Next.
Figure 14

- On the Report Content page, select the content you want to include in the report. More is better when it comes to reporting, so select all of the options (the default setting). Click Next.
Figure 15

- On the Report Job Schedule page, you select the frequency for this report. You can select from Daily, Weekly, on specified days and Monthly, on this date every month options. Note that by default, report jobs are run at 1:00AM (0100h). In this example we want to run a weekly report job, so we’ll select the Weekly, on specified days option. You can also select the day of the week you want the report to run. In this example, we’ll select Saturday. Click Next.
Figure 16

- On the Report Publishing page, you have the option to publish the report to a local directory or a network share. The reports are saved as HTML files that can be read in any Web browser. Enter the location where you want the reports published, and the user credentials requires to access the network share. Avoid publishing reports on the ISA firewall itself, as you want to avoid allowing connections to the ISA firewall. Click Next.
Figure 17

- On the Send E-mail Notification page, you have the option to send an e-mail message when the report is created. Enter the address of the SMTP server, the From and To e-mail addresses, and a short message. You can also include a link to the published report. Click the Test button to confirm connectivity with your e-mail server.
Figure 18

- Click Finish on the Completing the New Report Job Wizard page.
- The Report Jobs Properties dialog box shows the report you created.
Figure 19

Customize Reports
The ISA firewall’s reports can be customized to a certain extent. While you still can create reports that drill down on a specific user’s activity, you can customize the type of information included in the reports.
You can customize the following reports:
- Summary Content reports
- Web Usage reports
- Application Usage reports
- Traffic and Utilization reports
- Security Content reports
You can see these options in the figure below.
Figure 20

Click the Customize Web Usage Content link and you’ll see what appears in the figure below. Each of the report customization options allows you a different set of customization features. In the figure below, the Top Users tab is selected. Here you can configure how many users appear in the reports, and the sort order. Similar customization options are available for the other reports. Go through each of the report customizations closely and select those that meet your requirements.
Figure 21

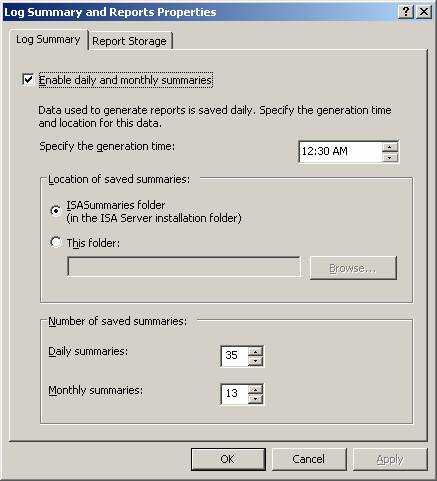
Configure Log Summary and Report Preferences
Along with configuring scheduled reports and customizing reports, you’ll want to configure your log summary options and report storage behavior. On the Tasks tab in the Task Pane, click the Configure Log Summary and Report Preferences link as it appears in the figure below.
Figure 22
In the Log Summary and Report Properties dialog box, click the Log Summary tab. You’ll see what appears in the figure below. By default, log summaries are created daily at 12:30AM local time. Information used to create the reports is stored in the log summaries, so you can’t have a report based on a specific data unless the log summary for that date is available. Note that these log summaries are based on the information in the ISA firewall’s log files. However, once the log summary is created from the log files, the actual log files are no longer required to create a report for that date.
The default location for the log summaries is in the ISA Server 2004 folder tree, in the ISASummaries folder. You can change the location by selecting the This folder option, but you cannot use a network drive or shared folder for this. You can also configure the number of log summaries you want to keep. The default values are 35 Daily summaries and 13 Monthly summaries. I am in the camp of more is better, so I typically keep 365 daily and 48 monthly.
Figure 23
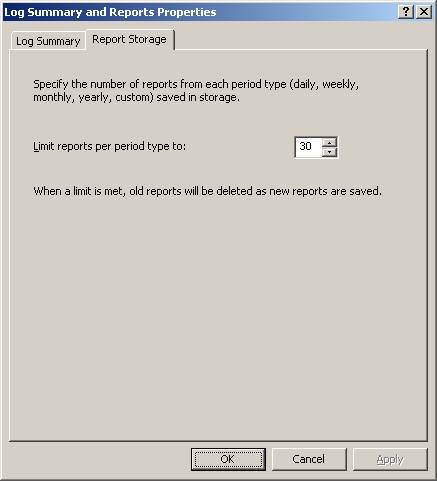
Click the Report Storage tab. This is a new feature in ISA Server 2006. Here you can set the number of reports of each period type that are saved to the local hard drive. The default is 30. I usually change this to something like 365, since I don’t want to have to rerun reports, but you set this based on your available disk space.
Figure 24
Have Questions about the article?
Ask at: http://tinyurl.com/kzbu5
Summary
In this article I went over some basic post-installation configuration options. These post-installation configuration options are applicable to the single member array unihomed Web proxy only ISA firewall configuration. While most of these configuration options apply to other types of ISA firewall deployments, the list provided in this article doesn’t represent a complete list for other scenarios. In the next article in this series, we’ll continue do a drill down on the post-installation configuration options which were not covered in this article.
If you would like to read the other parts in this article series, then check them out at:


