
Get your copy of the German language “Microsoft ISA Server 2004 – Das Handbuch”
Let’s begin
As I wrote above we will use a single Exchange / Domain Controller setup for this article. The configuration is as follow:
- 1 Exchange Server 2003 Standard with SP1 and Windows Server 2003 Standard SP1 as an Active Directory Domain Controller
- 1 Windows XP Professional Computer with SP2 and Microsoft Office Outlook 2003 with SP2
Step by Step
The following steps are necessary to implement RPC over HTTPS in a single Exchange Server environment:
- Configure an Exchange Server 2003 back-end server as an RPC proxy server
- Configure the RPC virtual directory for Basic authentication and SSL
- Configure the RPC proxy server to use specified ports for RPC over HTTP
- Set the NT Directory Services (NTDS) port on all global catalog servers that act as Exchange Server 2003 back-end servers
- Create a Microsoft Office Outlook 2003 Profile for your users to use with RPC over HTTPS
- Test the Connection
Configure an Exchange Server 2003 back-end server as an RPC proxy server
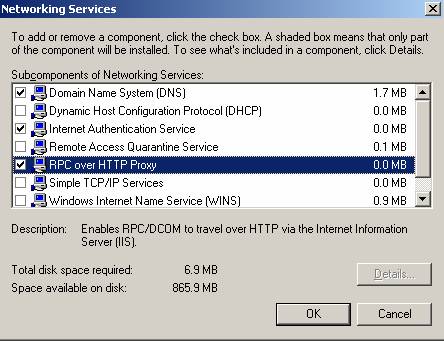
You must install the RPC over HTTP Proxy component on Windows Server 2003. The RPC over HTTP Proxy component is responsible for the encapsulation of RPC packets over HTTP(S) and is a component of Windows Server 2003. Therefore you can install this feature like any other Windows feature with the help of the Add/Remove components wizard.
Figure 1: Installing the RPC over HTTP Proxy
Configure the RPC virtual directory for Basic authentication and SSL
The next step is to configure the newly created RPC virtual directory in IIS to use Basic Authentication and SSL.
Basic Authentication is required to work with RPC over HTTPS and if you use Basic Authentication you must use SSL because Basic Authentication sends user credentials in clear text.
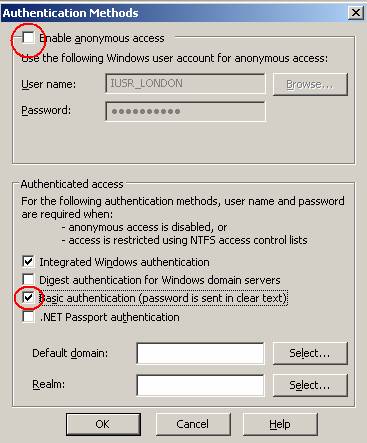
Start the Internet Information Service Manager, navigate to the Default Website and right click the RPC Virtual Directory. Navigate to the Directory Security tab and disable the Checkbox for Enable Anonymous Access and enable the Basic Authentication checkbox. You can leave the Integrated Windows Authentication checkbox unchanged.
Figure 2: Configuration of the RPC Virtual Directory
If you enable the Basic Authentication checkbox you will get the following warning:
Figure 3: Basic Authentication warning
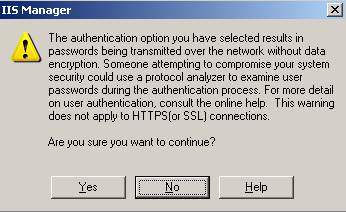
If you use SSL for Virtual Directory you can safely ignore the Warning of the IIS Manager warning.
Next you must enable SSL for the RPC Virtual Directory. For the purposes of this article I assume that you already have an SSL certificate implemented. Check the checkbox Require 128-bit encryption for additional security.
Figure 4: Enable SSL for the RPC Virtual Directory

Configure the RPC proxy server to use specified ports for RPC over HTTP
Now we need to configure the RPC Proxy Server on Exchange Server 2003 to use a specific Port Range. The Registry Key already exists but you must modify the Data.
The path to the Registry is:
HKEY_LOCAL_MACHINE\SOFTWARE\MICROSOFT\RPC\RPCPROXY.
Change the data to what is shown in the following picture. You must use Port Range 6001-6002 for the NetBIOS and DNS FQDN and Port 6004 also for the NetBIOS and DNS FQDN.
Figure 5: Configuring the RPC Proxy Directory (click for larger image)

Set the NT Directory Services (NTDS) port on all Global Catalog Servers that act as Exchange Server 2003 back-end Servers
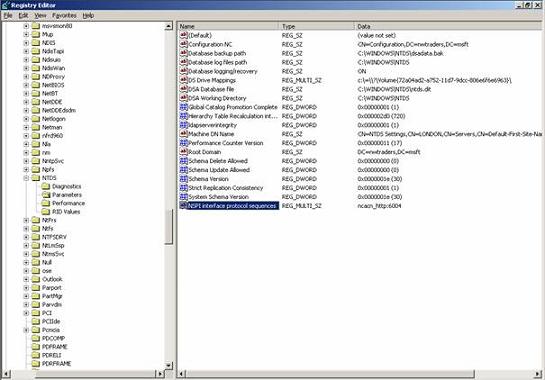
Again we must modify the Registry to specify a static port for the NSPI (Name Service Provider Interface) settings.
Start Regedit and navigate to:
HKEY_LOCAL_MACHINE\SYSTEM\CURRENTCONTROLSET\SERVICES\NTDS\PARAMETERS.
Create a REG_MULTI_SZ Record named NSPI interface protocol sequences with the data NCACN_HTTP:6004 as you can see in the following picture.
Figure 6: Configuring the NTDS –NSPI Protocol sequence
Create a Microsoft Office Outlook 2003 Profile for your users to use with RPC over HTTPS
Next, we must configure the Microsoft Outlook 2003 Profile to use RPC over HTTPS.
Navigate to the Control Panel in your Windows XP Professional Workstation and click the Mail icon. Add a new Mail profile or modify an existing Profile. Navigate to the Connection Tab and check the Checkbox Connect to my Exchange mailbox using HTTP and then click the Exchange Proxy Settings Button.
Figure 7: Enable RPC Proxy Settings

Enter your Server Information, similar to Figure 8.
Figure 8: Exchange Proxy Settings

Test the Connection
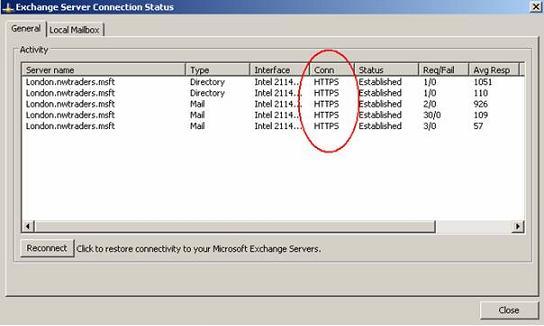
After enabling the RPC Proxy settings, your Outlook connection to the Exchange Server should be established successfully. The question is now: How to determine that it is an RPC over HTTPS connection?
The answer is simple. Right click the Outlook icon in the taskbar while you are holding the CTRL Key. The Context menu opens and now you have the option to see the Exchange Server Connection Status.
Figure 9: Test the RPC over HTTPS connection
Congratulations! You have successfully enabled your Exchange Server 2003 / Microsoft Outlook 2003 environment to use the RPC over HTTPS feature.
Conclusion
Implementing Exchange Server 2003 with RPC over HTTPS in a single Exchange / Domain Controller environment is really simple if you follow the above instructions or the RPC over HTTP Deployment Scenarios Guide for Exchange Server 2003 (link below). With this feature enabled, all your external users can use Outlook over the Internet as if they were locally connected to your LAN. If you have an ISA Server 2004 at your Firewall you can benefit from the advanced features and publish the Exchange Server over RPC/HTTPS.
Related Links
RPC over HTTP Deployment Scenarios Guide for Exchange Server 2003


