If you would like to read the other parts in this article series please go to:
- An Introduction to Network Access Protection (Part 1)
- An Introduction to Network Access Protection (Part 2)
- An Introduction to Network Access Protection (Part 3)
- An Introduction to Network Access Protection (Part 5)
- An Introduction to Network Access Protection (Part 6)
- An Introduction to Network Access Protection (Part 7)
In the previous article in this series, I showed you how to configure the VPN component that will be used to allow external users to gain access to our network. In this article, I will continue the discussion by showing you how to configure the Network Policy Server component.
As I explained earlier in the series, the Network Policy Server’s job is to compare the statements of health that it will receive from PCs that are requesting access to the network against the network health policy. The system health policy dictates what is required of PCs in order for them to be considered healthy.
In the real world, a system health policy would likely require workstations to be running a current Windows operating system, and to have all of the latest security patches. Regardless of what criteria you use to decide whether or not a workstation is healthy, you are going to have to do some work. Health criteria varies so much from one company to another that Microsoft left the system health validator policy empty (at least in the current beta). As such, it will be up to you to configure the system health validator.
For demonstration purposes, we will create a very simple system health validator that simply checks to see if the Windows firewall is enabled. If the firewall is enabled, then we will consider the workstation to be healthy.
As I mentioned earlier in this article series, in the real world you should not host the Network Policy Server on the same box as your VPN server. The VPN server is exposed to the outside world, and hosting the Network Policy Server on this box is just asking for trouble. There is nothing in Windows that prevents you from using the same server for both the VPN components and the Network Policy Server, so for demonstration purposes (and because of a lack of hardware) I will be using the same box to host both components.
Begin the configuration process by entering the MMC command at the Run prompt to open an empty Microsoft Management Console. When the console opens, select the Add / Remove Snap-in command from the console’s File menu. This will cause Windows to display the Add or Remove Snap-Ins dialog box. Select the Network Policy Server option from the list of available snap-ins, and click the Add button. You should now see a prompt asking you if you would like to manage the local computer or another computer. Make sure that the Local Computer option is selected and then click OK. Click OK one more time and the Network Policy Server component will be opened.
At this point, you must navigate through the console tree to NPS (Local) | Network Access Protection | System Health Validators, as shown in Figure A. Now, right click on the Windows System Health Validators object found in the center pane of the console, and select the Properties command from the resulting shortcut menu. This will cause Windows to display the Windows Security Health Validator Properties dialog box, shown in Figure B.
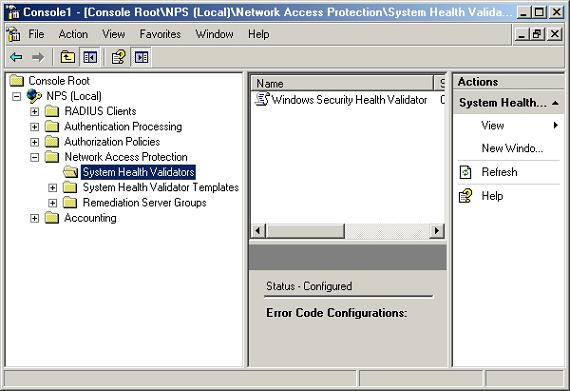
Figure A: Navigate through the console tree to NPS (Local) | Network Access Protection | System Health Validators

Figure B: The Windows Security Health Validator Properties dialog box is used to configure the system health validator
Click the dialog box’s Configure button and Windows will display the Windows Security Health Validator dialog box shown in Figure C. As you can see in the figure, this dialog box allows you to define your system health validator policy. By default the dialog box is configured to require the Windows firewall to be enabled, Windows update to be enabled, and anti virus and anti spyware protection to be installed and up to date. Since we are only interested in making sure that the Windows firewall is enabled, keep the A Firewall is Enabled for all Network Connections check box selected, and deselect all of the other check boxes. Click OK twice to continue.

Figure C: Select the A Firewall is Enabled for all Network Connections check box and deselect all of the other check boxes
Now that you have configured the System Health Validators, you must configure a System Health Validator template. System health Validator templates define the system health validation results. Essentially, this means defining what constitutes a pass or fail when the system health validation is performed on a client.
To configure the Network Policy Server’s health templates, right click on the System Health Validator Template container and select the New command from the resulting shortcut menu. When you do, Windows will display the Create New SHV Template dialog box that’s shown in Figure D.

Figure D: You must create a new system health validator template
As you can see in the figure, the dialog box prompts you to enter a name for the new template. Enter the word Compliant into the Name field. Now, make sure that the Template Type drop down list is set to Client Passes all SHV Checks. Select the Windows System Health Validator check box and click OK.
We have now created a template that defines what it means to be compliant. We must now create a second template that defines what it means for a system to be out of compliance. To do so, right click on the System Health Validator Templates container and select the New command from the resulting shortcut menu. You should now see the same screen that you were working with a moment ago.
This time, name the template NonCompliant. Set the Template Type to Client Fails one or More SHV Checks. Now, select the Windows Security Health Validator check box and click OK. If you return to the Network Policy Server console’s main screen and select the System health Validator Templates container, you should see both the Compliant and the NonCompliant template displayed in the console’s center pane, as shown in Figure E.

Figure E
If you return to the Network Policy Server console’s main screen and select the System health Validator Templates container, you should see both the Compliant and the NonCompliant template displayed in the console’s center pane.
Conclusion
In this article, I have shown you how to configure a system health validator so that Windows will check to see if clients requesting access to the network have the Windows firewall enabled. I then showed you how to create system health validator templates that define what it means to be in and out of compliance with the network health policy.
In the next part of this article series, I will show you how to create health authorization policies. Health authorization policies are the policies that control what happens if a client is compliant with the network health policy, or what will happen if the system that is requesting network access is found to be non compliant. It is these policies that determine what level of access, if any, the client will receive to the network.
If you would like to read the other parts in this article series please go to:
- An Introduction to Network Access Protection (Part 1)
- An Introduction to Network Access Protection (Part 2)
- An Introduction to Network Access Protection (Part 3)
- An Introduction to Network Access Protection (Part 5)
- An Introduction to Network Access Protection (Part 6)
- An Introduction to Network Access Protection (Part 7)


