If you would like to read the other parts of this article series please go to:
- Managing PCs using Windows Intune (Part 1) – Introduction
- Managing PCs using Windows Intune (Part 2) – Preparing Your Environment
- Managing PCs using Windows Intune (Part 4) – Managing Endpoint Protection and Alerts
- Managing PCs using Windows Intune (Part 5) – Remotely Assisting Users
- Managing PCs using Windows Intune (Part 6) – Deploy Software
- Managing PCs using Windows Intune (Part 7) – Licenses Policies Reporting
Introduction
Windows Intune is a subscription-based cloud service from Microsoft that lets you manage and secure your company’s PCs from anywhere using a web-based console. The first two articles in this series introduced Windows Intune and walked you through the process of setting up your environment so you can use Windows Intune to manage your corporate PCs. The next few articles in this series will explore the web-based admin console for Windows Intune and look at the different types of PC management tasks you can perform using this console. We’ll begin in this article by explaining the concept of workspaces and look at the main System Overview workspace of the Windows Intune admin console. Then we’ll show how to perform various PC management tasks using the Computers and Updates workspaces.
Note:
This series of articles is based upon a prerelease version of Windows Intune and the final released version may include additional features not included in this version.

Understanding Windows Intune Workspaces
The left-hand pane of the Windows Intune web-based admin console displays a series of workspaces. Each workspace lets you manage a different aspect of your PC environment. For example, Figure 1 below shows the System Overview workspace, which provides you with a bird’s eye view of the current state of your PC environment by displaying any alerts that need your attention, software updates that require your approval, malware indicates that need to be investigated, and so on.

Figure 1: The top-level workspace is called System Overview.
The ten workspaces shown in these figures can be used to perform the following tasks:
- System Overview – Quick summary of the health of your PCs. This is the first workspace you should go when you want to manage your PCs with Windows Intune.
- Computers – Used to group PCs together to make them easier to manage, display a hardware/software inventory for a PC, approve updates for a PC, run a malware scan on a PC, and so on. You’ll probably spend most of your time in this workspace when managing PCs with Windows Intune.
- Updates – Lists software updates needed to keep your PCs in good health and lets you take action to approve pending updates.
- Endpoint Protection – Lists any malware infections (past or current) and lets you take action on them if needed.
- Alerts – Lists any pending alerts you need to take action on. Also lets you configure alert and notification settings.
- Software – Lists software installed on your computers. Also lets you upload software to the cloud so you can centrally publish and deploy the software to your managed PCs.
- Licenses – Lets you manage your software licenses by uploading them Microsoft Volume License Services (MVLS). You can also manage your third-party software licenses.
- Policy – Lets you create policies to manage settings for Updates, Endpoint Protection, Windows Firewall, and the Windows Intune Center on managed PCs.
- Reports – Lets you create detailed reports of updates, hardware inventory, software inventory and licensing for your managed PCs.
- Administration – Lets you perform various administration tasks including configuring automatic approval rules for updates, creating new types of alerts, configuring recipients and notifications for alerts, configure new Windows Intune admin accounts, download Windows Intune client software for deployment to PCs, and other tasks.
For the remainder of this article we will explore the Computers and Updates workspaces; future articles in this series will examine other workspaces.
Exploring the Computers Workspace
If you select the Computers workspace, the navigation pane appears and displays an overview of the PCs on which the Windows Intune client software has been installed:

Figure 2: Overview pane of Computers workspace
Select the All Computers node in the navigation pane lists all your managed PCs by name:

Figure 3: List of managed PCs
Note that the bottom pane displays more information about the PC that is currently selected in the top pane.
Double-clicking on a PC in the top pane (or right-clicking on it and selecting View Properties) displays detailed information as shown next. Here the General tab displays some general information about the selected PC:

Figure 4: General tab for a PC
Selecting the Hardware tab displays a summary of the hardware for the PC:

Figure 5: Hardware tab for a PC
Selecting the Software tab lists all the software installed on the PC:

Figure 6: Software tab for a PC
Now let’s select Unassigned Computers under All Computers in the navigation pane. Unassigned Computers is a built-in group that contains all PCs that have not yet been assigned to a user-created group:

Figure 7: General tab of Unassigned Computers group
Selecting the Computers tab lists the names of the unassigned computers:

Figure 8: Computers tab of Unassigned Computers group
In a moment we’ll create some groups to group together our PCs to make them easier to manage. But first let’s see what other tasks you can perform from the Computers workspace.
If you right-click on a PC, you’ll see a number of different menu options to select from to perform different administration tasks on the PC. Examples of these options include:
- View Properties – Displays detailed information for the PC as shown in Figure 4 previously.
- Retire – Removes a PC from the admin console. Note that the Windows Intune client software remains installed on the PC, which means it will continue to receive updates and malware protection, but you won’t be able to manage it from the console.
- Remote Tasks – Lets you reboot the PC, run a malware scan on it, or update malware definitions.
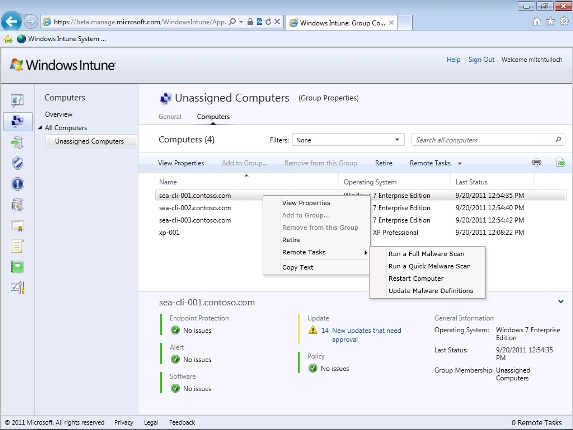
Figure 9: Performing admin tasks on the selected PC.
Note that the above admin tasks can also be performed by clicking the appropriate buttons on the toolbar above the list of PCs.
Now let’s create some computer groups to group our PCs together for easier management. First, our company Contoso Ltd. has three domain-joined PCs at the head office in Vancouver, so lets’ create a new group called Vancouver:

Figure 10: Creating a new computer group named Vancouver.
The next figure shows the newly created Vancouver group. This group currently has no members in it:

Figure 11: The Vancouver group has no members yet.
Now click Add Computers under Tasks on the right, then hold CTRL down and multiselect the three Windows 7 computers in Vancouver:

Figure 12: Adding three Windows 7 computers to the Vancouver group.
Clicking the Add button adds the selected computers to the group:

Figure 13: The three computers have been added to the group.
Clicking OK shows that the Vancouver group now has three computers in it. Note that some of these computers have problems such as malware infections or missing updates—we’ll deal with these issues soon:

Figure 14: Computers in Vancouver.
You can select the Computers tab of the Vancouver group to display more info about a specific computer in this group:

Figure 15: More info about one of the computers in Vancouver.
Now let’s create a second group called Workgroup. This group will be used to group together standalone PCs that are not domain-joined:
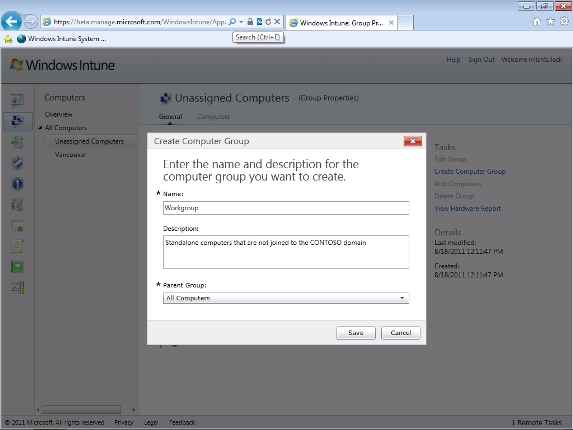
Figure 16: Creating the Workgroup group.
Contoso only has one standalone computer, and it’s running Windows XP, so let’s add it to the Workgroup group:

Figure 17: Adding a standalone PC to the Workgroup group.
If we select Unassigned Computers in the navigation pane, we can see that all our PCs have now been assigned to one of our user-created groups:

Figure 18: There are no more unassigned computers.
As a brief aside here, note that Windows Intune can manage both domain-joined and standalone PCs equally well, including a mix of PCs running Windows 7, Windows Vista and Windows XP. That’s pretty useful for smaller businesses that tend to grow organically by buying new PCs only when they need them which tends to result in a pretty heterogeneous PC environment.
Exploring the Updates Workspace
Now let’s see what we can do from the Updates workspace. Selecting this workspace displays a navigation pane with the Overview pane selected, which gives you a high-level overview of the update status of your managed PCs:

Figure 19: Overview pane of the Updates workspace.
Selecting All Updates displays a list of all updates for your PCs, whether installed or not. This can be a pretty big list:

Figure 20: All relevant updates for your PCs.
To see which updates are actually needed, you can select a category and scroll down until you find an update that has a “1” in the Needed column like this:

Figure 21: This update is needed by one of my PCs.
To see which computer needs this update, click on the link “Computers that need this update to be approved” in the above screen. This displays a filtered list of computers that need this particular update, and you can see that it’s our standalone Windows XP machine that needs this particular update:

Figure 22: List of computers needing a particular update.
To see what you can do with an update, right-click on it. The shortcut menu displayed shows a series of tasks you can perform for the update. These tasks include the following:
- View Properties – Get more info about the update
- Approve | Decline – Approve or decline installing the update on affected PCs.
- View Computers That etc. – Find out which computers need this update, are currently scheduled to receive it, or have tried installing it but failed.

Figure 23: Performing tasks involving updates.
Of course, instead of right-clicking you can also click on a toolbar button to perform these tasks when you’ve selected one (or more) updates from the list.
Let’s get back to that standalone Windows XP machine that needed that .NET Framework service pack. The easiest way to do this is to go back to the Computers workspace and select the Workgroup group:

Figure 24: Standalone computers in Contoso Ltd.
Under the Update Status heading, click the link “Computers that need new updates to be approved” to open the Computers tab of the Workgroup group. Note that our Windows XP machine has 106 updates that need approval—wow!

Figure 25: This computer is missing 106 updates!
Click on the link “New updates that need approval” to display a list of all 106 updates needed by the machine:

Figure 26: List of updates needed by this PC.
Press CTRL+A to select all the updates in the list:

Figure 27: Select all the updates.
Right-click on the selected updates and select Approve:

Figure 28: Approving all 106 updates.
At this point you have the option of configuring approval settings and deadlines:

Figure 29: Configuring approval settings and deadlines
Note the yellow bar at the bottom of the above screen—be sure to read such information when it is displayed.
Since we’re only concerned at the moment about the health of our standalone computers, we’ll configure approval settings only for the Workgroup group. Click on Keep Existing Approvals as shown below, then change this to Install:

Figure 30: Configuring approval settings for the Workgroup group.
Now click Keep Existing Deadline as shown below, and change this to As Soon As Possible:

Figure 31: Configuring approval deadline for the Workgroup group
The deadline As Soon As Possible will install the approved updates at midnight:

Figure 32: Approved updates will be installed at midnight.
By the way, if you want to have the updates installed immediately, select the Custom option instead and set the deadline for something like 5 minutes from now.
Clicking OK in the above screen may display a EULA if an update requires that you accept an EULA before installing the update:

Figure 33: Some updates require that you accept a EULA in order for the update to be installed.
After accepting all the EULAs, the admin console begins processing your approval request:

Figure 34: Approval request is being processed.
When this is finished, you’re returned to the Workgroup group of the Computers workspace. Note that the Update Status message has changed from “1 Computers that need new updates to be approved” (see Figure 24 earlier) to “1 Computers that have pending updates” as shown here:

Figure 35: Approved updates are now pending.
Selecting the Computers tab shows that our Windows XP machine now has 106 approved updates pending installation:

Figure 36: The 106 updates are now pending installation.
When the time comes for the approved updates to be installed, a message will be displayed on the affected PC:

Figure 37: The approved updates are being installed.
Once you’ve used Windows Intune to patch all your managed PCs, the System Overview workspace displays “No issues” under the Updates heading—compare the figure below with Figure 1 at the beginning of this article and also compare the list of alerts at the bottom of each figure:

Figure 38: All PCs are fully updated.
Conclusion
This article showed how to perform various PC management tasks using the Computers and Updates workspaces. The next article in this series will look at the Endpoint Protection and Alerts workspaces.
If you would like to read the other parts of this article series please go to:
- Managing PCs using Windows Intune (Part 1) – Introduction
- Managing PCs using Windows Intune (Part 2) – Preparing Your Environment
- Managing PCs using Windows Intune (Part 4) – Managing Endpoint Protection and Alerts
- Managing PCs using Windows Intune (Part 5) – Remotely Assisting Users
- Managing PCs using Windows Intune (Part 6) – Deploy Software
- Managing PCs using Windows Intune (Part 7) – Licenses Policies Reporting


