If you would like to be notified when Scott Lowe releases the next part of this article series please sign up to the WindowsNetworking.com Real time article update newsletter.
If you would like to read the other parts in this article series please go to:
- Microsoft System Center Service Manager – Part 1: Introduction and Planning
- Microsoft System Center Service Manager – Part 2: Installation
- Microsoft System Center Service Manager – Part 3: Initial Configuration
In the first three parts of this series, you learned about the prerequisites, installation and initial configuration steps associated with Microsoft’s newest entry in the System Center line: Microsoft System Center Service Manager. As the newest entry to the System Center line, Service Desk fills the end-user void in the company’s management line. In this article, you will move from the more behind-the-scene items related to Service Manager to initial actual use of the product. Specifically, you’ll learn about configuration steps that you need to take to start using your Service Manager system, including settings options related to users, problems, incidents, activities, change requests and data retention.
Terminology
You can tell that massive frameworks are complex when they require thousands of pages of literature and teams of consultants to implement them. The Information Technology Infrastructure Library (ITIL) is an example of one such framework. Based on ITIL, the Microsoft Operations Framework (MOF) has the following definitions:
- Incident. In ITIL-speak, an incident is defined as anything that takes place that results in any kind of failure in the infrastructure. In some cases, an incident may be symptomatic of a larger problem. An example of an incident might be a failed network switch or a crashed PC.
- Problem. Problems arise as a result of incident identification in an environment. A problem comes into play when an incident can’t be solved or when a group of incidents begins to point to some common root cause that needs to be solved. For example, if the same user keeps calling with a PC crashing incident and a reboot solves the incident, there is evidence of a larger problem that needs to be solved.
- Change Request. Any kind of modification – addition, change, removal – of anything to or from currently supported and baselined infrastructure items such as desktop computers, network components, application settings or software programs.
- Activity. An activity is a unit of work that is performed as part of managing a problem, resolving an incident, or completing a change request or any other work item.
Configuring incident settings
Bearing in mind that incidents will be the most common item addressed by the service desk, we’ll start by discussing some configuration options that you have with regard to incidents. These settings are configured by going to Administration > Settings > Incident Settings. Select Incident Settings and from the Tasks pane at the right-hand side of the screen, click Properties. This opens the Incident Settings window.
On the General tab of the Incident Settings window, shown in Figure 1, provide to Service Manager a prefix that will be used as new incidents are raised. As users report incidents to the service desk, more detail is better. Therefore, users might be inclined to attach files to the incident report to help define the scope of the incident. Also on the General tab, specify the maximum number of files as well as the maximum size of the files that can be attached to an incident report. Finally, choose the default support group to which incoming incidents are assigned.

Figure 1: Incident General Settings
When you click on the Priority Calculation option in the Incident Settings window, you will get the screen shown in Figure 2. On this screen, you see that there is a matrix that shows Urgency and Impact on a chart. By default, there are nine drop down items with each accepting a value from 1 to 9. In Service Manager’s defaults, 9 is the lowest priority while 1 is the highest. So, a high urgency, high impact incident would be a priority 1 item while a low impact, low urgency incident deserves a 9 priority. These priority calculations are created based on the needs of each individual organization.

Figure 2: Incident priority calculation
When it comes to service desk response time, a priority 1 issue certainly requires faster turnaround than a priority 9 issue. On the Resolution Time tab, choose a target resolution time for each priority level. As you can see in Figure 3, you can associate each priority level a target resolution time. For example, for priority 1 issue – high urgency, high impact – might have a 1 hour resolution time, but priority 9 issues might get a week, a month or even a year by default. Make sure that you define realistic resolution times.
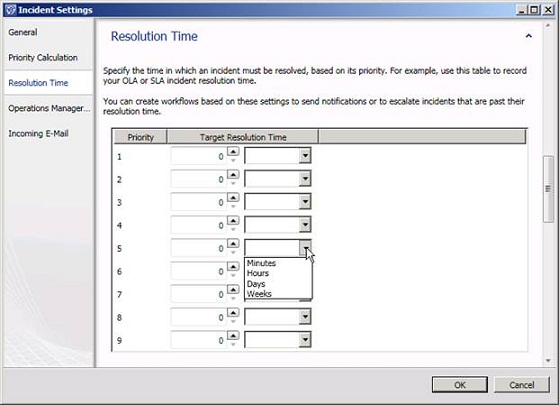
Figure 3: Determine resolution SLAs per priority level
Service Manager can integrate with both Configuration Manager and Operations Manager to create a full-service IT management and monitoring system. If you’re running System Center Operations Manager and you want to integrate it with Service Manager, provide the address for the web console URL on the Incident Settings tab shown in Figure 4.
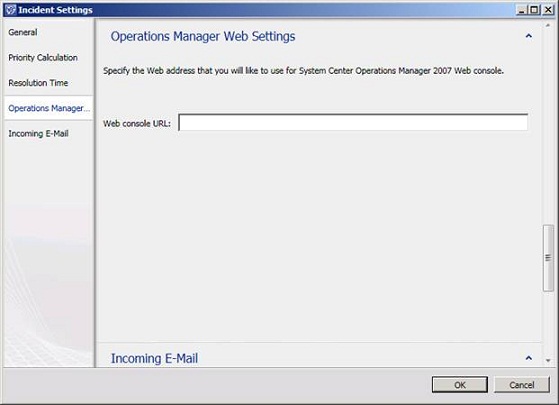
Figure 4: Provide the Operations Manager web console URL
Finally, if you want to enable your Service Manager installation to pick up email messages, configure the settings on the Incoming E-Mail tab with locations for both the SMTP drop folder and the bad folder. Also, if you want to limit the number of incoming messages, change the value in the field next to Maximum number of e-mail messages to process at a time.

Figure 5: Configure incoming e-mail settings
You probably noticed that everything shown was defaults – blanks and a default number of urgency and impact options. You can add additional impact and urgency levels if you like. Go to the Library navigation item and choose Lists. On the list of Lists, you’ll see options for Impact and Urgency (Figure 6). Double-click one of the lists to open the Properties page for that list. On the List Properties page, click the Add Item button to add a new item to the list. You’ll be asked to choose a management pack in which to store updates. You can save them to the unsealed Default Management Pack or create a new management pack just for changes. You should avoid using the Default Management Pack for these kinds of changes when you can and choose instead to create a new management pack by clicking the New button on the requested screen (Figure 7).

Figure 6: Library list items
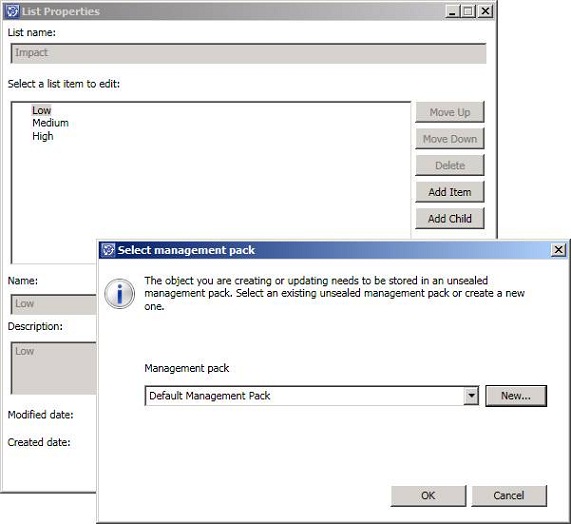
Figure 7: Select management pack
In Figure 8, you’ll see that I’ve clicked the New button and I am creating a new management pack called Customizations. I’ve provided a name for the management pack as well as a description.
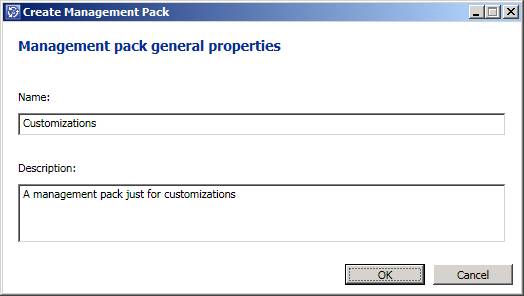
Figure 8: Create a new management pack
Once you’ve created the new management pack, you can add new items to the list. You’ll see in Figure 9 that I’ve added two new items – Low/Medium & Medium/High to the list. Now, if I go back to the Incident Settings page, I see the priority options show in Figure 10. As a note, you’ll see that there are no assigned priorities for the new options. You have to set those after you create the new list items.

Figure 9: New list options have been added
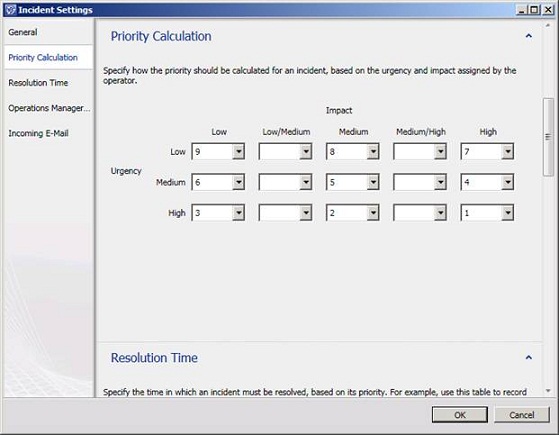
Figure 10: The new priority matrix
Configuring problem settings
You learned earlier about the differences between incidents and problems and also learned that you should have fewer problems than incidents in your organization. In Figure 11, you’ll see the settings available for configuring Problem records. As was the case with incidents, problem records get a prefix, which defaults to “PR”. In the Priority section, you’ll see that the new urgency and impact items we created earlier have made their way to the problems page.
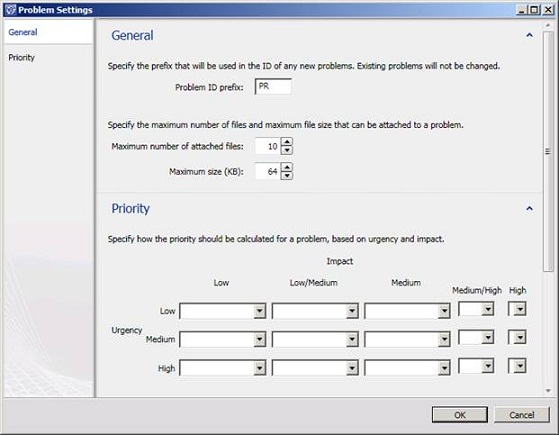
Figure 11: Problem settings configuration
Configuring change settings
Changes that are made to your infrastructure are recorded via change requests in Service Manager with the default prefix of CR, as you can see in Figure 12. Change requests can include files that document the change. On the Change Request Settings page, you can decide how many files can be attached and the size of those files.

Figure 12: Configure your change request settings
Configuring activity settings
Any time a technician works on a problem, incident or change request, that activity should be logged so that there is a clear activity record that can be traced for future reference, if necessary. If you go to the Activity Settings area (Figure 13), you’ll have a place where you can decide which prefixes to use for different kinds of activity logging. There are three activity prefixes to configure:
- Activity prefix. The default prefix is AC.
- Manual activity prefix. The default prefix is MA.
- Review activity prefix. The default prefix is RA. When activities are reviewed, this prefix will be used.
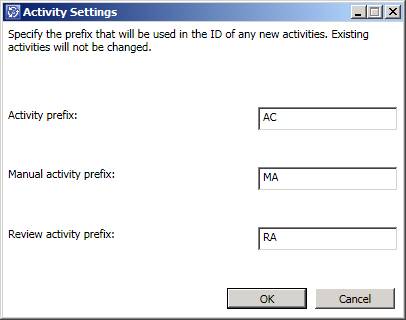
Figure 13: Configure activity request settings
Configuring e-mail notifications
Go to Administration > Notifications > Channels and select E-Mail Notification Channel. Next, from the Tasks pane, click the Configure option. Your first task is the select the checkbox next to Enable e-mail notifications. Then, click the Add button to open the Add SMTP Server window. Provide the fully-qualified domain name for your SMTP server, a port number and an authentication method. If you choose an anonymous authentication, make sure to configure your mail server for relay from the Service Manager system. If you use multiple SMTP servers, use the Up and Down buttons to change the order in which SMTP servers will be used. Figure 14 shows you more.
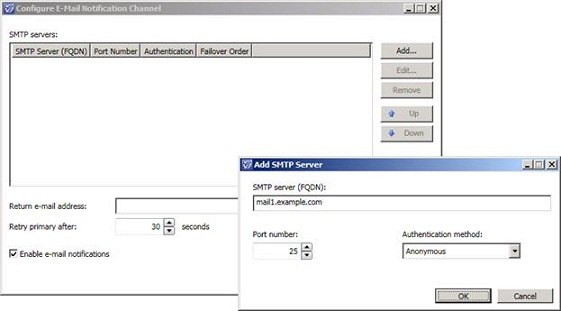
Figure 14: Configure an e-mail notification channel
Managing incident classifications
Service Manager comes with a number of default incident classifications, including networking problems, software problems, e-mail problems and more. It’s expected that you will change the default incident classifications list to meet the needs of your organization. To do so, go to the Library, select Lists and choose Incident Classification. From the Tasks pane, click the Properties option. Use the Add Item button to add new items to the list. You can also choose to remove existing items by selecting that item and clicking the Delete button.
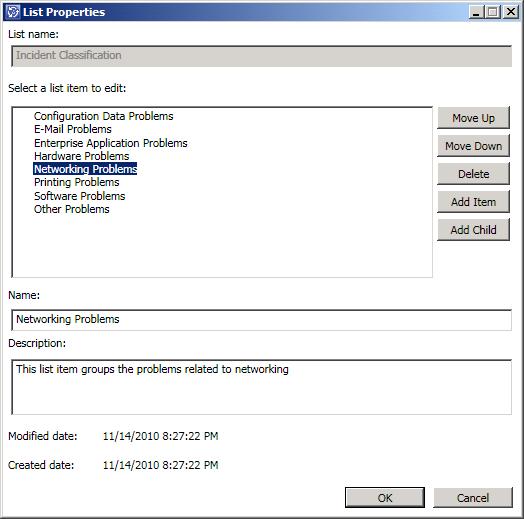
Figure 15
Creating an incident
With some basic information now in place, let’s create a sample incident using the Service Manager console and see what happens. Go to the Work Items navigation area and choose Work Items > Incident Management. From the Tasks pane, click Create Incident. This opens up a page like the one shown in Figure 16.

Figure 16: New incident creation form
On the page shown in Figure 16,
- Affected user. I’ve selected an affected user by clicking the “…” button to the right of the Affected user box.
- Title & description. In the title and description boxes, I’ve typed in relevant information.
- Classification category. Use the drop down arrow at the right hand side of the box and choose an appropriate category.
- Source. There are many ways for a new incident to be raised in Service Manager. In this case, I’ve used the console to add a new incident. Other options include e-mail, phone, the self-service portal and Operations Manager.
- Impact. What kind of impact does this incident have?
- Urgency. What is the urgency for getting the incident resolved?
- Priority. You can’t change the priority here since it’s a function of the matrix we discussed earlier. This is pulled from that matrix.
- Support group. To what group is this incident assigned.
- Assigned to. The name of the specific person handling the request.
Summary
In this part of the series, you learned how to start using Service Manager to record incidents and learned what impact your configuration changes have on the process.
If you would like to be notified when Scott Lowe releases the next part of this article series please sign up to the WindowsNetworking.com Real time article update newsletter.
If you would like to read the other parts in this article series please go to:


