Introduction
In a recent article I did here on ISAserver.org, I went over some of the basic concepts of TMG firewall Networks. In that article, I discussed how the TMG firewall takes advantage of TMG firewall Networks to control how traffic moves to and through the TMG firewall. As you learned, in order to move traffic to or through the TMG firewall, you have to create TMG firewall Networks and then create Network Rules to connect the Networks in order for traffic to pass between the Networks.
However, there is a lot more to TMG Networks than just a collection of IP addresses and Network Rules that define the route relationship between the Networks and I promised you more of the “inside scoop” about TMG firewall Networks. In this article we’ll look at some of the details behind a TMG firewall Network and all of the other things you can do to control the clients behind a Network after you create it.
The Default External Network
Before we get into the details of TMG firewall Networks, let’s take a look at an exception: the default External Network. The default External Network is defined as all IP addresses that are not part of another TMG firewall Network. That’s a pretty broad definition! If you open the TMG firewall console and click the Networking node in the left pane of the console, you’ll see a list of TMG firewall Networks in the middle pane of the console. Double click on the External Network. You’ll see what appears in the in Figure 1 below.
There aren’t many things you can do with the default External Network. The only tabs on the default External Network are the General and the NLB tabs (the NLB tab will only appear if you are using the Enterprise Edition of the TMG firewall). The General tab contains nothing but the network name and description.

Figure 1
The Default Internal Network
OK, so the default External Network isn’t very interesting. Let’s look at something that’s a lot more configurable – the default Internal Network. The options available on the default Internal Network are the same as those you’ll see for any other TMG firewall Network you choose to create. Only the default External Network has the limited options you saw in Figure 1.
When you double click on the default Internal Network, you’ll first see the General tab, which once again is bland. Here you can see the name of the Network and you can also add a description if you like. You probably won’t do that with the default Internal Network, but you might want to do that for other TMG firewall Networks you create. The General tab is shown in Figure 2.

Figure 2
Next, click on the Addresses tab, shown in Figure 3. On this tab, you add the addresses that define the TMG firewall Network. In this example, you can see that the default Internal Network is defined by all the addresses between 192.168.1.0 and 192.168.1.255. You can add these addresses in different ways:
- Add Adapter – This is the best way to add addresses, as it takes advantage of the routing table on the TMG firewall to define the addresses. When you click this button, you select the NIC that you want to be the root of the TMG firewall Network, and then the addresses are automatically configured for the Network.
- Add Private – If you want to add a collection of private address (RFC 1918), you can press this button and then select the private network ID that you want to assign to the TMG firewall Network. Be careful with this one – if you have multiple Internal Networks, you can’t assign the same private network ID to two TMG firewall Networks.
- Add Range – If you want to easily add a range of IP addresses to define your TMG firewall Network, you can click this button.

Figure 3
Click the Domains tab next. It’s shown in Figure 4. On this tab, you enter the domains that you don’t want your clients to go through the TMG firewall to reach. In this example, our internal domain name is tacteam.net. We don’t want clients to connect through the TMG firewall to reach resources that are located in that domain, so we enter that domain in the Domains list. It is important that you enter your internal domains in this list so that the Web proxy and Firewall client (TMG client) will not be used when connecting to these domains. If you don’t enter your internal domains in this list, then the Web proxy and Firewall client computers will forward requests that are sent to those domains to the TMG firewall for name resolution and outbound access, with unexpected and generally undesired results.

Figure 4
Now let’s click the Web Browser tab, which is shown in Figure 5. There are many useful options on this tab:
- Bypass proxy for Web servers in this network – When this option is selected, Web proxy clients will not try to connect to the TMG firewall to access Web servers that are on this TMG firewall Network. This is important because you don’t want to bounce off the TMG firewall to reach resources that are on the same TMG firewall Network as the clients.
- Direct access computers specified on the Domain tab – This option tells Web proxy clients that they should not use the TMG firewall to reach the domains you configured on the domains tab. If you don’t enable this option, only the Firewall client computers will bypass the TMG firewall to reach resources in the domains listed on the domain tab.
- Directly access these servers or domains – If you have domains that you didn’t include on the domains tab, you can enter domains here that you want the Web proxy client to ignore. This means that the domains you list here will be accessed through a method that does not include the Web proxy client configuration (such as the SecureNAT client configuration).
- If Forefront TMG is unavailable, use this backup route to connect to the Internet – This option tells Web proxy clients that if the TMG firewall is unavailable, it should use itsSecureNATconfiguration (Direct access) or use another TMG firewall (Alternative Forefront TMG).

Figure 5
Next, click on the Auto Discovery tab, shown in Figure 6. On this tab, you can enable auto discovery information publishing by putting a checkmark in the Publish automatic discovery information on this network check box. When you enable this option, Web proxy and Firewall clients that are configured to use WPAD, or to use the URL to the autoconfiguration script to receive information from the TMG firewall, will connect to the TMG firewall on the port listed next to the Use this port for automatic discovery requests option to receive information on how to configure the Web proxy and Firewall client (essentially, the information you configure on the tabs in the TMG firewall Network’s Properties dialog box). If you don’t enable autodiscovery publishing, then all the information you configure in this dialog box will not be delivered to the Web proxy and firewall client computers.

Figure 6
Okay, now click on the Forefront TMG Client tab, shown in Figure 7 (this used to be called the “Firewall Client” tab in ISA Server). There are a number of options here that are important for you to understand:
- Enable Forefront TMG Client support for this network – If you plan to deploy Firewall client computers on the clients on this TMG firewall Network, then you need to enable this option so that the Firewall client listener is enabled on the TMG firewall.
- Forefront TMG name or IP address – This is the name that the Firewall client computers will use to connect to the TMG firewall. While you can use an IP address in this box, I recommend that you use a FQDN that maps to the IP address on the interface that acts as the root of this TMG firewall Network.
- Automatically detect settings – When you configure the client to be a Firewall client, it will also configure the Web browser (Internet Explorer) on the Firewall client computer. This option allows the web browser to take advantage of wpad entries in DNS or DHCP to find the TMG firewall computer and configure it to be a Web proxy client to the TMG firewall.
- Use automatic configuration script – This option configures the browser to connect to a URL that points to the TMG firewall computer. After connecting to this URL, the Firewall client computer will pull information from the TMG firewall to configure the client as a Web proxy client. You can use the default URL, or you can configure a custom URL if you want to host the auto-configuration script on a machine that is not the TMG firewall.
- Use a Web proxy server – Use this option if you want to configure the browser on the Firewall client computer to be a Web proxy client, but you don’t want it to use the auto-configuration information that you’ve configured in this dialog box. If you choose this option, the Firewall client computer’s browser will not be aware of which domains to bypass the web proxy client configuration for, and will not be aware of other settings you’ve configured in this dialog box to make the web browser “smarter” as a web proxy client.
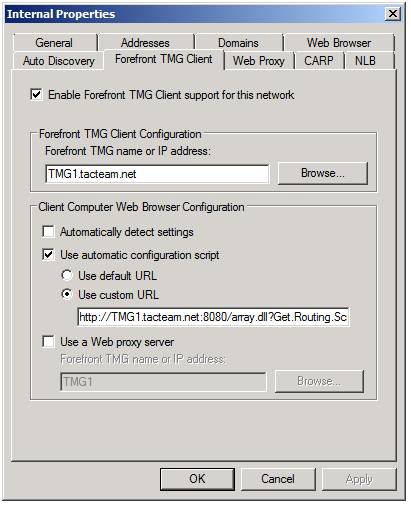
Figure 7
Now it’s time to click on the Web Proxy tab, shown in Figure 8. On this tab, you can enable the web proxy listener on this TMG firewall Network. The web proxy listener must be enabled if you want to support web proxy clients on this Network. The Enable HTTP option allows the web proxy clients to establish an HTTP tunnel to forward web requests to the TMG firewall, using the port listed in the HTTP port text box. The default is TCP port 8080, but you can change this if you want. The Enable SSL option only works when you’re configuring web proxy chaining.

Figure 8
When you click the Authentication button on the Web Proxy tab, you can configure the authentication methods the web proxy listener supports as shown in Figure 9. If your firewall is a domain member (and in most cases it should be) then Integrated should be enabled so that users won’t have to manually enter credentials. If you have non-domain member machines on your network, then you might want to enable Basic so that users can enter credentials manually. RADIUS authentication is also available if your firewall is not a domain member, but in general I do not recommend this option.

Figure 9
The Advanced button on the Web Proxy tab opens the Advanced Settings dialog box that’s shown in Figure 10. Here you can configure the number of connections you want the web proxy listener to accept. The default is Unlimited, but you can set a maximum number of concurrent connections per server, and you can also set the connection timeout in seconds (default is 1800 seconds, which is 30 minutes).

Figure 10
Now let’s click the CARP tab, shown in Figure 11. Here you can enable or disable CARP (Common Address Redundancy Protocol) for this network. When this option is enabled, clients will be instructed to connect to the server that is responsible for the content that the client wants to access. Note that you can also create CARP exceptions, as some web sites expect all requests to come from the same server, and when CARP is enabled, the decision is based on the entire URL, not just the FQDN. When an exception is configured for a particular site, a single server in the array will make the request to content at the destination site.

Figure 11
Finally, click on the NLB tab, shown in Figure 12. If you have more than one firewall in your TMG firewall array, you have the option to enable NLB for high availability. You can set the IP addresses used for the Virtual IPs here. In addition, you can choose to use one of three NLB modes:
- Unicast
- Multicast
- IGMP multicast
Note that you need to configure NLB in the TMG firewall console. Don’t go into the Windows NLB console to configure NLB, since the integrated NLB support is service aware and the Windows NLB is not service aware.

Figure 12
Summary
In this article, we finished up our discussion of TMG firewall Networks by going into the details of the TMG firewall Network. We started by taking a short look at the default External Network, which doesn’t have any configuration options. We then took a deeper dive into the details of the default Internal Network, which has the same options available as any other TMG firewall Network you might create. Keep in mind that the settings on the TMG firewall Networks are important if you plan to deploy Firewall or web proxy clients on the TMG firewall Network. If you’re not planning to deploy any Firewall or web proxy clients behind a particular TMG firewall Network, then the settings for that Network aren’t that important.


