Introduction
Windows Server 2012 has a number of great new features. One of the most welcome new features is the ability to create NIC teams. A NIC team is a collection of network interfaces (NICs) that work together as one. There are many benefits to building a NIC team. The main benefit is bandwidth aggregation. NIC teaming allows the bandwidth of every NIC in the team to be combined, thereby delivering more bandwidth than any single NIC in the team would be able to handle by itself.
Another noteworthy benefit to NIC teaming is redundancy. NIC teaming protects the server against NIC failures. If a NIC within a NIC team fails then the team is able to continue functioning in spite of the failure, but at a reduced capacity.
Technically speaking, NIC teaming isn’t an entirely new feature. Previous versions of Windows Server supported NIC teaming, but only with some very significant restrictions. The main restriction was that the NIC team had to be implemented at the hardware level, not the software level. This meant that you had to purchase server hardware and NICs that natively supported NIC teaming. Furthermore, the server and the NICs had to be provided by the same vendor. Needless to say, this approach to NIC teaming was expensive to say the least.
These limitations are gone in Windows Server 2012. Now NIC teaming can be implemented at the software level, so there is no need to purchase specialized server hardware. Furthermore, the NIC team does not need to be vendor consistent. You can create a NIC team consisting of NICs from multiple vendors.
Another benefit is that a NIC team can be huge. You can combine up to 32 physical NICs into a NIC team. Imagine for a moment that you built a team of 32 ten gigabit NICs. That would be the functional equivalent to having a 320 gigabit connection (minus overhead).
NIC Team Uses
Right about now you might be wondering under what circumstances you can use a NIC team. Generally speaking, a NIC team can be used in any situation that a physical NIC would be used in. NIC teams can handle normal server level traffic, but they can also be used by virtual machines. Having said that, there are a few exceptions. NIC teaming does not work with the following:
SR-IOV
Remote Direct Memory Access (RDMA)
TCP Chimney
Microsoft doesn’t really explain why TCP Chimney isn’t supported (at least not that I have found), but they do indicate that that the reason SR-IOV and RDMA aren’t supported is because these technologies send traffic directly to the network adapter and completely bypass the networking stack, which means that SR-IOV and RDMA are unable to detect the NIC team.
Building a NIC Team
Creating a NIC team is an easy process. To do so, open the Server Manager and click on Local Server. Next, locate the NIC Teaming option in the Properties section and then check to see if NIC Teaming is enabled or disabled, as shown in Figure A.

Figure A: Check to see whether NIC Teaming is enabled or disabled.
Assuming that NIC Teaming is disabled, click on the Disabled link and the NIC Teaming window will open, as shown in Figure B.

Figure B: NIC teams are created through the NIC Teaming console.
Now, go to the console’s Teams section and click on the Task drop down. Select the New Team option. When you do, you will see the NIC Teaming dialog box, shown in Figure C.

Figure C: Use the NIC Teaming dialog box to create the NIC Team.
As you can see in the figure, the dialog box is pretty simple. You can create a NIC team by entering a name for the team and then picking the network adapters that are included in the team. In the figure above I stuck with the default names for the network adapters that were installed in my server, but if you do rename your network adapters then the custom names that you have assigned will show up in this dialog box.
Before you create the NIC team, it is a good idea to define some additional properties. While this certainly isn’t a requirement, doing so gives you more control over the team’s functionality. If you look at the figure above, you will notice that there is an Additional Properties drop down near the bottom of the figure. If you click this drop down, you will be presented with some additional options, as shown in Figure D.
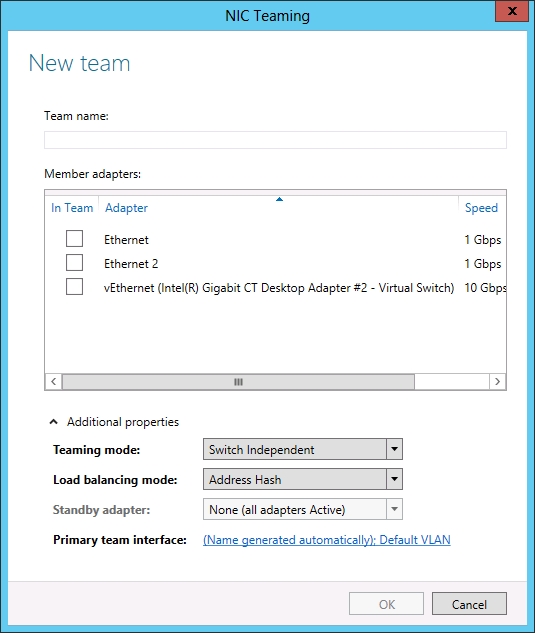
Figure D: There are some additional properties that you can configure.
Teaming Mode
The first option on the list is the teaming mode. You can choose from three different teaming modes. The default option is Switch Independent. As the name implies, switch independent mode lets you build a NIC team without having to worry about your network switches. The NICs that make up the team can even be connected to multiple network switches.
The next option is called Static Teaming. Static teaming is a switch dependent mode. This mode requires you to configure both the computer and the network switch so as to identify the links that make up the team.
The third teaming mode is also switch dependent. It is called LACP, and is based on link aggregation. The advantage to using this type of NIC teaming is that you can dynamically reconfigure the NIC team by adding or removing NICs as your needs dictate.
Load Balancing Mode
The next option on the list is load balancing mode. Load balancing mode lets you choose between two options – Address Hash or Hyper-V port. The Address Hash option is usually the best choice because it allows traffic to be load balanced across all of the NICs in the team.
The Hyper-V Port option balances traffic on a per virtual machine basis. This type of load balancing assigns each virtual machine’s traffic to a specific NIC. The problem with this approach is that virtual machines are unable to take advantage of distributing traffic across multiple NICs.
Standby Adapter
The last option is Standby Adapter. As the name suggests, the Standby Adapter option lets you designate a NIC as a standby spare. That way, if a NIC in the team were to fail then a spare is on hand to take over. It is worth noting however, that you can only designate one NIC as a standby adapter. Windows does not support having multiple spare adapters.
Conclusion
As you can see, NIC teams are relatively easy to set up and configure. The nice part is the degree of flexability that Microsoft gives you when setting up a NIC team. It is up to you for example, if you want to define a standby adapter or not. You might be wondering however, what happens if you choose not to configure any of the additional properties. In this type of situation, Windows takes a one size fits all approach to NIC teaming. The team mode is set to Switch Independent, the load balancing mode is set to Address Hash, and there is no standby adapter defined.


i have already enable it
but i have a problem again how can i give an IP address to tp link wifi router