If you would like to read the previous article in this series please go to: Office Communications Server 2007: Microsoft goes VoIP (Part 1)
If you would like to be notified when Ted Wallingford releases the next part of this article series please sign up to the WindowsNetworking.com Real Time Article update newsletter.
Microsoft Office Communications Server turns Office Communicator into an indispensable conferencing, VoIP and messaging tool for Windows desktop. Find out how to install, configure and begin using Office Communications Server in this hands-on introduction.
Why OCS?
In my previous piece, I looked at the strategic importance of Microsoft’s relatively new Office Communications Server (OCS). Microsoft has made it clear that they want in on the action in the telecommunications sector, and they are applying a familiar strategy: make a solution that runs on Windows, make it available en masse and for free, and then begin to displace established players in the space.
OCS just happens to run on Windows—and that fact alone makes it preferable to many system administrators who have stronger data-networking skills than old-school telecom skills. But simply running on Windows is not a good enough reason to justify an enterprise’s wholesale switch to OCS from an Avaya PBX or a Cisco CallManager.
Instead, OCS fills in some important blanks in other players’ telephony solutions. OCS provides desktop telephony with instant messaging and web-conferencing in a manner that takes advantage of Active Directory, giving Windows Administrators control over all that Office Communicator, Redmond’s desktop telephony application, has to offer. This positions OCS well against competing products from the likes of Citrix, Polycom, and Cisco, which do not play well with Active Directory.
In addition to VoIP telephony and conferencing, OCS also introduces desktop sharing and application sharing, which makes it a great collaboration solution. Users with access to the same pool of OCS servers can talk, message, conference, and now collaborate using shared views and controls of Windows desktop applications.
Architectural Overview of OCS
OCS is available in two editions – Standard and Enterprise. The key difference is that Standard hosts all server components on a single Windows server, whereas Enterprise allows the systems engineer to dedicate different servers to different roles. These roles are organized into pools and can be load-balanced and tied to a dedicated back-end database server, if desired. The feature set of the two editions is the same; the only difference is scalability.
Specialized servers are provided with OCS to deal with specific applications of the suite:
- The IM Conferencing Server provides group-enabled instant text messaging.
- The Web Conferencing Server enables multiparty data collaboration and application sharing.
- The A/V Conferencing Server provides audio and video conferencing.
- The Telephony Conferencing Server facilitates audio conference integration with external telephony conference services.
Microsoft also provides a suite of specialized proxy services which enable you to support the use of OCS with firewalled users. These are called “Edge Servers”, and OCS includes one for supporting SIP traffic from external networks such as the Internet (SIP is the standard protocol used by VoIP phones, one for web conferencing with Internet based users, and one for A/V conferencing with Internet-based users).
Getting Started
By the end of this series, we will have built a fully functional OCS site, but there are a few things you will need first. There are two pieces of software we are concerned with: Office Communicator – the client and OCS – the server. Office Communicator itself requires Windows XP or Windows Vista, while OCS requires Windows Server 2003 running in an Active Directory domain, not a workgroup. RAM is not hugely important to OCS, though it would not be wise to install OCS on a production server, so pick a spare PC with Server 2003, make sure it does not have any other important duties, and you are good to go. One other thing – make sure your server is patched to Service Pack 1 at a minimum.
As with many of Microsoft’s other server software solutions, OCS leverages Internet Information Server (IIS), so you will need to make sure that all the requisite IIS services are installed and running on your Windows Server prior to installation of OCS. Make sure the following services are running: World Wide Web Publishing, IIS Admin, and RPC. OCS also requires .Net Framework 2.0, which it will install if you haven’t already. The SQL Server components that OCS requires will be installed automatically by the OCS installer, so if you do not have SQL Server up and running, do not fret.
Active Directory Preparation
OCS requires a special subset of object classes and service groups in Active Directory (AD), so your AD schema needs to be updated before adding an instance of OCS to your network. Fortunately, Microsoft offers two methods of performing this update. The simplest method is to use the wizards provided in the MSI setup package, which you can download from:
http://office.microsoft.com/en-us/communicationsserver/default.aspx
Snag a copy of Office Communicator while you’re at it. Place the downloaded MSI package on your server in a temporary staging folder and then run it. This will create a setup folder in the path you choose. From here, you’ll launch the OCS installer.
Since OCS requires a Windows 2003 Native domain (and cannot work in a mixed-mode or Windows 2000 domain), you will need to make sure your domain is running at the Windows 2003 functional level. To do this, open Active Directory Domains and Trusts in MMC (you can find this in the Administrative Tools submenu of the Start Menu on one of your domain’s domain controller servers). Then, right click the node with your domain’s name. Select ‘Raise Domain Functional Level’ as in figure 1.
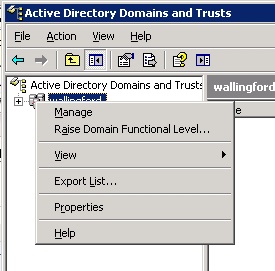
Figure 1: Raising Domain Functional Level
Finally, select Windows Server 2003 from the drop-down list and click Raise, as in Figure 2. Keep in mind that once you have made the leap to the native domain functional level, there is no going back. This is why I stress keeping your OCS testing off of your production network, especially if your production AD needs to run at a lower functional level.
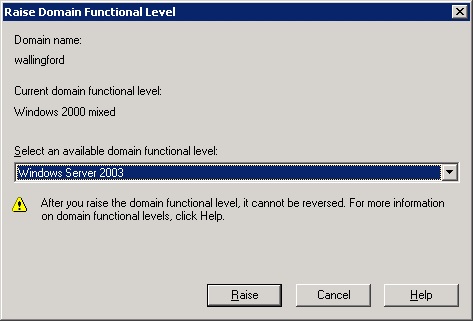
Figure 2: Selecting the domain functional level
Now, you can use the Deployment Wizard, shown in Figure 3, to perform the Active Directory updates. Run it from your domain controller’s server console. Be sure you are logged in as a member of the domain administrators group. There are three AD updates that will be run: Prep Schema, Prep Forest, and Prep Current Domain. All are available through options in the Setup utility for OCS. Run them in order. If you have only one domain controller in your testing environment, as I do, then you can skip the verification steps in between them.

Figure 3: OCS 2007 Deployment Wizard
Installation
Once the Deployment Wizard steps for Active Directory updating are done, you are ready to install OCS. Re-run the setup utility from the folder where you unpacked the downloaded MSI package, and click the “Deploy Standard Edition Server” link. Then, click the Run button next to the “Deploy Server” label. The only wizard step worth taking note of here is the Web Farm FQDN step, where you are prompted to enter the address of a server that can be used for aggregation of distribution group and address book information. In this case, we are just going to use the host name of the local host – the server where we are installing OCS.
The following step, Location for Database Files (shown in Figure 4), asks you where you want the installer to build the databases that will be used by OCS. It would not be a good idea to store these on your system disk (usually C:) or your swap partition, if you are using a dedicated one. Once you finish this step, breeze through the rest of the wizard.

Figure 4: Location for Database Files
There is no need to install SQL Server either; the necessary components will be set up by the installation wizard automatically. This takes a few minutes, so grab a cup of coffee.
OCS Initial Configuration
The third step in the Deployment Wizard window is the Configure Pool/Server Wizard – run it now. The first step is to select the server you want to configure – by default, you will be offered the name of the server you just installed, which is what we want. (See Figure 5.) Click Next, and you will be prompted to create a list of local SIP domains.
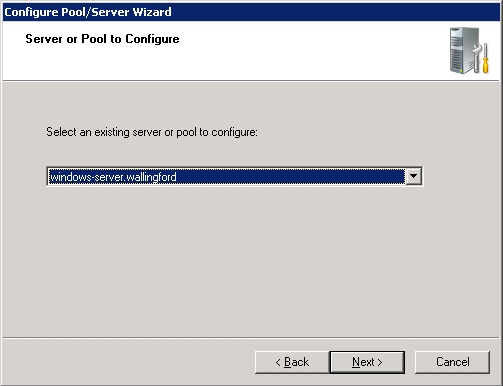
Figure 5: Select an OCS server to configure
A SIP domain is a top-level organizational unit for SIP endpoints, equivalent to and often named identically to an Internet domain. A SIP endpoint is any device that participates in media sessions using the SIP protocol – these could be servers, PBXs, web conferencing software programs, IP phones, or any other device that uses SIP to establish media sessions. In this case, accept the default suggestion, which should be the name of the Active Directory domain name in which this server is a member.
Keep in mind, a SIP domain may or may not be the same as your Windows domain name. In a public, Internet-connected SIP environment, it will likely be something different, as SIP domains are intended to be used with the Internet-standard top-level domain scheme. Too cut a long story short – using your Windows domain name is fine for inside-your-premise use of OCS, but if your Windows domain name is not resolvable by DNS on the public Internet, then you will be in violation of the SIP standard if you attempt to use it there.
In the Client Logon Settings step, I would suggest selecting “Clients will be configured manually for logon”. This will give us an opportunity to explore client configurations in greater detail later on. At the following step, choose “do not configure for external user access” and click Next. Finish the wizard, and you are ready to move to the next configuration step.
The next step in the setup utility is the Certificate Wizard, which will generate encryption certificates that can be utilized by the web conferencing server to create secure connections across the network. After the welcome, select “create a new certificate” and click Next. Submit the automatically-generated certificate request to the local server, whatever its name is. If the Certificate Authority is installed on the local server, then its name will automatically appear for selection. If not, you will need to visit Add/Remove Windows Components in Control Panel and install Certificate Services. Once Certificate Services is running, you can generate and validate the certificate needed by OCS.
Finally, click the Run button for step 7, Start Services. If you have done everything correctly, OCS will fire up and you can move to the final step, Validate Server Functionality.
Install Office Communicator on a Workstation
Office Communicator 2007 is available in beta form, a free download from the address provided above. Installation is straightforward. Just run the installation wizard and you are ready to launch Communicator 2007 on your Windows desktop.
What’s Next?
In the next installments of this OCS series, we will cover setting up instant messaging, voice and video conferencing, user administration, and some enhanced security and management features like I.M. filtering. We will even set up Communicator Web Access – so you can see how IIS can facilitate mobile instant messaging.
Additional Resources
Deployment guide download
Office Communicator
If you would like to read the previous article in this series please go to: Office Communications Server 2007: Microsoft goes VoIP (Part 1)
If you would like to be notified when Ted Wallingford releases the next part of this article series please sign up to the WindowsNetworking.com Real Time Article update newsletter.


