If you would like to read the next parts in this article series please go to:

Introduction
In part 1 of this series on what’s new in the TMG Beta 2 firewall, we took a look at what’s new and cool in the Array and Monitoring nodes. This week we’ll look at the Firewall Policy and Web Access Policy nodes.
Firewall Policy Node
The Firewall Policy node has always been my favorite. Here you create the Access Rules and Publishing Rules that form the heart of the TMG firewall’s functionality. When you click on the Firewall Policy node in the left pane of the console, click the Tasks tab in Task Pane on the right side of the console. There you will see what appears in the figure below.
Notice that there are a number of new options and relocation of options that used to be placed in other areas of the firewall console in previous versions of the ISA firewall.


Figure 1
One of the new options you see in the Task Pane is the Configure VoIP entry. When you click that link you will see the SIP Configuration Wizard as seen in the figure below. Using the SIP Deployment Wizard, you can configure the TMG firewall to protect an IP PBX that uses the SIP protocol, a feature that wasn’t included in previous versions of the ISA firewall.
Note in the SIP Configuration Wizard that we support three primary scenarios:
- External IP PBX
- Internal IP PBX connected to a PSTN gateway
- Internal IP PBX connected to an external IP PBX server
In a future article I will go through the configuration wizard and explain how to use the TMG to protect your SIP PBX deployments.

Figure 2
When you click the Configure VoIP Settings link in the Task Pane, you will see the VoIP Settings dialog box. Here you can enable internal SIP clients to register with an external SIP server. Other settings available here are:
- Default external registration port for SIP
- Base port for SIP external registration after the default port
- Number of registration ports for SIP in addition to the default port
In addition, you can configure SIP Quotas by clicking the Configure SIP Quotas button.
This will bring up the Flood Mitigation dialog box and land you on the SIP Quotas tab. On the SIP Quotas tab you can configure the following:
- Global max number of registrations on the filter
- Max number of registrations for specific IP address
- Global max number of calls on the filter
- Max number of calls for specific IP address
As you probably have gathered at this point, each of these entries is aimed at protecting against flood attacks against the SIP filter.

Figure 3
The Web Access Policy Node
Let us move on to the Web Access Policy node, found in the left pane of the firewall console. Click on the Web Access Policy node and then click the Tasks tab in the Task Pane on the right side of the console. There you will find something that looks very much like what you see in the figure below.
Given that the Web Access Policy node is all new, you would suspect that all the entries on the Tasks tab for this node would also be all new. In fact, a number of familiar configuration options are now found here, having either been moved from other locations of the firewall console or duplicated here to make them easy to access. These updates to the firewall console are intuitive, since all the tasks found here are related to the Web Proxy filter component and features of the TMG firewall.
The Configure Web Access Policy link is new. When you click that the Web Access Policy Wizard will start. In addition, the Configure Malware Inspection and Configure HTTPS Inspection options are also new, as they represent two new feature sets included in the TMG firewall that were not available in previous versions.

Figure 4
The figure below shows a page from the Web Access Policy Wizard. The Web Access Policy Wizard enables you to quickly and easily configure Access Rules that apply only to HTTP and HTTPS connections, and then groups them together to make them easier to manage in the totality of firewall policy. At least that’s the design goal. In a future article we will spend a lot of time on the Web Access Policy Wizard and the results of its configuration. At that time I will leave it up to you to determine if the Web Access Policy Wizard makes things easier than configuring Access Rules on your own, or if it makes it more confusing. At this point I am on the fence, and leaning toward feeling that it is easier just to create Access Rules individually and bypass the wizard. YMMV 🙂
Notice in the figure below that the Wizard allows you to create two general types of policy:
- A simple policy for all Web proxy clients in the organization
- A customized policy that enables per user, per group and per computer access controls
Most security minded organizations are going to use the latter option, but I suspect most organizations that are new to the TMG firewall are going to use the former option until they are comfortable with the TMG’s security model. Seasoned ISA firewall pros will probably not use the wizard at all, or will use it first out of curiosity and then go back to creating Access Rules manually. It will be interesting to see how Web Access Rules are created by TMG firewall admins after the product is released later this year.
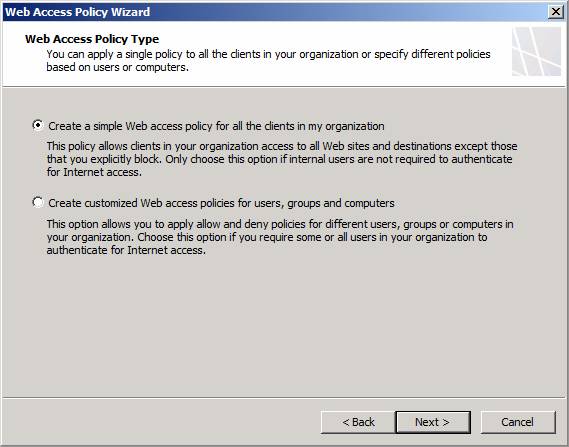
Figure 5
One of the best improvements included with the Forefront TMG firewall is the new malware inspection feature. In previous versions of the firewall, you had to go to a 3rd party to get anti-malware inspection for Web access. No longer! Now it comes built into the TMG firewall. When you click the Configure Malware Inspection link in the Task Pane, you’ll see the Malware Inspection dialog box as seen in the figure below.
Notice the large number of configuration option tabs available with this new feature:
- General – here you enable or disable malware inspection and tell TMG how to handle and empty malware inspection engine (TMG is installed without a malware inspection engine, it must be downloaded after the firewall is installed and connected to the Internet)
- Destination Exceptions – allows you to configure create a list of sites that are exempts from inspection
- Source Exceptions – allows you to configure a list of network entities that are exempt from inspection
- Inspection Settings – allows you to set granular inspection settings, such as blocking encrypted files and blocking “suspicious” files
- License Details – provides information about the anti-malware licensing on the firewall (details of licensing aren’t settled at this time)
- Update Configuration – allows you to set the type of automatic update actions and how often to poll for anti-malware updates
- Storage – TMG creates a folder to temporarily store files for malware inspection, on this tab you can customize the folder location for this activity
- Content Delivery – allows you to configure standard or fast trickling content and allows you to set content-specific exceptions, such as use download progress notifications instead of the default method (fast or standard trickling) for specific content types and use fast tricking instead of the default method (fast or standard trickling) for the selected content types
In a future article we will go through all the details of the Malware Inspection dialog box and take a look at some of the features that might not be clear to you, like the differences between fast and standard trickling and the inspection settings.
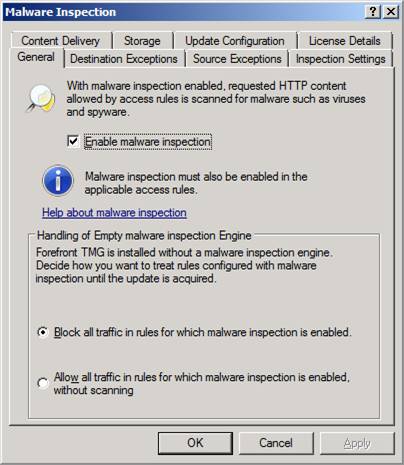
Figure 6
When you click the Configure HTTPS Inspection link you will see the HTTPS Outbound Inspection dialog box. This exposes a long sought after feature – the ability to inspection content hidden inside SSL tunnels. Previous versions of the firewall did not support outbound HTTPS inspection, and you needed the excellent ClearTunnel software from Collective Software to get this level of security (www.collectivesoftware.com). With the TMG Beta 2, this feature is built in. Outbound SSL inspection will allow all of the TMG firewall’s application layer inspection features to be applied to the contents of SSL connections, thus enabling a major improvement in your organization’s security posture.
There are four tabs:
- General – here is where you enable outbound SSL inspection and set what CA that will issue the certificates generated to impersonate the destination SSL sites
- Exceptions – here is where you configure sites that are exempt from SSL inspection. These should be trusted sites that you are sure will not contain malware (do such sites exist?)
- Certificate Validations – here is where you set the certificate validation policy that applies to all clients making SSL connection request through the TMG firewall; examples include how long to wait to block expired certificates and whether or not you want to check for server certificate revocation.
- Client Notification – here you set whether or not users are notified that their SSL connections are being inspected. Note that this will require that the Firewall client be installed on the client systems, since this is the vehicle through which the notifications are delivered.
I will do a very nice deep dive for you on SSL inspection in the near future. In fact, this will the subject of my presentation at this year’s TechEd – outbound SSL inspection! I expect you to be there so that you can take the quiz. 🙂
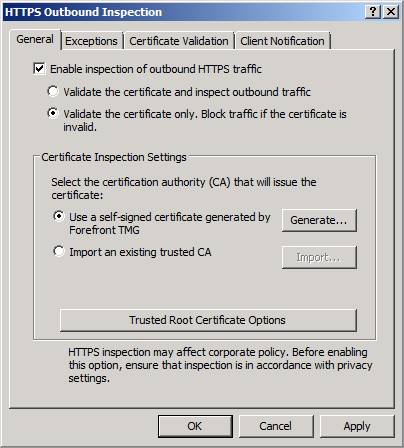
Figure 7
Moving away from the dialog box, if you take a look at the middle pane after creating a Web Access Policy, you’ll see useful information about your Web proxy configuration, such as Web Proxy, Authentication, HTTP Compressions, Malware Inspection, Web Caching and HTTP Inspection status information, as shown in the figure below.
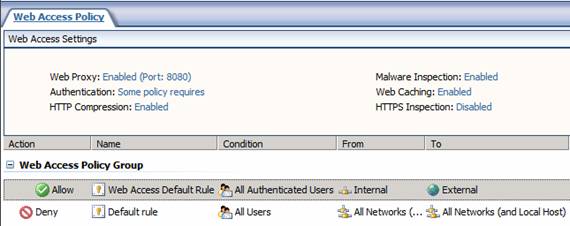
Figure 8
Summary
In this, part 2 of our multipart article series on some of the new and interesting features included in the TMG Beta 2 firewall, we took a look at some of the new options and features exposed in the Firewall Policy and Web Access Policy nodes. In part three, we’ll see what’s new in the E-mail Policy, Intrusion Prevention System and Remote Access Policy (VPN) nodes. Also, remember to register for TechEd 2009 in Los Angeles! I will present on the outbound SSL inspection feature and demo some cool things you can do with it. See you then!
If you would like to read the next parts in this article series please go to:


