If you missed the first part in this article series please read Removing The First Exchange 2003 Server (Part 1).
Introduction
Decommissioning an old Exchange 2003 server is a fairly straightforward process. However, there are additional steps that you need to consider if you are decommissioning the first server within an administrative group. This is because the first Exchange server installed into an administrative group holds specific configuration elements or additional roles that you may not have moved to another Exchange server within the same administrative group. By taking the time to make sure these additional roles have been correctly and successfully migrated to the new Exchange server, you can save yourself a few potential headaches later on when you decide to decommission the old Exchange server.
In part 1 of this 2-part article, we looked at the steps required to replicate several important system folders to the new Exchange server installed into the administrative group. Also covered were the steps required to ensure the Offline Address List is generated by the new server and not the server to be decommissioned. Here in part 2 we’ll cover the remainder of the tasks you need to perform to ensure the first Exchange server can be decommissioned cleanly and successfully.
Re-Homing The Recipient Update Service
The Recipient Update Service, or RUS to give it the acronym that it’s well known by, is an important component of Exchange 2000 and Exchange 2003 that can easily be missed during the server decommissioning process. The RUS is largely responsible for stamping user accounts with the correct addresses and failing to re-home this component to the new Exchange server will result in the loss of this functionality when the old server is decommissioned. This is because the RUS is configured with the names of both an Exchange server and a domain controller, so naturally it’ll be configured with the name of the first Exchange server that you installed unless you’ve changed it at some point. Regardless, it’s worth checking this configuration before you decommission the old server. To change this configuration to the new Exchange server, follow these steps:
- Run the Exchange System Manager snap-in.
- Navigate to the Recipients object and expand it. Underneath this object, you will see the Recipient Update Services object. Highlight this object.
- Now in the right-hand pane you’ll see a list of the Recipient Update Services objects that you have configured. You’ll see a minimum of two of these as shown in Figure 1. The important thing to note from Figure 1 is that any RUS that has the Exchange Server column showing as DCEX1, the server to be removed, needs to be altered.

Figure 1: Recipient Update Services
- Right-click each RUS to be re-homed and choose Properties. You will now be presented with a screen similar to that shown in Figure 2.

Figure 2: RUS Properties
- On the General tab of the properties of the RUS, you’ll see the Exchange server field containing the name of an Exchange server. You need to make sure this is not the old server being decommissioned, in this case DCEX1. If it is set to the old server, you need to change it and you can do this via the Browse button which is used to start the process to choose a new Exchange server. Click the Browse button and in the Select Exchange Server window, type in the new server name and click the Check Names button.
- Assuming the new server name is underlined, click OK to get back to the properties of the RUS and make sure the new server name is now shown in the Exchange server field. If it is, click OK to exit out of the RUS property pages. You’ve now removed the dependency of the RUS on the old Exchange server. Make sure you repeat this process for any RUS that is configured to use the old Exchange server.
Routing Group Masters
This next section really comes into play if you have multiple routing groups and routing group connectors. It’s important to ensure that the server being decommissioned is not the routing group master. For more information on exactly what the routing group master does, see this article here. To change the routing group master, follow these steps:
- Run the Exchange System Manager snap-in.
- Navigate to the relevant routing group and expand it. Under the routing group, select the Members object. In the right-hand pane, the servers within this routing group will be displayed. One of them will be listed as the Master. If this is the server being decommissioned, ensure that the new server is selected as the Master.
- To select the new server as the master, simply right-click that server and choose the Set As Master option. This is shown below in Figure 3 where I’m setting server EX2 as the new Routing Group Master.

Figure 3: Setting The Routing Group Master
- Once you’ve done this, the screen should automatically refresh and the new server should now be displayed as the master. It’s as simple as that.
Additional Connectors
If you have any connectors homed onto the old server, these will have to be re-homed onto the new server. One interesting example would be an X.400 Connector, since the ‘other end’ of the connector would typically point to an IP address, which could well be the IP address of the server ready to be decommissioned. Having said this, X.400 Connectors have become a lot less common over the last few years, but nevertheless it’s one to watch out for.
I won’t dwell any more on this area but you get the general idea. Check your connectors to determine if any of them are dependent on the old Exchange server.
Shut Down For A While
No, this doesn’t mean that after all these steps you can take a break. What I mean here is that it’s now time to decommission the old server by removing the Exchange server software from it. But wait! It’s good practice to shut down the Exchange services for a period of time, at least a few days but preferably a week, to make sure that there are no issues. The last thing you need to be doing is restoring a server because someone or something is still dependant on the presence of the old server. Shutting down the old server for a week should give you plenty of time to see if any issues will arise or not.
Removing Exchange
The last thing that I want to discuss seems to come up quite often within the public newsgroups, mailing lists and web forums. Assuming that you’ve replicated all your public folders, moved all user mailboxes across and followed the steps within this article, you’re now ready to remove the Exchange server software from the old server.
However, after setting the ‘Action’ field to ‘Remove’ against the Microsoft Exchange component within the Exchange Installation Wizard, you are presented with the error shown in Figure 4.

Figure 4: Existing Mailboxes Error
How can this be when you’ve already moved the user mailboxes across? Well, it’s likely that you still have some objects within Active Directory that have Exchange attributes configured for this server. To find these objects, perform the following steps:
- Run Active Directory Users and Computers.
- Right-click your domain towards the top of the left-hand pane and choose Find from the context menu.
- In the Find Users, Contacts, and Groups window, click the Advanced tab.
- Click the Field button and then choose User. From the list of attributes displayed, choose Exchange Home Server.
- Set the Condition field to Ends With and then type the name of the old Exchange server into the Value field.
- Click Add to add this condition to the Condition List. An example of what this should look like is shown in Figure 5.
- Click the Find Now button and you should be presented with a list of objects that still have Exchange attributes. You will need to clear these before you can remove the server. Note that you don’t need to worry about system mailboxes.
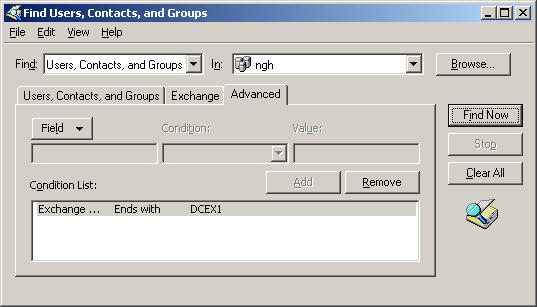
Figure 5: Finding Exchange Attributes
Once you’ve done all of this, you can insert the Exchange server software CD into the server to be decommissioned, run setup and proceed to remove the server.
Summary
When you’ve got an old Exchange server to decommission, you shouldn’t just reach for the power button as there are procedures to follow. This is even more important if you’re decommissioning the first Exchange server that was installed into an administrative group. Hopefully within this article I’ve given you the information you need to successfully and correctly do this.
If you missed the first part in this article series please read Removing The First Exchange 2003 Server (Part 1).


