If you would like to read the other parts in this article series please go to:
- Scripted Network Defense (Part 1) – Programmatic Defense of Windows Hosts Against Network Attacks
- Scripted Network Defense (Part 2) – Perfmon Events and Task Triggers
Introduction
Wireless networking presents many security challenges. Consider a couple of scenarios. In one, you need to take action if a user connects to a specific WiFi network if the Access Point is improperly secured. In the other, your organization is concerned about a futuristic WiFi worm that might piggyback off of Windows 7 wireless hosted networks. Let’s take a closer look at how you might go about addressing these problems.
Advanced WiFi Event Filtering
In the previous article in this series (“Scripted Network Defense – Part Two: Perfmon, Events and Task Triggers“), we looked at how to attach a task to a Windows event. For many purposes that technique is fully adequate but if you need to respond to a more fine-grained set of conditions, you’ll need to use more advanced methods. In this article we’ll look at the use of XPath queries to decide whether or not to execute a task when a specific Windows event occurs. In this case, we’ll focus on Event ID 8001, which Windows logs under:
Event Viewer > Applications and Services Logs > Microsoft > Windows > WLAN-AutoConfig
In our scenario, inspired by a discussion on the Superuser forums, we’re particularly interested in a hypothetical WiFi network “linksys” in the specific case where someone inadvertently connects to it with no encryption. The instant such an event occurs we want to take some action. (Preventing users from connecting to insecure WLANs can also be configured via Group Policy – the intention here is to illuminate a technique that can be adapted for your own purposes). The specific items we’ll be using as our trigger are highlighted in the sample event below:

Figure 1: This event was logged when connecting to an unsecured WiFi network named Linksys
First we’ll attach a Task to this event (see lower right pane above) as in Part 2 of this series:
- At the “Create a Basic Task” screen, accept the default name and click Next
- Click Next at the “When an Event is Logged” screen
- At the Action screen, you can choose anything you like. For our present purposes it’s not important, but for example you might want to apply a specific set of firewall rules via a script, enforce the use of HTTPS, etc. Click Next.
- If you chose to run a Program, select it now, then click Next.
- In Part 2 we just clicked Finish, but this time select the Properties checkbox:

Figure 2: Modifying the properties of a basic task
Once you’re at the Properties dialog:
- Switch to the Triggers tab and click Edit
- Choose Custom Task
- Switch to XML query (this offers the power and flexibility we’ll need)
- Select “Edit query manually” (click Yes if warned about manual edits)
Here’s how it looks on screen:

Figure 3: Manually edit the XPath query
At this point we’ll insert some XPath code (documented here) for filtering just the events we want. If you’ve never used XPath, it’s simply a language that describes how to navigate the nodes of an XML document (the format in which Windows stores event log entries). To figure out what code we need, we’ll view an existing event of the desired type (see left side of Fig. 3) and pick out the pieces we need for our filter.
XPath seems terse and cryptic the first time you see it. For example, the XPath code we’ll use here is:
<QueryList>
<Query Id=”0″ Path=”Microsoft-Windows-WLAN-AutoConfig/Operational”>
<Select Path=”Microsoft-Windows-WLAN-AutoConfig/Operational”>
*[System[Provider[@Name=’Microsoft-Windows-WLAN-AutoConfig’] and EventID=8001]]
and (*[EventData[Data[@Name=’SSID’] and (Data=’linksys’)]])
and (*[EventData[Data[@Name=’AuthenticationAlgorithm’] and (Data=’None’)]]
)
</Select>
</Query>
</QueryList>
But as the screenshot below shows, there’s a fairly straightforward relationship between the event and the XPath filter we devised:

Figure 4: XML record of an event and the XPath code to select for it
Click OK all the way out to save the query and we’re done. To test our work we’d try to trigger the event we’re interested in, e.g. connect to the “Linksys” access point that’s not using any encryption and verify that the program we configured into the Action screen actually runs.
If things don’t work or if you want to edit the XPath later on, you can go to Windows Task Scheduler > Event Viewer Tasks and do a right-click > Properties on the desired task:

Figure 5: Modifing an event viewer task
WMI Jiu-Jitsu
The more interconnected systems become, the more novel the risks that arise. Such is the case with Wireless Hosted Networking, a.k.a. Virtual WiFi, a technology introduced in Windows 7. While not widely used to date, this new WLAN capability virtualizes a host’s network card and allows the PC to become a software-based Access Point. There are valid use cases for Virtual WiFi but there are also risks both to the PC and any WLAN devices connected to it. While Microsoft went to some lengths to secure the technology, a 2011 piece by a white hat hacker, Enterprise Wi-Fi Worms, Backdoors and Botnets for Fun and Profit, discusses a potential futuristic threat that warrants attention. Every time a cool new technology comes out, you can be sure the bad guys are looking for a way to exploit it.
While we won’t go into the specifics of Virtual WiFi very deeply here, suffice it to say that enabling it can be as simple as running two commands:
netsh wlan set hostednetwork mode=allow
netsh wlan start hostednetwork
As the final challenge in our series on scripted network defense, let’s consider how to detect and deal with the hypothetical risk of, say, a zero-day malware exploit that attempts to surreptitiously build a WiFi backdoor network based on Virtual WiFi. One option is to simply use Group Policy to disable the feature:

Figure 6: Group Policy for managing Virtual WiFi
But there is no guarantee that malware running in the local system context via a zero-day flaw in Windows can’t override this. Instead, we want to devise a host-based form of defense-in-depth that automatically detects when Virtual WiFi is enabled and takes appropriate action.
To effect this thrust-and-parry network jiu-jitsu, we’ll use Windows Management Instrumentation (WMI). WMI is an internal Windows database, something akin to a cross between the registry and SNMP, and offers some of the lowest-level, bare-metal system management features available on the Windows platform. It is almost entirely accessible via scripting technology – no need for C# or compiled code. WindowsNetworking.com author Mitch Tulloch did an excellent series on WMI back in 2007. This present article fast-forwards us to 2012, the latest PowerShell techniques, and a completely worked modern example.
Here’s our game plan: similar to the Event Log example earlier, we’ll monitor for a condition and have it trigger an action. Instead of monitoring Event Log entries, however, we’ll be looking for changes directly in the underlying WMI repository. Just as the Event Log in effect “subscribes” to events occurring in the WMI world, we can target them directly ourselves via code. In practice this is less necessary than it used to be because the integration of Tasks, Events and Performance Monitor is much richer than it once was, but you can’t beat WMI when you really need to get down and dirty.
First, let’s just get the lay of the land and see what WMI can actually show us. There are several good GUI tools available. The two I’ve used most are Windows’ built-in WbemTest.exe utility and WMIExplorer, a very nice free PowerShell-based tool. Start it from the command line via powershell.exe ./WMIexplorer.ps1 (you may want to do this from an elevated command prompt to avoid potential permissions issues). Click Connect to bind to the WMI repository (by default the one on your local PC). Most WMI classes of interest are stored under the namespace ROOT\CIMv2 (an acronym for “Common Information Management v2”):

Figure 7: Basic view after launching WMIexplorer
In this example, I’ve scrolled down to the Win32_PerfFormattedData_Tcpip_TCPv4, clicked Get Instances and am viewing the ConnectionsEstablished property. If you’ve ever wondered where Perfmon gets its underlying data, much of it is in this area of the WMI repository. I’ve chosen this example to get us going simply because it’s what we were unwittingly using in the second article in this series.
Now we turn to how to view this data via PowerShell. Here (lines wrapped for readability) are several equivalent ways of getting the same info we got earlier from the Perfmon GUI. Which method you choose depends on the task at hand.
PS C:\> Get-WMIObject -Namespace ROOT\CIMv2 -Class Win32_PerfFormattedData_Tcpip_TCPv4 |
Format-List -Property ConnectionsActive
ConnectionsActive : 2547
PS C:\> $tcpObj = Get-WMIObject -Namespace ROOT\CIMv2 -Class Win32_PerfFormattedData_Tcpip_TCPv4
PS C:\> $tcpObj | Format-List -Property ConnectionsActive
ConnectionsActive : 2547
PS C:\> $tcpObj = Get-WMIObject -Namespace ROOT\CIMv2
-Query “SELECT ConnectionsActive FROM Win32_PerfFormattedData_Tcpip_TCPv4”
PS C:\> $tcpObj | Format-List -Property ConnectionsActive
ConnectionsActive : 2547
Now that we understand the basics of using PowerShell to talk to WMI, let’s move on to our WiFi scenario.
Virtual WiFi
Assuming that a WiFi card is present in your Windows 7 or higher system you can enable the Virtual WiFi capability via the command line. Here’s what things look like on a typical PC before Virtual WiFi is enabled: just a vanilla WiFi connection:

Figure 8: A lone WiFi connection
Using an elevated command prompt, run:
netsh wlan set hostednetwork mode=allow
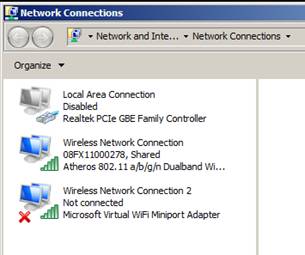
Figure 9: Virtual WiFi Adapter makes its appearance
Note the new “Microsoft Virtual WiFi Miniport Adapter”. Now that it has been enabled, connect it via:
netsh wlan start hostednetwork

Figure 10: Virtual WiFi Adapter in its connected state
WMI Event Query
Our goal is to detect when one of these Virtual WiFi adapters enters a connected state. To do so, we need to find a WMI event that is triggered when this happens. In the present case, we’ll monitor for firings of the WMI event class MsNDIS_StatusMediaConnect (which unlike the data we looked at before, which was in a namespace ROOT\cimv2, is located in the namespace ROOT\WMI).
One of the challenges of working with WMI is simply finding where event data is stored. Documentation helps, but sometimes plain old browsing (and its attendant serendipity) through WMIexplorer is the easiest approach. In this case, the various NDIS (Network Driver Interface Specification) event classes seemed promising and I ended up choosing one that, according to this MSDN article, fires “when the NIC establishes a link layer connection and when the network cable is plugged in or a WLAN NIC comes into range.”
While WMI event monitoring is extremely flexible, there is a bit of a learning curve. One essential distinction is between temporary and permanent event subscriptions. Broadly speaking, programs that run continuously (such as Windows services) usually register to receive WMI events on a temporary basis, that is, only while they’re actually running. If the program isn’t running and an event of interest is triggered, there won’t be anyone listening. An example might be a database program that monitors disk usage via WMI – if the database service isn’t running, there’s no one to receive disk full notifications.
Permanent WMI event subscriptions are the alternative. When the WMIprvSE.exe (WMI Provider) Windows service detects an event for which a subscription exists, it automatically launches a program that has expressed an interest in the event. In WMI-speak, it is said that a binding exists between an event query and an event consumer.
Traditional systems administration is fairly procedural – run a script, it does its job, then exits. To monitor over a long period of time you either need to run the script repeatedly via a Scheduled Task or else have it block in a permanent loop and do repeated sleep/wake polling. In contrast, WMI-based event driven systems administration is an extremely powerful, modern approach that allows systems to do deep self-monitoring and self-healing.
First we’ll take a quick look at how temporary, dynamic event subscriptions work.
- Launch wbemtest.exe as an admin user and connect to the ROOT\wmi namespace:

Figure 11: Launching WbemTest and connecting to a namespace
- Switch to Asynchronous invocation:

Figure 12: Asynchronous speeds up Wbemtest GUI refresh
- Click “Notification Query” and enter “SELECT * FROM NSNdis_StatusMediaConnect” (don’t worry, it’s case insensitive) then click Apply:

Figure 13: Real-time monitoring for NIC connections
- Assuming that you earlier created the Virtual WiFi adapter via netsh wlan set hostednetwork mode=allow, in an elevated command prompt, type:
netsh wlan stop hostednetwork
netsh wlan start hostednetwork - An event should appear:

Figure 14: An event has fired
We’ll come back to this event in just a moment. But first, let’s move on to PowerShell and permanent event subscriptions.
As mentioned earlier, WMI permanent event consumption consists of creating filters, consumers and bindings. A filter consists of a WQL query, a consumer is something that is invoked (e.g. run script, send email, logging), and the binding connects one to the other. What makes this process “permanent” is simply that these filters, etc. are written into the WMI repository in the ROOT\subscription namespace, where they persist between reboots. For a couple of excellent recent tutorials, please see PowerEvents for Windows PowerShell and WMI Query Language via PowerShell.
Here’s the PowerShell code we’ll use to do the trick. The portions you would need to change are bolded:
#
# Create WMI Event Filter
#
$iFilter = ([WMICLASS]”\\.\root\subscription:__EventFilter”).CreateInstance()
$iFilter.QueryLanguage = “WQL”
$iFilter.EventNamespace = “ROOT\wmi“
$iFilter.Query = “SELECT * FROM MsNDIS_StatusMediaConnect“
$iFilter.Name = “Virtual WiFi Watcher“
$Result = $iFilter.Put()
$Filter = $Result.Path # To be used in binding
#
# Create WMI Event Consumer
#
$iConsumer = ([wmiclass]”\\.\root\subscription:CommandLineEventConsumer“).CreateInstance()
$iConsumer.Name = “Virtual WiFi Watch Consumer“
$iConsumer.CommandLineTemplate = “powershell.exe -command C:\admin\scripts\wifiwatch.ps1 %InstanceName%“
$Result = $iConsumer.Put()
$Consumer = $Result.Path # To be used in binding
#
# Establish binding between WMI event filter and consumer
#
$iBinding = ([wmiclass]”\\.\root\subscription:__FilterToConsumerBinding”).CreateInstance()
$iBinding.Filter = $Filter
$iBinding.Consumer = $Consumer
$iBinding.Put()
The event filter is straightforward: we are looking for any event of the MsNDIS_StatusMediaConnect class that fires in the ROOT\wmi namespace. The consumer is a bit trickier. First, there are several kinds of event consumers. Besides CommandLineEventConsumer, which allows you to run a script of your own choosing, Microsoft offers several other so-called Standard Consumers. Second, let’s look at the script, c:\admin\scripts\wifiwatch.ps1:
$BannedAdapterType = “Microsoft Virtual WiFi Miniport Adapter”
if (“$args” -eq “$BannedAdapterType”) {
(Get-WmiObject -Class Win32_NetworkAdapter -Namespace root\CIMV2 `
-Filter “Name=’$BannedAdapterType'”).Disable()
}
The whole point of the exercise is revealed: if the string passed into this external script matches the Virtual WiFi adapter’s stereotypical name, disable the adapter:

Figure 15: Virtual WiFi adapter suppressed as soon as WMI detects it being in a connected state
Within a second or two of being connected (netsh wlan start hostednetwork), the Virtual WiFi adapter is automatically disabled. Defense-in-depth: even if malware tried to circumvent system policies it would run smack into this WMI event-triggered brick wall.
While one could also do this query entirely in the WQL statement:
SELECT * FROM MsNDIS_StatusMediaConnect where InstanceName = “Microsoft Virtual WiFi Miniport Adapter”
I prefer to put this kind of testing logic into a script, which is easier to modify and maintain, and keep the WQL query as generic as possible.
The final tricky part is what appears to be an environment variable: %InstanceName%. The intention is to supply the consumer script with the name of the WLAN adapter that triggered the event. The mechanics of doing so is a mechanism built into WMI called standard string templates that allows you to reference an object’s parameters.
Go back to the Wbemtest query result from earlier and double-click the instance in the results pane. The desired property in this case, the one that held the name required by our script’s logic, is called InstanceName:

Figure 16: Finding the name of a WMI object property for use in standard string templating
WMI can be complicated at first but as you master it, you’ll find that it provides a deep, rich ecosystem for monitoring and defending Windows PCs. There are many other avenues to explore and I hope you’ll give free rein to your own creativity.
If you would like to read the other parts in this article series please go to:


