Introduction
It is no secret that Microsoft needs to work on security for their operating systems. It is also no secret that many of their attempts to date have not worked as seamlessly as they have originally intended. However, Microsoft is finally onto something with the introduction of the new Security Configuration Wizard, which is bundled with Windows Server 2003 service pack 1.
The Wizard works in conjunction with security policies. The resulting security policies can be applied to any server on your network, allowing for consistency and stability of the security settings on all servers. The security policies are created based on a baseline server. Once the security policy is created, it can be applied to the baseline server, or any other server in the organization.
In this article, we will go over the options that you have as you maneuver through the Security Configuration Wizard, starting with the options of how to manipulate the security policies. We will also cover key areas that are targeted by the Wizard, including services, network security, registry settings, administration and other server responsibilities.
Getting to the Security Configuration Wizard
The Security Configuration Wizard is not installed by default after you install Windows Server 2003 service pack 1. You will need to go through the Add/Remove Windows Components applet in Control Panel to install the Wizard.
After the Wizard is installed, you can access it easily by going to the Administrative Tools menu off of the Start Menu. Once you start the Wizard, you will be presented with the screen shown in Figure 1.
Figure 1: Security Configuration Wizard welcome screen

You should note the message that is highlighted with the yellow yield sign. The message indicates that the wizard will detect inbound ports that are being used by this server. This requires that all applications that use inbound ports be running before you run the Wizard and create the security policy.
Working With Security Policies
Once you launch the Wizard, you will first be prompted to make a decision about the security policy you are going to be working with. You can create a new policy, edit an existing policy, apply an existing policy, or rollback the last applied policy. All of these options can be seen in Figure 2.
Figure 2: You need to make an initial decision as to what you need to do with the security policy

Security policies are created as XML files, using the XML file extension. The default security policy storage location is C:\Windows\Security\msscw\policies. You can provide a description with each security policy, which is extremely useful if you have a multitude of policies.
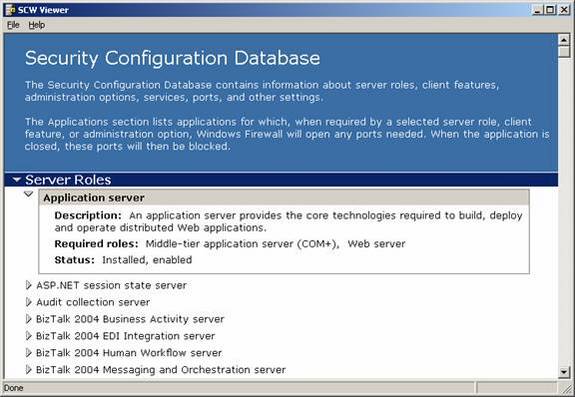
When you work with the security policy XML file, you won’t be working with the file as a whole; you will be working with the file in different sections. These sections are organized and referenced within the Security Configuration Wizard interface using a security configuration database structure. You can view the security configuration database using the SCW Viewer, which can be seen in Figure 3.
Figure 3: The SCW Viewer allows you to see all of the settings that are configured in the security policy, without viewing the native XML code or using an XML viewer
Configuring the Security Policy
Once the security configuration database is generated, you will work within the Security Configuration Wizard to make the security settings desired for a server or group of servers. The Wizard will gently walk you through an assortment of sections related to the roles and functions that the server is responsible for. The following is a summary of the different sections that you will encounter as you configure the security policy.
Role-Based Service Configuration – This section provides a way to configure the services that are installed and available based on the server’s role and other features. The Wizard is not designed to install components or setup a server to perform specific roles. Instead, it is designed to enable services and open ports based on a list of server roles and client features.
Note:
To install components or setup a server for a role, run the Configure Your Server Wizard.
This section is broken down into subsections, which allow you to select server roles, client functions, services, etc. Here is a list of the subsections that you will encounter for the Role-Based service configuration section:
- Select Server Roles
- Select Client Features
- Select Administration and Other Options
- Select Additional Services
- Handling Specific Services
- Confirm Service Changes
Network Security – This section is designed to configure inbound ports using Windows Firewall. The configurations will be based on the roles and administration options that were selected in the previous section. You will also be able to restrict access to ports and configure port traffic to be signed or encrypted using IPSec. The selection of the ports are based on ports and applications that use specific ports, as can be seen in Figure 4.
Figure 4: Network Security is controlled by configuring the ports on the server

Registry Settings – This section is designed to configure protocols used to communicate with computers on the network. Security for communication protocols is important due to legacy Windows operating systems requiring protocols that are vulnerable to password cracking and man-in-the-middle attacks. The key areas that are targeted in this section include:
- SMB Security Signatures
- LDAP Signing
- Outbound Authentication Protocols
- Inbound Authentication Protocols
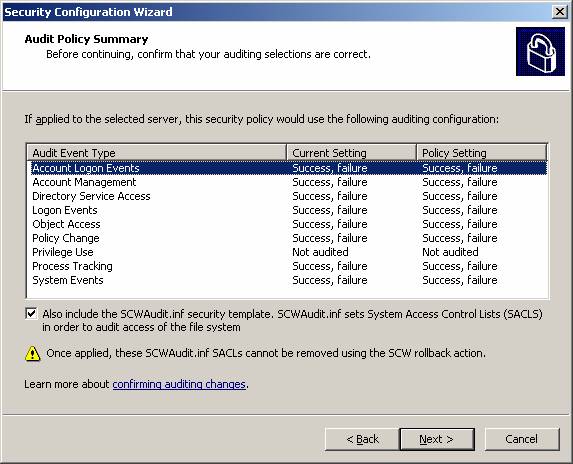
Audit Policy – This section will configure the auditing of the server based on your auditing objectives. The audit policy within the Wizard can be configured to not audit any events, audit only successful events, or audit both successful and unsuccessful events. The audit policy will not only configure the Object Access events, but the entire audit policy list of events. Figure 5 illustrates what the audit policy will be for a server that should be auditing both successful and unsuccessful events.
Figure 5: Audit policy settings.
Internet Information Services – This section will only display if you selected the server to run the Web server role. This section is designed to configure the security aspects of Internet Information Services (IIS). The subsections that you will be shown for this section include:
- Select Web Service Extensions for Dynamic Content
- Select Virtual Directories to Retain
- Prevent Anonymous Users from Accessing Content Files
Summary
Once you have your security policy created, you are empowered to control other computers on the network in a consistent and secure configuration. When you save the security policy you will be given the opportunity to also include one or more security templates within the policy. This added option of including security templates provides a powerful way to centralize the security settings for servers within your organization. An excellent built-in feature of using the security policy is the ability to use the rollback feature. This feature allows you to backout of the most recent security policy application, if applications, service, or other functions fail due to settings that are too secure.