iSCSI is not new technology anymore. In internet time, I would say it’s pretty old by now. So if you are in the process of designing the storage subsystem for your Exchange implementation, you may want to consider using iSCSI. Since the combination of NAS and iSCSI offers an extremely attractive price/performance model, I decided to test the HP NAS device I used in a previous article, this time with an iSCSI configuration.
Introduction
Internet SCSI (iSCSI) is an official standard ratified by the Internet Engineering Task Force (RFC 3720, RFC 3783) that allows the use of the SCSI protocol over TCP/IP networks.
iSCSI technology is today well accepted in corporate production environments, now that Gigabit Ethernet is so widely spread. The use of regular Ethernet infrastructure is the secret of the low cost associated with iSCSI based Storage Area Networks (SAN), a valid alternative to the traditional Fibre Channel SANs.
Some iSCSI concepts are new and others may differ from your past understanding or usage of the terms, so here’s a brief description of iSCSI terminology.
- Initiator—The source of iSCSI commands, which are sent over the network. The initiator can be in the form of a specialized hardware adapter or software, which is used with a standard Ethernet network adapter. In this test environment the Microsoft iSCSI Software Initiator software was used. Microsoft does not support the use of third party iSCSI software initiators on Windows
- Target—The storage device itself, e.g. a Windows Storage Server, iSCSI targets in this case provide security of what initiators are given read and/or write access to the devices.
- iSNS Server—Internet Storage Name Service—a software service used for discovery of devices in iSCSI networks.
Figure 1: iSCSI overview

The HP ProLiant Storage Server iSCSI Feature Pack
Unlike the regular Storage Server Feature Pack that ships in a CD with the HP ProLiant Storage Server, the iSCSI Feature Pack is not free. HP sells it in 2 different versions: the Standalone Edition and the Gateway Edition. For an updated price check with your local HP representative.
The HP ProLiant Storage Server iSCSI Feature Pack adds iSCSI target functionality to HP Storage Server (NAS) devices designed for small and medium business environments. The combination creates an iSCSI Storage Server solution that is capable of hosting file, print, and application storage services on a single platform.
An iSCSI initiator (such as the one from Microsoft) is installed on the Exchange Server 2003 computers to add iSCSI functionality.
Test Scenario
For the purpose of this article I used an HP Storage Works NAS b2000, kindly provided by HP Portugal, with the following configuration:
Figure 2: HP StorageWorks NAS b2000
- Intel Xeon 2.80 GHz Processor with 512-KB level 2 ECC cache
- 1 GB Standard PC2100 DDR SDRAM
- Integrated Smart Array 5i Plus Controller with optional Battery-Backed Write Cache
- 2 x NC7781 PCI-X Gigabit NICs (embedded) 10/100/1000 WOL (Wake on LAN)
- Internal storage: 1×36.4 GB Ultra320 10K drive (for OS); 2 x 9.1 GB Ultra3 10K (for user data)
Setup Process
The setup process is relatively simple and can be divided into four major steps:
- Creation of disk arrays and logical drives on the NAS device
- Installation of the iSCSI Feature Pack on the NAS device and its configuration
- Installation of the Microsoft iSCSI initiator on the Exchange Server and its configuration
- Migration of the Exchange DBs by using System Manager
I’ll start to describe the detailed step-by-step instructions right from the installation of the iSCSI Feature Pack, since the configuration of disk arrays and logical drives is probably already familiar to you.
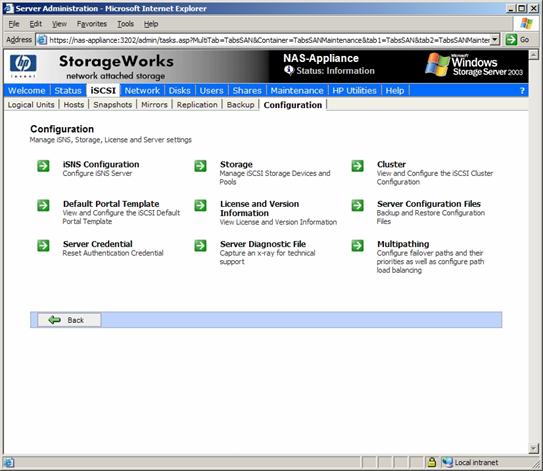
- Install the feature pack on the Windows Storage Server 2003 server. This installation modifies the Web Administration console in order to include iSCSI configuration settings, as shown in Figure 3.
Figure 3: iSCSI Configuration in Web Administration console

- Log into the Windows Storage Server, and launch the Web Administration console. You must enter the key code for the HP ProLiant Storage Server iSCSI Feature Pack before using it (Figure 4). Select the iSCSI tab and the Configuration menu choice. Add the Key Codes for iSCSI Storage Server via the Configuration License Screen (Figure 5).
Figure 4: License warning
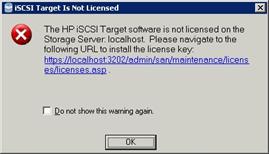
Figure 5: Configuration License screen

- Navigate to iSCSI and then Configuration. Select iSNS Configuration to configure either a remote computer or the local system as an iSNS Server (for device discovery in iSCSI networks).
Figure 6: iSCSI configuration pane
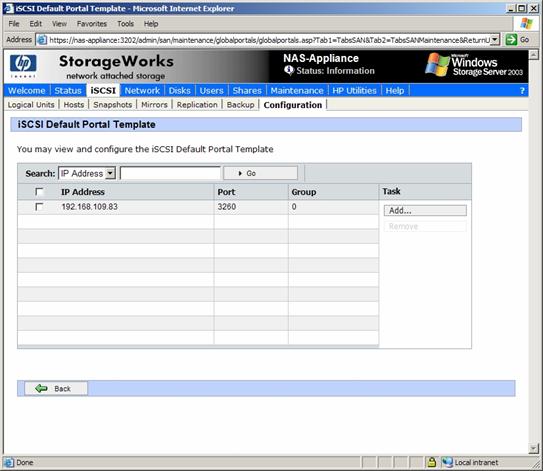
- Select Default Portal Template to verify the portal (combination of IP address, port number, and group number) for this server (Figure 7). By default, the iSCSI Server assigns the host one portal for each network interface card (NIC) IP address. If you have network teaming enabled, the address of that single, virtual team interface should be detected.
Figure 7: iSCSI Default Portal Template
- Select Logical Units and select the New task. Enter a name and the amount of storage to use or all available storage. (Figure 8). Leave the host access at defaults for now and finish creating the logical unit (Figure 9).
Figure 8: iSCSI Logical Units
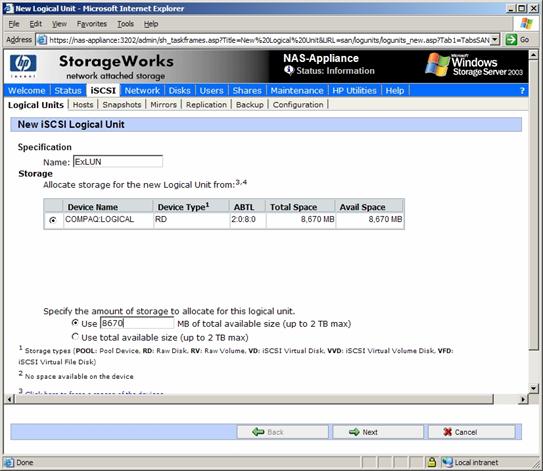
Figure 9: Logical Units Host Access Rights (Default)

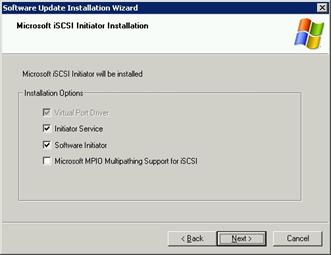
- Download the latest Microsoft iSCSI Software Initiator (Version 2.01 build 1748), and install it on the Exchange Server (Figure 10, Figure 11).
Figure 10: Microsoft iSCSI Initiator Installation Wizard
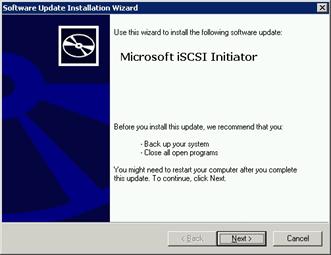
Figure 11: Microsoft iSCSI Initiator Installation Options
- On the Exchange Server, launch the Microsoft iSCSI Software Initiator software either through the Control Panel or the icon on the desktop (Figure 12). Select the Discovery tab and click the Add button. Enter the IP address or name of the Windows Storage Server and click OK (Figure 13). If you get an error saying “the requested name is correct but no data of the requested type was found” this means that the server you entered is not running the HP iSCSI software.
Figure 12: iSCSI Initiator Properties

Figure 13: iSCSI Target selection

- Return to the Windows Storage Server Web Administration console and select Hosts to add the Exchange Server (Figure 14). Enter the server name and keep the option to resolve by server address (as opposed to fully qualified DNS name). Keep the Authentication Type as Anonymous if you prefer no authentication. Select CHAP if you have configured a server secret which the Initiator (Exchange Server) must know or Mutual CHAP if you have configured a secret on both the Initiator and Windows Storage Server.
Figure 14: iSCSI Hosts

- Next, select the Initiator Name/Address pairs from the drop down list (Figure 15) to add to the host and click OK. If there is not a known iSCSI initiator available in the drop-down list, return to the Exchange Server and run the Microsoft iSCSI Software Initiator software to make sure that you have entered the target portal properly.
Figure 15: Initiator Name/Address pairs

- Set the access right for the Exchange Server to Read/Write Exclusive (Figure 16).
Figure 16: Logical Units Access Rights

- On the Exchange Server, run the Microsoft iSCSI Initiator software. Click on the Available Targets tab and the Refresh button, and you should see the iSCSI storage listed, as shown in Figure 17 (if it is not, return to the Windows Storage Server console and select the Host, select the Initiators task and select Add to select the known iSCSI initiator from the drop-down). Select the target and click Log On… In the dialog box (Figure 18) select Automatically restore this connection when the system boots and click OK. The status should show Connected.
Figure 17: iSCSI Targets

Figure 18: iSCSI Target options

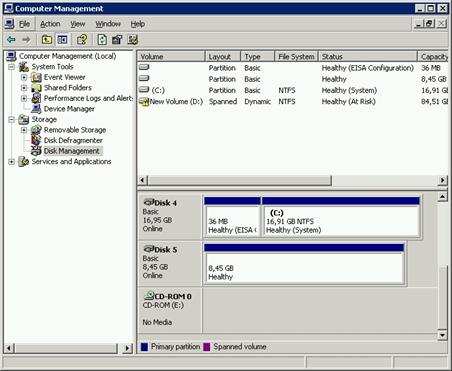
- Launch the Disk Management console (diskmgmt.msc), which can also be found in the Computer Management console (Figure 19). If the new disk does not appear, select Rescan disks. You may see the Initialize and Convert Disk Wizard. Keep the defaults to initialize but not convert the new disk. If the wizard does not run automatically, right-click on one of the new disks and choose Initialize Disk.
Figure 19: Disk Management
- Run diskpart.exe from a command prompt to create a new partition (Figure 19). Be certain that you select the correct disk. Create the partitions using diskpart with the option align=32.
Figure 20: Diskpart

- In the Disk Management console, right-click on the new partition and select Change Drive Letter and Paths… Click the Add button and assign a drive letter. If you do not assign a drive letter to the new volumes first, the format will fail. Next, format the drives using the Disk Management MMC.
- The last step is to move the Exchange databases to the new iSCSI disk. Unlike NAS storage, Exchange sees iSCSI disks as regular storage, so the database move is done through Exchange System Manager. If you read my other article about NAS (http://www.msexchange.org/tutorials/Exchange-NAS-Proved-Approved.html) then you know that this step had to be done with the Remote storage Wizard (RSW).
Performance Analysis
I always like to test the performance behavior of the different storage technologies, so once again I used JetStress and did some quick tests.
For the purpose of this test I used the following scenario:
- 100 Mailboxes
- Average profile (0,5 IOPS/Mailbox)
- 50 Mbytes
Figure 21: Disk Subsystem performance indicators

The test results are all positive. Notice the reduced write latency, below 10ms as it should be. I would have like to test a heavier load, but due to disk space restrictions (I only had 8GB) I was unable to do it.
Conclusion
iSCSI meets the performance needs of a small and medium Exchange solution. Additionally it adds flexibility and ease of management with very low cost, when compared to traditional Fibre Channel SANs. Industry watchers predict that iSCSI SANs will proliferate in 2006 and beyond, so take this technology into account the next time you’re designing a new storage subsystem.
Additional Reading