If you would like to read the other articles in this series please go to:
- An Introduction to Terminal Services Remote Programs (Part 1)
- An Introduction to Terminal Services Remote Programs (Part 2)
- An Introduction to Terminal Services Remote Programs (Part 3)
In the previous article in this series, I demonstrated the procedure for distributing a remote program by means of an RDP file. In this article, I will conclude the series by showing you how to use an MSI file for remote program distribution.
Before I Begin
Before I get started, there are three things that I need to quickly mention. First, in order for the technique that I’m about to demonstrate to work, the new workstation that will be running the remote program must have version 6.0 of the Remote Desktop Connector installed. This is the version that is included with Windows Vista.
Second, in order for a user to be able to run a remote program, the user must be authorized for remote login just as they would need to be if they were going to be working directly from the terminal server.
Third, at the time that this article was written both Longhorn Server and Windows Vista were still in beta testing. As such, any of the techniques that I have described could potentially change by the time the software is released.
Creating an MSI File
Begin the process by selecting the Terminal Services Remote Programs command from Longhorn’s Administrative Tools menu. When the console opens, you should see the Allow list, which contains a list of the applications that you have configured to run remotely. You can see the Allow list in Figure A.
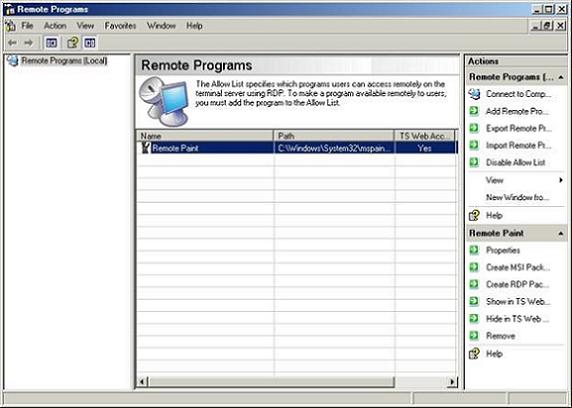
Figure A: The Allow list is a list of programs that you have configured to run remotely
Select the application that you want to create an MSI file for and then click the Create MSI Package link found in the Remote Paint section in the lower, right hand corner of the Remote Programs console. When you do, Windows will launch the Remote Programs Wizard.
Click Next to bypass the wizard’s welcome screen. You should now see a screen prompting you to specify the package settings, as shown in Figure B. As you can see in the figure, the first thing that you must enter it is a location in which to save the newly created package files. By default, the wizard will save newly created package files in the C:\Program Files\Packaged Programs folder, but you can enter any location that you like.

Figure B: You must enter a location for saving packages
After specifying the location for newly created package files, you must enter the port number to be used. Port 3389 is used by default. Normally, there shouldn’t be any reason to change this port number, unless you have configured the Terminal Services to use an alternate set of ports. The last setting of the screen is the server farm setting. If your server is a part of a server farm, then you must select the This Server is Part of a Farm check box, and enter a Farm name. Otherwise, you don’t have to worry about these settings.
Click Next and you will see the screen shown in Figure C. As you can see in the figure, the top half of this screen allows you to choose where the shortcut icons will appear on client computers. By default, remote programs are placed into a start menu folder called Remote Programs. You can enter any folder that you want though, and you also have the option of creating a desktop shortcut by selecting the Desktop check box.
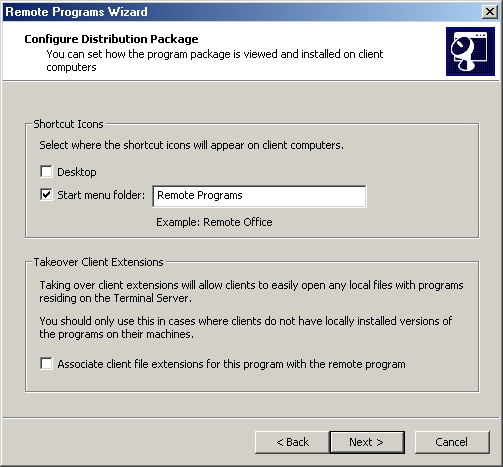
Figure C: Choose the locations where shortcut icons will be displayed on client computers
The bottom half of the screen contains an option for taking over client extensions. If you select this check box, then the remote program that you’re creating the package for will register file extensions on the client when it is installed. For example, a default Windows installation associates the DOC file extension with Wordpad. If you install a remote version of Microsoft Office and you do not select this check box, then any time a client attempts to open a Microsoft Word document by double-clicking on the file, the document will be opened in Wordpad. If, on the other hand, you do select this check box, then double clicking on a Microsoft Word document would cause the document to be opened by Microsoft Word.
Click Next and you will see a screen displaying a summary of the settings that you have chosen. Assuming that all of the information on the summary screen appears to be correct, click the Finish button to complete the process and close the wizard.
The new file that you have created will now appear in the server’s C:\Program Files\Packaged Programs folder (or the location that you have chosen). One thing that is important to notice is that although you have technically created an MSI Windows installer package, the file that you have created does not use the .MSI extension. Instead, the file uses the .RAP extension.
Deploying the Remote Program
Now that you have created a Windows installation package, you can use the package to deploy the remote program onto network clients. Begin the process by copying the Windows installation package that you have created to any location in which it will be accessible by network clients.
Once the file has been copied, go to a workstation that you want to install the remote program onto and double-click on the Windows installation package that you have created. Doing so will launch the Windows installer. Initially, you will be prompted to enter a set of login credentials for a user account that has the authority to install the remote program onto the workstation. This prevents malicious applications from being installed to workstations without user’s knowledge or consent.
After the authentication credentials are entered, the application installation will complete. If you click on the workstation’s Start button and to go to the All Programs folder, you will see that a new folder called Remote Programs has been created (assuming that you use the default folder). The remote application that you installed should be listed beneath the Remote Programs folder.
The first time that you attempt to run the remote application, you may be prompted to enter your password. After doing so, you will see the security warning shown in Figure D. Notice in the figure that you are not only giving the remote application permissions to access your system, you also have the option of controlling the level of access. For example, you can use the various check boxes to restrict access to your local drives, ports, clipboard, and other devices. While setting the appropriate access level is important, you probably don’t want users to be pestered with the screen every time that they access the remote application. That being the case, I recommend selecting the Don’t Prompt me Again for Connections to this Computer check box.
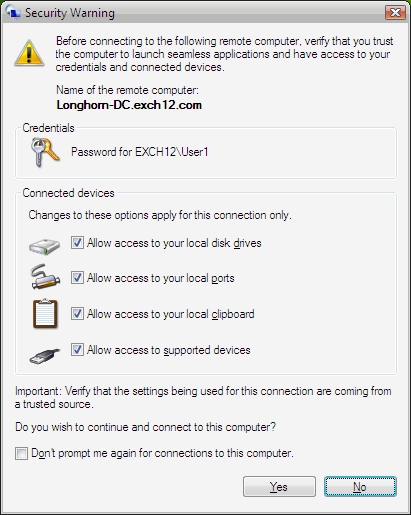
Figure D: A security warning will be displayed the first time a connection is established to a remote program
When you are satisfied with the security settings, click Yes and a remote connection to the application will be established. Figure E shows what the connection process looks like.
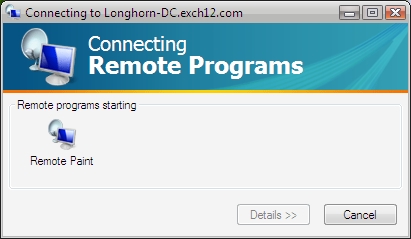
Figure E: Windows will display this message when it is establishing a connection to a remote program
When the remote application does start, it appears in an identical manner to applications that are running locally on the workstation.
Conclusion
As you can see, configuring the Terminal Services to run remote programs involves a fair amount of work. Even so, I believe that the Terminal Services ability to run remote programs will prove to be very handy once Longhorn Server is released because doing so will allow administrators to maintain centralized control of applications, while still allowing users to retain their own individual desktops.
If you would like to read the other articles in this series please go to:
