If you would like to read the other parts of this article series please go to:
- Test Lab Guide: TMG Core Test Lab
- Test Lab Guide (Part 1) – Demonstrate TMG PPTP, L2TP/IPsec and SSTP Remote Access VPN Server
- Test Lab Guide (Part 2) – Demonstrate TMG PPTP, L2TP/IPsec and SSTP Remote Access VPN Server (Cont.)
- Test Lab Guide (Part 4) – Demonstrate TMG PPTP, L2TP/IPsec and SSTP Remote Access VPN Server (Cont.)
Introduction
In part 2 of our VPN Test Lab Guide series, we completed the VPN server configuration. However, as with the ISA firewall that came before the TMG firewall, VPN clients can’t connect to the TMG VPN server until we create some Access Rules to allow VPN client connectivity. Therefore, the next step in this Test Lab Guide is to create a VPN Clients Access Rule.
Create the VPN Clients Access Rule
At this point, the VPN clients can connect to the TMG VPN server, but they can’t really do anything until you create an Access Rule. The Access Rule can be configured to allow VPN clients to connect to the entire internal network, or you can control which parts of the network or even which specific servers on the network the VPN clients can connect to. The TMG firewall offers you very granular control when it comes to specifyingto which resources the VPN clients can connect after establishing the VPN client connection to the TMG firewall.
To create the Access Rule, click the Firewall Policy node in the left pane of the console, as seen in Figure 1 below. In the right pane of the console, click the Create Access Rule link.

Figure 1
This brings up the Welcome to the New Access Rule Wizard page. On that page, enter the name of the Access Rule. In this example, name the Access Rule VPN Clients to Internal and Internet. Note that we must create a rule to enable the VPN clients to access the Internet because the default configuration of the Microsoft VPN client is to disable split tunneling. When split tunneling is disabled, the VPN client must be able to reach the Internet through the VPN server. The client can bounce off the TMG firewall to which it’s connected, or you could configure the VPN clients to connect to the Internet through a different TMG firewall on your network. That’s a subject for another article, and maybe we’ll do that in the future, because performance is a bit better when you have the VPN clients connect to the Internet through a TMG firewall array that’s different from the one to which they’ve established the VPN connection. In this example, though, we’ll configure the TMG firewall so that the VPN client can connect to the Internet through TMG1 – which is the same TMG firewall with which they establish the VPN connection.
After entering the name of the Access Rule, client Next, as shown in Figure 2.
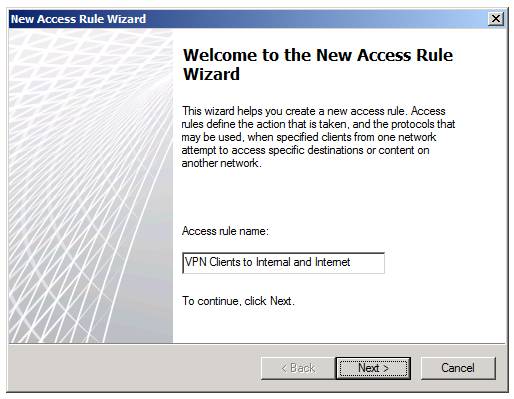
Figure 2
On the Rule Action page, select the Allow option, since this rule is designed to allow connections and not deny connections.
Click Next as shown in Figure 3.
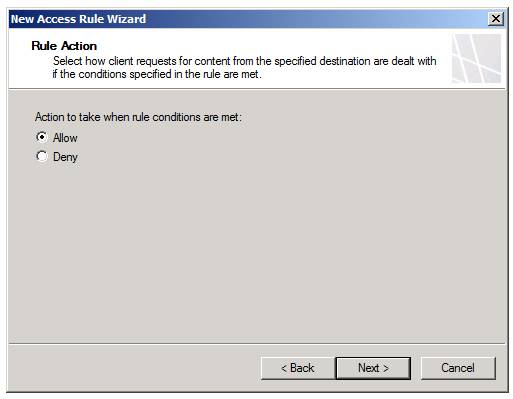
Figure 3
On the Protocols page, select the All outbound traffic option from the This rule applies to drop down list. Note that in a production environment, you would probably be more judicious about which protocols you would allow, so in that case you would choose the Select protocols or the All outbound traffic except selected option.
Select All outbound traffic and click Next as shown in Figure 4.

Figure 4
On the Malware Inspection page, select the Enable malware inspection for this rule option. We want this option enabled because the VPN clients are going to connect to the Internet through the TMG firewall, so we want to make sure that all web traffic is inspected for malware.
Select Enable malware inspection for this rule and click Next as shown in Figure 5.
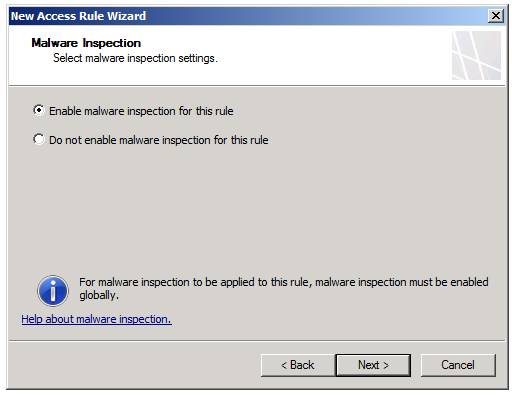
Figure 5
On the Access Rule Sources page, click the Add button. In the Add Network Entities dialog box, click the Networks folder and then double click the VPN Clients entry. Next, click Close in the Add Network Entities dialog box that’s shown in Figure 6. This configures the rule to be applied only to VPN clients, which are defined by a collection of IP addresses dynamically added to the VPN Clients Network by the TMG firewall. When VPN clients connect to the TMG firewall’s VPN server, each VPN client is assigned an IP address, and that IP address is automatically added to the TMG Firewall’s VPN Clients Network.

Figure 6
The VPN Clients Network appears in the This rule applies to traffic form these sources list.
Click Next as shown in Figure 7.

Figure 7
On the Access Rule Destinations page, click the Add button. In the Add Network Entities dialog box, click the Networks folder, then double click the Internal Network and the External Network. Then click Close in the Add Network Entities dialog box as shown in Figure 8.

Figure 8
The External and Internal Networks now appear in the This rule applies to traffic sent to these destinations list. Note that the External Network represents all addresses that are not represented by any other TMG Firewall Network definition. This includes the Internet.
Click Next on the Access Rule Destinations page as shown in Figure 9.

Figure 9
On the User Sets page, use the default setting of All Users. Note that if you wanted to have more granular access controls, you could restrict this rule to apply to specific users. We can do this because the TMG firewall has the user context available to it due to the fact that each user has to log onto the VPN server. The TMG firewall can use this logon information to identify the users and enable user/group based access controls for VPN clients. This enables Firewall client-type functionality in terms of user/group based access controls without requiring the Firewall client to be installed on the VPN clients. However, none of the other features that would be enabled by the Firewall client are available – just the authentication and user identification feature.
Click Next on the User Sets page as shown in Figure 10.

Figure 10
Review the settings on the Completing the New Access Rule Wizard page and click Finish as shown in Figure 11.

Figure 11
The new Access Rule now appears in the All Firewall Policy list. We want to make some changes to the rule, so let’s right click the rule and click the Properties entry as shown in Figure 12.
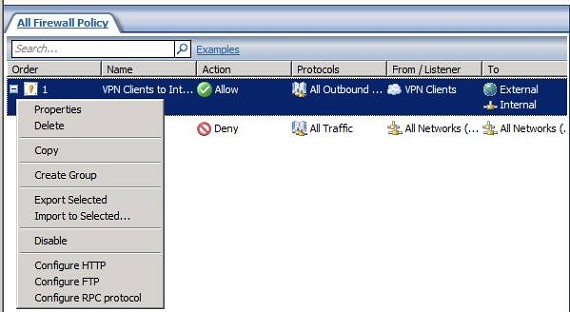
Figure 12
In the VPN Clients to Internal and Internet Properties dialog box, click the To tab. Notice that on the To tab, you can see both External and Internal in the This rule applies to traffic sent to these destinations section, as we configured when we ran the Access Rule wizard. In the Exceptions section, click Add.
This brings up the Add Network Entities dialog box. Click the URL Categories folder. This shows you the list of built-in categories that you can use for URL filtering. Double click the following entries to add them to exceptions list:
- Illegal Drugs
- Malicious
- Obscene/Tasteless
- Pornography
These will now appear in the Exceptions list, as seen in Figure 13 below. This means that the VPN clients will be able to access all Internet sites except those included in these categories.
Click Close in the Add Network Entities dialog box.

Figure 13
In the VPN Clients to Internal and Internet Properties dialog box, click Apply and then click OK. Note that a dialog box appears and informs you that URL filtering is currently disabled and needs to be enabled globally for it to work, as you can see in Figure 14. In a production environment, you should enable URL filtering globally so that the URL filtering will work for the VPN clients (and all the other clients, for that matter). However, in this example, the Test Lab Guide lab is not connected to the Internet, so there’s no reason for us to go through the steps of enabling URL filtering since we can’t demonstrate this feature in the isolated Test Lab.

Figure 14
Click Apply to save the changes and update the firewall configuration. In the Saving Configuration Changes dialog box, click OK after the changes are saved, as shown in Figure 15.

Figure 15
Summary
In this article, part 3 of our configuring the TMG firewall as a remote access VPN server Test Lab Guide, we went through the steps of configuring the TMG firewall with an Access Rule that allows the VPN clients to connect to the default Internal Network and to the default External Network (which represents the Internet). After we created the rule, we customized the rule so that VPN clients have URL filtering applied to them. The reason we need to configure URL filtering to the VPN clients is because the default behavior of the Microsoft VPN client is to disable split tunneling, which means that the VPN clients will need to access the Internet through the TMG firewall’s VPN server. After we created the rule, we saved the changes to the Firewall Policy.
At this point, the VPN server configuration is complete! In the next and final article in this series on configuring the TMG firewall as a remote access VPN server Test Lab Guide, we’ll configure the INET1 DNS server with a split DNS zone (I’ll explain in that article why we need to do that) and then we’ll configure the Microsoft VPN client software to support PPTP, L2TP/IPsec, and SSTP connections. See you then! –Deb.
If you would like to read the other parts of this article series please go to:
- Test Lab Guide: TMG Core Test Lab
- Test Lab Guide (Part 1) – Demonstrate TMG PPTP, L2TP/IPsec and SSTP Remote Access VPN Server
- Test Lab Guide (Part 2) – Demonstrate TMG PPTP, L2TP/IPsec and SSTP Remote Access VPN Server (Cont.)
- Test Lab Guide (Part 4) – Demonstrate TMG PPTP, L2TP/IPsec and SSTP Remote Access VPN Server (Cont.)


