If you missed the previous parts in this article series please read:
- Testing Applications for Vista Compatibility, Part 1
- Testing Applications for Vista Compatibility, Part 2
- Testing Applications for Vista Compatibility, Part 3
- Testing Applications for Vista Compatibility, Part 4
- Testing Applications for Vista Compatibility, Part 6
In the previous article in this series, I began showing you how to make sense out of the application compatibility data that you have collected. In this article, I will continue the series by showing you how to work through known compatibility issues.
For our analysis, we will be using the Windows Vista Application Reports, which are available through the Microsoft Application Compatibility Manager. You can access these reports by opening the Application Compatibility Manager, and navigating through the console tree to Windows Vista Reports | Applications. When you do, you will see a screen that’s similar to the one that’s shown in Figure A.

Figure A: The Windows Vista Application Report is the primary tool for analyzing application compatibility
I have already shown you in a previous article how the Windows Vista Application Report screen lists all of the applications that have been inventoried, and the number of known issues for each application. Now let’s delve a little bit deeper into this list.
If you look at Figure A, you will notice that the report lists one compatibility issue for Microsoft Visual Studio .NET. If you double click on the listing for Visual Studio, Windows will display a properties sheet for Visual Studio. Since the report indicates that Visual Studio has compatibility issues, let’s take a look at the properties sheet’s Issues tab.
As you can see in Figure B, the Issues tab provides a brief synopsis of the issue that was reported. Had multiple issues been reported, they would have all been listed on this tab.

Figure B: The Issues tab lists any known compatibility issues with the application
If you double click on the issue, you will see a much more detailed explanation of the issue, as shown in Figure C. As you can see in the figure, Microsoft has provided us with a priority, a severity rating, and a full description of the issue. This screen also tells us that the issue is unique to Vista, and does not affect Windows XP.
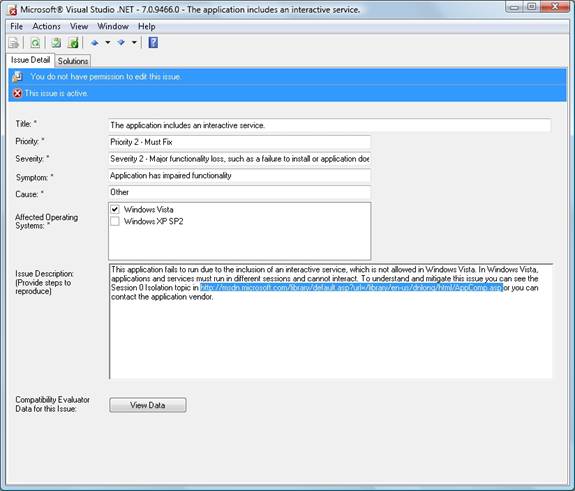
Figure C: Double clicking on an issue provides you with more detail
There are a couple of different things that I want you to pay attention to on this screen. First, notice at the top of the screen that the issue is active, but I do not have permission to edit the issue. For some reason, Microsoft has chosen not to allow you to modify the issues that they provide information on.
The other thing that I want you to notice is that the Issue Description section contains a URL that you can use to get more information. The reason why I am pointing out the URL is because the URL links to a generic description of the error, not to a page that tells you how to fix Visual Studio’s compatibility issues.
Now that you know about the issue, let’s work through it. The first thing that I would recommend doing is selecting the Check for Updates command from the Help menu. This will cause the Application Compatibility Manager to go out to the Internet and see if there is any new information on the issue.
Once you have the latest information, I recommend checking the vendor’s Web site for Vista compatibility information. In this case, Service Pack 1 for Visual Studio 2005 makes Visual Studio Vista compatible. Since I know that, I can select the Add Solution command from the Actions menu. When I do, I am presented with a dialog box that allows me to enter a description of the solution, as shown in Figure D.
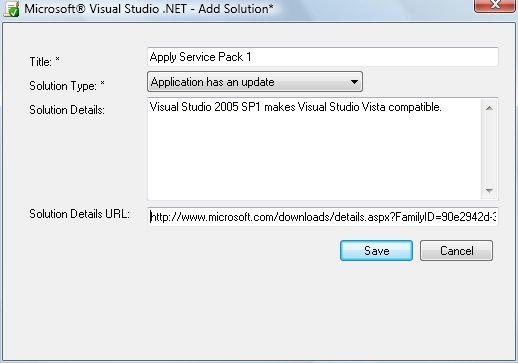
Figure D: The Application Compatibility Manager allows you to enter a solution to the compatibility issue
Notice in the figure that you can choose from multiple solution types. Since I have selected the Application has an Update option, the dialog box provides me with a field where I can enter the URL that points to the update. Once I have filled in all of the pertinent information, I just click Save, and the solution is added to the issue’s Solutions tab, as shown in Figure E.
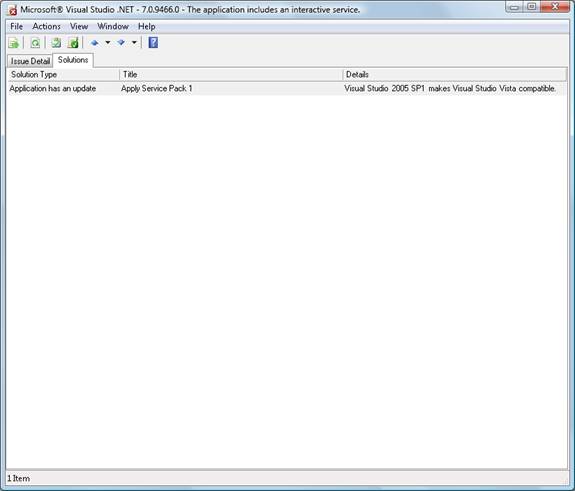
Figure E: The solution that you enter is added to the Solutions tab
Since we can fix Visual Studio’s compatibility issues by applying a service pack, let’s pretend that we want to go ahead and take care of the compatibility issue. In order to do so, the first thing that we need to do is to determine which computers are going to need the service pack. Fortunately, this is easier to do than you might think.
To see which computers need the service pack, close the dialog box that provides details about the issue, and return to the application’s properties sheet. If you go to the properties sheet’s Computers tab, you will see a list of all of the computers that the application is installed on, as shown in Figure F.

Figure F: The Computers tab tells you which computers the application is installed on
Keep in mind that the Computers tab only tells you which computers have the application installed. The Application Compatibility Manager has no way of knowing whether or not the service pack has been installed on any of these computers or not. It is up to you to figure out which of the systems have the service pack installed, and which computers still require the service pack.
Now let’s assume that we have applied the necessary service pack, and that Visual Studio is now Vista compatible. The problem is that the Application Compatibility Toolkit still shows Visual Studio as having an outstanding issue. We know that we have resolved the issue, but the Application Compatibility Manager doesn’t. That being the case, we need to tell the Application Compatibility Manager that we have resolved the issue.
To do so, I would double click on the listing for Visual Studio. When the Visual Studio properties sheet appears, I would go to the Issues tab and then double click on the issue that has been resolved. Windows now displays the now familiar issue dialog box, shown in Figure C.
To report the issues as being resolved, simply select the Resolve command from the Actions menu. The dialog box now reports that the issue has been resolved, as shown in Figure G. If you happen to resolve an issue by accident, you can always choose the Activate command from the Actions menu to flag the issue as being active.
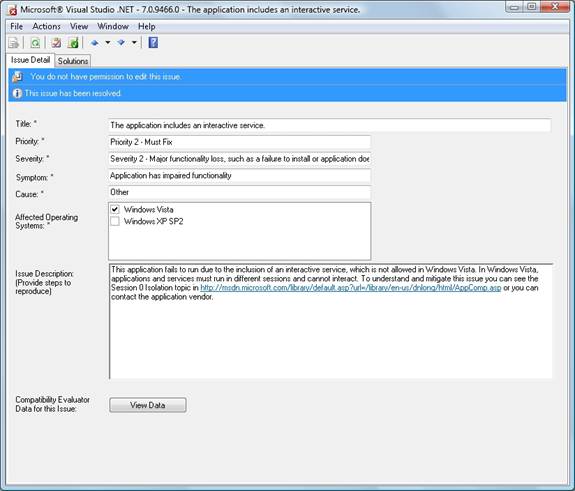
Figure G: The Application Compatibility Manager now shows that the issue has been resolved
If you close all of the open dialog boxes, you will see that the main Application Report screen still shows Visual Studio as having an active issue. This is only because the report is not automatically refreshed. If you press the F5 key, you will see the listing for Visual Studio change to show that no issues are active.
Conclusion
In this article, I have shown you how to examine and resolve an application’s known Vista compatibility issues. In Part 6, I will conclude this series by showing you how to determine whether or not an application is compatible with Vista, even if the Microsoft Application Compatibility Manager doesn’t report any known compatibility issues.
If you missed the previous parts in this article series please read:


