If you would like read the next part in this article series please go to Wireless Network Defense (Part 2).
WiFi Security
I have recently written about the relative ease by which a wireless network can be penetrated if not properly protected. Tools such as Netstumbler, Airsnort, and others are some of the staples of the WiFi hacker. It is these very same tools that will be used to attack your WiFi networks. These tools can be used with varying degrees of success. The deciding factor of whether or not your network will be cracked largely depends on how up to date your defenses are. There is little point in defending your network with a flyswatter if your attacker is wielding a gun. You must stay up to date with technology for your medium, which will be discussed later on in this article.
Home WiFi
There are two really distinct types of WiFi in use today, and each one has their share of challenges when it comes to security. The first and largest implementation of WiFi is that of the home user. Corporations across the world have largely been hesitant to install WiFi due to the well chronicled dangers associated with its use, but many other companies have. That said, armed with both knowledge and a little common sense, WiFi networks, be they home or corporate, can be secured from all but the most skilled of attackers. What we shall now cover is WiFi security for the home user. I will base this on someone using a SoHo WiFi router, however the same principles can be applied to any other type of router for home or small business use.
The first step is to ensure that you have at least logged into the web based interface that all makers of SoHo routers make available to you. It is via this web based interface that the WiFi router can be configured for both security and your home network needs. It will be through this means that we shall implement some in depth defense for a typical home network. With that said, let’s get to it then shall we.
Figure 1

We can see in the above screenshot that I have the default page of the WiFi router up. This is after I logged in via the dialog box that is prompted after I navigated to 192.168.1.1 via my web browser. The first thing we see in the picture above is the “Automatic Configuration – DHCP” drop down menu. If you click on it you will be confronted with several choices beyond the default one. Which do you think is best? In my opinion the best one by far is to go with “Static IP”. Why? This is fairly simple to answer actually, and the answer lies within how the DHCP protocol itself works. Assuming you have DHCP enabled on your WiFi router, then any laptop or WiFi enabled desktop that connects to your WiFi network will automatically be assigned an IP address. This is not really an ideal practice to have. After all, why would you want to simplify an attacker’s life by serving them up an IP once they have breached your WEP key?
You are much better off running Static IP addresses on your home WiFi network. Static IP’s are rarely used in a corporate setting due to the sheer amount of computers on those networks. As a home user you have typically only a handful of computers. Configuring these computers with static IP’s will really only take you a couple of minutes. This may seem tedious but you really need to remember that in depth defense will win the day. Every small step counts. Next up in the screenshot above is the “Router Name”. You can see that the default “WRT54G” is there. Once again there is no need to keep the default router name. Call it something entirely different. Another factor we will be covering shortly will also address how to further secure your WiFi network name.
Other fields seen such as “Host Name”, “Domain Name” can be left blank if you so desire. It will not interfere with the WiFi routers operation, nor will it decrease its security either.
Figure 2
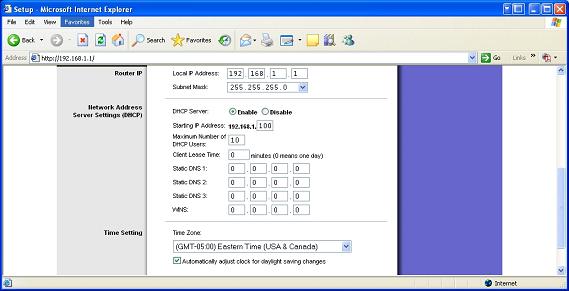
Seen above is another screenshot that simply expands on the default page of the WiFi router once you have accessed it. You can see what the IP address range that the router uses is and its subnet mask. You can just leave those as they are, changing them (Subnet Mask) will only cause you problems. Next is that “DHCP Server” field and we want to make sure that it is disabled. Remember that you really should simply provide static IP addresses to your home network computers. The “Starting IP address” can be left as its default setting. This simply means that all IP addresses assigned to computers should go from 192.168.1.100 and up ie: 192.168.1.100 for Dad’s computer , 192.168.1.101 for Mom’s computer and the such. We then want to have “Maximum Number of DHCP Users” set to 0. After that leave the “Client Lease Time” as its factory settings seen above. Now you will have to manually enter the DNS server’s IP addresses here seeing as they won’t be entered for you by the DHCP protocol. You may wish to read up more on the DHCP protocol via the link I supplied two paragraphs above. It really is a pretty cool protocol and shares a symbiotic relationship with BOOTP.
Once you have finished making the above noted changes make sure that you save them! That may sound rather obvious however many people forget to do just that and then wonder why the changes were not implemented. Well, on that note I will break the article series at this point. In part two we will go over the remaining fields in the web interface provided to you by the SoHo WiFi router. Though this may seem pedantic, and rather slow to many of you, it really is most imperative. Many of you system administrators may have considerable experience in configuring wired networks. On the other hand, a wireless network presents a whole new set of variables that you must contend with. Being able to properly administer such a SoHo WiFi router as we are dealing with now is an important skill. Not every corporate network will provide you with a high end WiFi router.
Wrapup
It is only through knowledge that you will be able to properly defend your WiFi network. While WiFi is considered a mature technology, its standards and security measures are still in a continual state of flux. Even with this in mind it is possible to apply sound security practices to your wireless network. First and foremost amongst those practices is the proper setup of your wireless router. Little point in piling on the security if the foundation itself is weak now is there. On that note I shall see you in Part two for further configuration advice. Till then!
If you would like read the next part in this article series please go to Wireless Network Defense (Part 2).