Like pervious versions of Windows Server, Windows Server 2008 includes a very nice Connection Manager Administration Kit (CMAK) that you can use to create VPN connectoids that users can use to connect to your Windows Server 2008 VPN servers. Actually, you can use the connectoids to connect to any Windows VPN server, as along as you’re using the supported protocols.

The advantage to using the CMAK is that you can create an executable file that users can download from a Web site. Then all they have to do is double click on the file and the connectoid that you’ve configured for them will be automatically installed on their computers. The users then just need to double click on the connectoid object in the Network Connections folder to dial up the VPN connection. This incurs much less overhead than trying to teach the users how to create their own VPN connections.
The CMAK is a Windows Server 2008 Feature that you can install using the Windows Server 2008 Server Manager. Just click on the Features link in the left pane of the console and then click the Add Features link. On the Select Features page, select the Connection Manager Administration Kit open and complete the installation.
You can then open the CMAK from the Administrative Tools menu. The first thing you’ll see is the Welcome to the Connection Manager Administration Kit Wizard page. Click Next.

Figure 1
On the Select the Target Operation System page, you select the operating system for which you want to create the connectoid. One major difference between Windows XP and Windows Vista is that Vista supports the SSTP SSL VPN protocol. In this example, we’ll choose the Windows Vista option and click Next.

Figure 2
On the Create or Modify a Connection Manager profile page, you can choose to make a new profile, or merge the settings you create now with another profile that you previously created. In this example we’ll create a new profile. Click Next.

Figure 3
On the Specify the Service Name and the File Name page, you give the name to the connectoid and the file name of the CMAK package. In the example, we’ll use a Service name of Corporate VPN. This name is what the end users will see after they install the CMAK package. In the File name box, we’ll enter CorpVPN. This will be the name of the CMAK package that will be created and the name of the file the users will download and install.

Figure 4
On the Specify a Realm Name page, you can enter a realm name to the user name. This is typically used when you’re using your ISP as an authentication gateway to your VPN server. We won’t be using a realm name in this example, so we’ll click Next.

Figure 5
You can merge information from other profiles on the Merge Information from Other Profiles page. This is different from the previous page where we were given the option to update a previous profile. This page allows us to import phone book information from multiple other profiles. In this example we don’t have other profiles with phone book information, so we’ll click Next.

Figure 6
In the Add Support for VPN Connections page, you can configure the VPN connectoid to connect to the VPN directly over the Internet, or through a dial-up connection. Dial-up connections aren’t used much anymore, so we’ll continue this one to allow a VPN connection through a direct link to the Internet. Put a checkmark in the Phone book from this profile checkbox and then select either the always use the same VPN server or the Allow the user to choose a VPN server before connecting option. If you select the Allow the user to choose a VPN server before connecting option, you will need to browse to a .txt file that contains the names of those VPN servers, as seen in the figure below.
In this example we have a single VPN server or a VPN server that is using NLB and a single IP address, so we’ll enter that IP address in the Always use the same VPN server text box. Click Next.

Figure 7

Figure 8
On the Create or Modify a VPN Entry page, you can set configuration details for the VPN connection. A default value, Corporate VPN Tunnel is created for us already. Click the Edit button to make changes.

Figure 9
On the General tab, you have the option to enable or disable file and printer sharing for the VPN client. This is generally a good idea for VPN client connections, since these hosts are unlikely to have files and printers that will be shared with networks to which they connect. You also have the option to enable both IPv4 and IPv6, just IPv4 or just IPv6 connectivity to the VPN client. In this example, we’ll allow both IPv4 and IPv6 connectivity.

Figure 10
On the IPv4 tab, we can set the primary and secondary DNS server addresses. Or, you can set it up so that the client receives this information from the VPN server. In most cases, you’ll want the VPN client to obtain this information from the VPN server.
You can also choose to make the client use the VPN connection as the client’s default gateway. When you do this, you disable split tunneling, which is a good thing. However, it also means that if the client needs to connect to the Internet, it will need to do that either through the VPN server to which the client is connected to, or through a Winsock and Web Proxy server (such as the ISA Firewall) that is on another machine on the network. While this put additional stress on your Internet connection, disabling split tunnel is a VPN networking best practice and you’ll be more secure if it’s disabled.
Finally, you can enable or disable header compression. This is enabled by default and in general should be left enabled. This allows you to increase the throughput through your remote access VPN client connections.

Figure 11
We will bypass the IPv6 tab.
On the Security tab, you can set the client up to require encryption. You can also set the VPN strategy, which is how the VPN client will try to connect to the VPN server. You can see that you have the following options:
- Only use Point to Point Tunneling protocol (PPTP)
- Try Point to Point Tunneling Protocol First
- Only use Layer Two Tunneling Protocol (L2TP)
- Try Layer Two tunnel Protocol First
- Only use Secure Socket Tunneling Protocol (SSTP)
- Try Secure Socket Tunneling Protocol First
The VPN client will try VPN protocols in the order of PPTP first, L2TP/IPsec second and SSTP third. However, if you choose to try another protocol first, it will change this order. For example, if you say to check the SSTP VPN protocol first, then SSTP will be first, then PPTP and then L2TP/IPsec.
In the Logon security frame, you can choose to use Use Extensible Authentication Protocol or Authentication methods. If you choose the former, then you can configure the EAP authentication you want to use. If you choose the latter, then you can put checkmarks in the checkboxes for the protocols you want to support, including PAP, CHAP, and MS-CHAPv2.

Figure 12
If you choose the PEAP option, you can force the client to validate the server certificate, and also force the client to connect to a specific server, as defined by the common/subject name on the server certificate presented to the client by the VPN server. You also can limit what Trusted Root Certification Authorities are trusted. Note that I selected PEAP in this example, but from what I read in TechNet in several articles on PEAP, it says that PEAP is not supported on VPN clients. Perhaps this was a Windows Server 2003 limitation, or an error in the CMAK interface, or something else. I’ll let you know if I ever find out the answer to this question. For more information on PEAP for Windows Server 2003, check out PEAP
However, if you check this table you’ll see that PEAP-MS-CHAPv2 is supported for remote access VPN client connections.

Figure 13
On the Advanced tab, you can enter the DNS suffix that the VPN client connection will use and this will also be used to register with the DDNS on your internal network if you have DDNS enabled for these clients.

Figure 14
On the Add a Customer Phone Book page, you can include the numbers used to connect to a dial-up server first, before the VPN connection is established. Since we aren’t using dial-up servers in this scenario, we won’t create a custom phone book.

Figure 15
On the Specify Routing Table Updates page, you can choose to update the routing table on the remote access VPN client so that it knows the custom routes on the network to which it is connected. If you choose the Define a routing table update option, you will need to provide a route file using the format described here.
If you put in an entry in the URL to a route file, the routing table entries will be updated based on the entries included at the file accessible through that URL.
Click Next.

Figure 16
On the Configure Proxy Settings for Internet Explorer page, you set the Web proxy address that the browser should use when it’s connected to the VPN. Note that this is a different address that the client might use when it’s not connected to the VPN. The options are:
- Do not configure proxy settings
- Automatically copy the Internet Explorer proxy settings for the current user to the tunnel interface. This requires that the user had already configured the Web proxy settings in the Internet Explorer, which defeats the point of automating the configuration of the VPN client
- Automatically configure proxy settings
The last option requires that you create a text file that has the Web proxy settings configured. This URL contains the details for the text file requirements.
Configuring a Web proxy server is useful when you want the VPN client to use a Web proxy server, which is on a computer different from the VPN server to which the VPN client is connected. In addition, most Web proxies used by corporations have the ability to do site and content filtering, thus increasing the security if your remote access VPN client connections. Click Next.
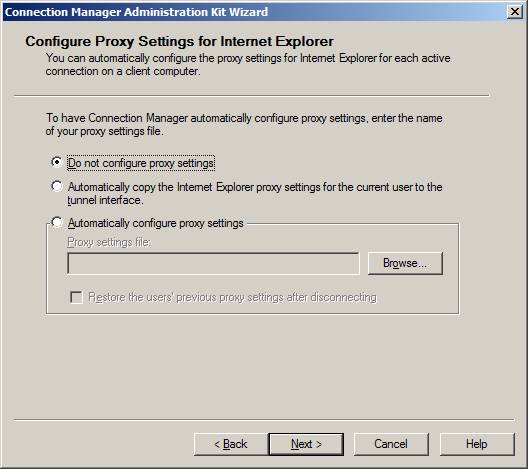
Figure 17
There are a number of custom actions that you can configure the VPN client to carry out. For example, you can configure some actions to take place before the connection is established, some actions that are carried out after the connection is established, and some actions that are carried out after the client disconnects. This requires some developer expertise, but if you are interested in this kind of custom actions, check out the CMAK page for details.

Figure 18
On the Display a Custom Logon Bitmap page, you can include a custom graphic that will appear in the VPN client connection window. If you create the custom graphic, it must be 330×140 pixels. Use the Browse button to find the custom graphic. I won’t use a custom graphic in this scenario, so I’ll accept the default setting, Default graphic, and click Next.

Figure 19
You can also create a custom graphic for the Phone Book. This graphic needs to be 114×309 pixels. We don’t have a Phone Book in this example, so we’ll accept the default setting, Default graphic, and click Next.

Figure 20
You can even create custom icon files that will appear in the Network Center or Network Connection folder. This is icon files (.ico) that will be used instead of the default icons. We don’t have any custom icon files in this example, so we’ll accept the default value, Default icons, and click Next.

Figure 21
If you have a custom help file in the .chm format, you can choose to include that custom Help file on the Include a Custom Help File page. We don’t have a custom Help file in this example, so we’ll click Next.

Figure 22
On the Display Custom Support Information page, you can include a phone number that users can call for tech support. Click Next.

Figure 23
On the Display a Custom License Agreement page, you can include a license text file that the user will see when installing the VPN connectoid. We don’t have a license file in this example, so we’ll click Next.
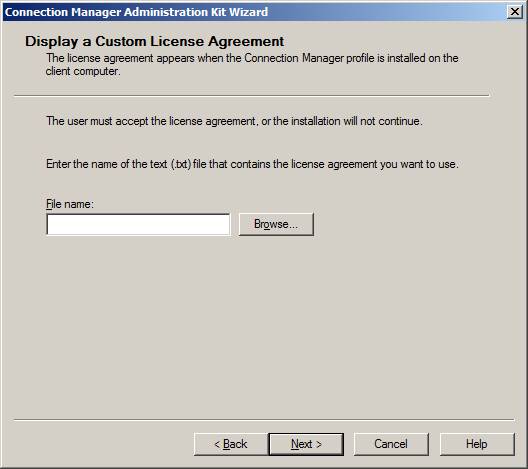
Figure 24
On the Install Additional Files with the Connection Manager profile page, you can include additional files that might be used in pre-connect, post-connect or disconnection custom actions. For example, if you were to use the Windows Remote Access Quarantine Control feature, you would include components of that solution as part of the profile. We don’t have any additional files to include in this scenario, so we’ll click Next.

Figure 25
That’s it! The Profile is complete and the installation file is ready to be compiled. Click Finish to create the CMAK installation file.

Figure 26
A Windows Explorer window will open to the folder containing the installation file. Also included in this folder are other files that you can use in the future to update the package. Copy the .exe file to a place where users can download the file, such as a file share or a Web site, then tell the users who require the VPN connection to get the file and install it on their computers.

Figure 27
Let’s run the file and see what the installation experience is like for the end-user. The first think they’ll see is a dialog box that asks if they want to install the Corporate VPN. Not that this is based on the name you included at the beginning of the CMAK. Click Yes.
The user will be given the choice to make the connection available for All users or My use only. One thing that your users need to be aware of is if they want to log on via dial-up networking, then they need to make the connectoid available to All users. Otherwise, they machine doesn’t have a logged on user prior to log on and can’t tell who the user is and won’t make it available for logging on via dial-up networking. If users don’t log on via dial-up networking, then they can select My use only for a more secure configuration.

Figure 28
The log on dialog box appears. Enter a user name and password and domain, if the VPN server is a domain member of you’re using RADIUS for domain authentication. Click Connect. And that’s it! The user will connect to the VPN.

Figure 29
Summary
The Connection Manager Administration Kit provides you an easy way to create connection service profiles for VPN users. Users will not need to know the details of the configuration, will not need to remember the name of the VPN server, and will not have to delve into the VPN protocols that should be used to connect to the VPN server. This should help reduce Help desk calls due to problems with end-user related problems with configuring VPN connectoids. Note that while the configuration is pre-built for the user, the user can still make changes to the configuration, so this is not an ironclad method against end-user “fiddling” around with application configuration.