If you would like to read the next part in this article series please go to Working with the Windows Server 2008 Task Scheduler (Part 2).
The Windows Task Scheduler is practically as old as Windows itself. It has been around since at least Windows NT 4.0, and has evolved relatively little over the years. Since the days of Windows NT, the Windows Task Scheduler has existed in the form of a command line tool called AT.
The AT was used to run tasks at a specific time. Although AT worked really well, it required the administrator to enter a number of complicated command line switches.
Somewhere along the way, Microsoft introduced a graphical interface to the AT tool (I think it was first released in the Windows 98 Resource Kit, but I can’t remember for sure). This tool, called WinAT, greatly simplified the process of using the Windows task scheduler, but for some reason it just never seemed to have caught on with administrators.
Although the AT command is alive and well in Windows Vista and in Windows Server 2008, Microsoft has finally brought the Windows Task Scheduler into the twenty first century. The AT command hasn’t really changed at all though. In fact, if you look at the screen capture shown in Figure A, you can see that the Windows Vista version of the AT command looks the same as what was used in much older versions of Windows.

Figure A: The Windows Vista version of the AT command looks like what you would find in much older versions of Windows
The Windows Vista and Windows Server 2008 versions of the Task Scheduler offer many more capabilities than what have previously been included in the Windows Task Scheduler, but these new capabilities are not exposed through the AT command. Instead, there is a new GUI console that provides you with access to all of the new capabilities. In Windows Server 2008, you can access the new and improved Windows Task Scheduler by opening the Server Manager and navigating through the console tree to Server Manager | Configuration | Task Scheduler. You can see what this console looks like in Figure B.
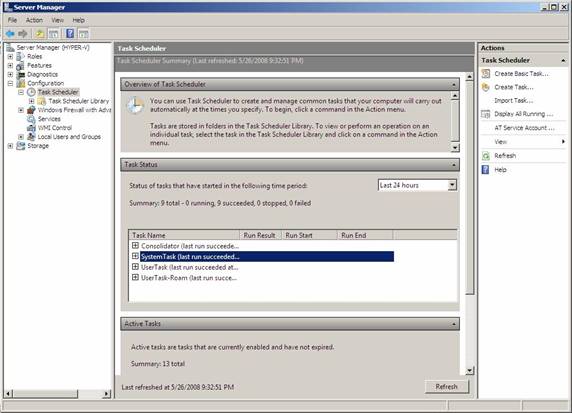
Figure B: The initial Windows Task Scheduler screen displays all of the tasks that have completed in the last 24 hours
Triggers
One of the biggest differences between the Windows Server 2008 / Windows Vista task scheduler is the number of triggers that are available. A trigger is an event that causes the scheduled action to occur. If you are using the AT command as an interface to the Windows Task Scheduler, then the only trigger that is available to you is a schedule trigger. For instance, you can configure the Windows Task Scheduler to perform an action at a specific date and time. You have the option of making the event recurring, but that’s really about it as far as trigger options go.
If you use the new graphical interface for the Windows Task Scheduler, you still have the option of creating scheduled triggers, but there are a lot more options that are available to you as well. Some of the other triggers that are offered include:
-
At Log On
-
At Startup
-
On Idle
-
On an Event
-
At Task Creation / Modification
-
On Connection to User Session
-
On Disconnect from User Session
-
On Workstation Lock
-
On Workstation Unlock
As you can imagine, these various types of triggers give you a lot of flexibility. For instance you could create a task that automatically runs a script when a certain system event occurs. Likewise, you could create a task that displays a security warning message each time a user unlocks their computer.
Actions
Just as Microsoft has created lots of new types of schedule triggers, they have also given you more options when it comes to performing an action once a trigger occurs. If you’ve ever worked with the AT command, then you know that previously your only option for performing an action was to run a command. This command could be an executable program, or it could be a batch file.
The Windows Task Scheduler GUI in Windows Server 2008 still allows you to execute a command when a trigger occurs, but that isn’t your only option. You also have the option of sending an E-mail message (with an optional attachment) or of displaying a message in a window on the machine on which the trigger has occurred.
Technically speaking, all of these options are possible when using the AT command. The difference is that if you want to use the AT command to send an E-mail message or to display a text message, then you would have to write a script that would generate the message, and then set up a task that would launch the script at the scheduled time. Windows Server 2008 frees you from having to do the scripting, because it offers built in tools for sending E-mail messages of displaying text messages. All you have to do is to fill in the various fields.
Conditions
The nice thing about the Windows Server 2008 Task Scheduler is that it also allows you to control the conditions under which a trigger takes effect. For example, you may only want the scheduled task to run if the computer is running on AC power, and not if it is running on battery. Likewise, if the computer is in hibernation, you need to decide if the computer should wake up to perform the triggered task, or if you would prefer for the computer to stay asleep.
If Windows is running on a laptop, then there may be times when a network connection is unavailable. If the triggered task is network dependant, then it would be pointless to run the task if the task requires network connectivity, so you will need to tell Windows whether or not the task is network dependant.
These are all examples of conditions that can affect the way that a task can run. As you can see in Figure C, Windows allows you to pre-configure these, and other conditions so that the Windows Task Scheduler knows under which circumstances to run a triggered task.
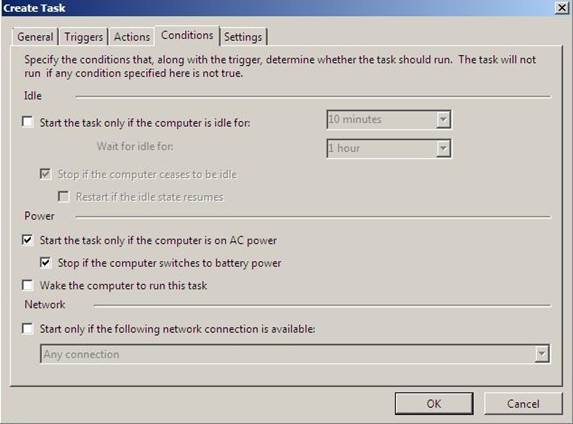
Figure C: Windows provides a number of optional conditions that you can configure
Settings
Settings are similar to conditions, but are used once the triggered task is already running. For example, a setting will allow you to tell Windows what to do if the triggered task fails, or if it runs for an excessive length of time. You can also use settings to force a task to stop under certain situations or even to automatically delete an expired task. You can see the settings that are available to you in Figure D.

Figure D: Settings allow you to control how a task behaves once it starts
Conclusion
In this article, I have talked about the basic components that make up the new and improved Windows Task Scheduler. In Part 2 of this article series, I will show you how to create a task, and talk about some of the built in tasks.
If you would like to read the next part in this article series please go to Working with the Windows Server 2008 Task Scheduler (Part 2).


