If you would like to read the next part in this article series please go to Accepted Domains (Part 1).
Introduction
This is the second and final part of an article looking at the feature known as accepted domains in Exchange 2010. In part one of this article, we started off by looking at the default accepted domain that is created when you install the first Hub Transport server within a new Exchange 2010 organization. We discovered how this is an authoritative accepted domain and also covered how this information is synchronized to the Edge Transport server role via the Edge subscription process. Finally, we finished up by looking at how you need to have your accepted domains configured in order to have them selected within an email address policy.
Here in part two we will complete our look at accepted domains by looking at the two remaining accepted domain types that can be configured, namely internal and external relay domains.
Internal Relay Domains
In part one of this article series, we saw how Exchange will accept inbound email messages destined for users whose SMTP addresses match the authoritative accepted domains. You may well find yourself in situations where you need to share the SMTP namespace across different messaging systems. For example, some of the users that share the SMTP namespace may be hosted on Exchange while some of them may be hosted on a completely different messaging system. In this case, we can make use of internal relay domains. With an internal relay domain configured, Exchange will still accept the message destined for that domain namespace. Then, Exchange will try to match the SMTP address with one configured within the Exchange organization exactly as we have seen with an authoritative accepted domain. However, if the SMTP address cannot be found within the Exchange organization, the internal relay domain configuration ensures that Exchange will route the message to the other messaging system so that delivery can be attempted there. We will discuss how this routing takes place later in this article.
Let’s take the example where the neilhobson.com SMTP namespace is shared between an Exchange 2010 organization and some other 3rd party messaging system deployed on the internal network. To configure the SMTP namespace correctly, we must first identify neilhobson.com as an internal relay domain as you can see from Figure 2-1.
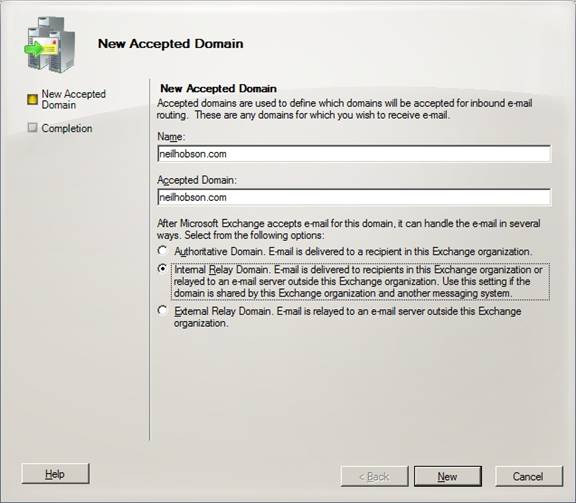
Figure 2-1: Creating an Internal Relay Domain
If you have the accepted domain that you want configured as an internal relay domain already defined as an authoritative domain, you can change it to an internal relay domain either via the Exchange Management Console as shown in Figure 2-1, or via the Exchange Management Shell and the Set-AcceptedDomain cmdlet.
For example, to set the existing neilhobson.com accepted domain as an internal relay domain, the following command could be used:
Set-AcceptedDomain –Identity neilhobson.com –DomainType InternalRelay
The result of running this command can be seen in Figure 2-2.

Figure 2-2: Setting an Internal Relay Accepted Domain via the Exchange Management Shell
Internal Relay Domain Send Connector
As we discussed just a moment ago, an internal relay domain configuration means that Exchange will first attempt to resolve the SMTP address to an object within the Exchange organization. If a match cannot be found, Exchange will route the message to the other messaging system rather than issue a non-delivery report as you’d expect with an authoritative accepted domain.
This message routing has to be configured by the administrator and to do this a Send connector must be created. Specifically, the Send connector must have an address space that matches the internal relay domain and is configured to deliver messages to the smart host responsible for the other messaging system. Therefore, in my lab environment, I can create a Send connector with an address space of neilhobson.com that is also configured to deliver messages to the smart host IP address as you can see from Figure 2-3.

Figure 2-3: Creating the Send Connector
When Exchange determines that the inbound SMTP message does not match any object within the Exchange organization, it will route that message via a Send connector that has an address space as close as possible to the SMTP message. Therefore, in my example, the address space of the newly created Send connector has an identical match to the inbound SMTP message. Exchange will then route messages to the smart host that has an IP address of 192.168.0.55 in this particular example.
We can perform a quick test to see whether this re-routing is going to work by using the Telnet client from another machine. In the example shown in Figure 2-4, I am sending a test message to an address that I know does not exist in the local Exchange organization.

Figure 2-4: Internal Relay Domain Test Message
Once the message has been queued for mail delivery, we can run the Queue Viewer utility from the Toolbox found in the Exchange Management Console to confirm that the message is now queued for the target IP address of the smart host responsible for the other messaging system. This is shown in Figure 2-5, so clearly a non-delivery report has not been generated for this email even though the target SMTP address does not exist within the local Exchange organization.
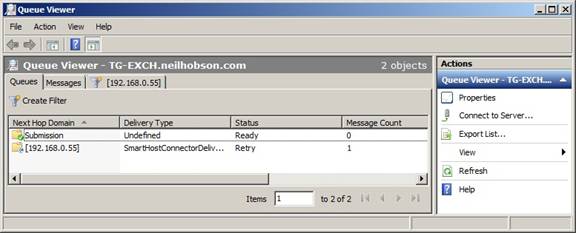
Figure 2-5: Queued Internal Relay Domain Test Message
Internal relay domains can also be used between two separate Exchange organizations. For example, the MX records for nghcloud.co.uk could be configured to point to the Edge Transport servers within the neilhobson.com Exchange organization. With an internal relay domain configured for nghcloud.co.uk within the neilhobson.com forest, messages destined for nghcloud.co.uk are processed by the Exchange 2010 servers within the neilhobson.com forest; ultimately the Hub Transport servers in this forest relay the messages over to the Hub Transport servers in the nghcloud.co.uk forest via additional Send connectors. There are other considerations of course, such as directory synchronization, but that’s beyond the scope of this particular article.
External Relay Domains
We have seen that with internal relay domains messages can be relayed internally via the Hub Transport server to another smart host, which can be a completely separate non-Exchange messaging system. The fact that the message is routed internally by the Hub Transport server is an easy way to remember that this configuration requires an internal relay domain.
Following that logic then, it makes sense that an external relay domain involves external message routing. For example, take the scenario where the MX records for nghcloud.co.uk are configured to point to the Edge Transport servers within the neilhobson.com Exchange organization. If these Edge Transport servers are configured with an external relay domain for nghcloud.co.uk, messages destined for the nghcloud.co.uk SMTP namespace are accepted by the Edge Transport servers in the neilhobson.com Exchange organization, but are then relayed via a Send connector configured on the Edge Transport servers to the Edge Transport servers responsible for the nghcloud.co.uk Exchange organization. In other words, the message routing happens externally at the Edge Transport server level rather than at the Hub Transport server level as we saw with internal relay domains.
Summary
That completes this two-part article on accepted domains in Exchange 2010. Accepted domains are an important part of the Exchange 2010 configuration as one or more of them are required to perform correct message routing. Whether you will use internal or external relay domains remains to be seen as that depends on the requirements of your Exchange 2010 organization.
If you would like to read the next part in this article series please go to Accepted Domains (Part 1).


