If you would like to read the nexy part in this article series please go to Accessing Exchange 2007 from your Apple Macintosh (Part 2)
Brief
In the course of this two part article I will examine the various options for accessing Exchange from Apple Mac OS X including a discussion of some of the pros and cons of each solution. I will outline the steps required to configure both the client and Exchange to allow access. The clients I will look at in detail are Mac Mail 2.1.1, Outlook Web Access in the Safari Browser, and Entourage 2004 with the latest patches. I will assess each client based on the following criteria
-
Basic email functionality
-
Folder access other than Inbox
-
Calendaring
-
Personal mailbox contacts access
-
GAL Search
-
Offline Access
-
PST Import/Export
-
Junk Mail Filtering
-
SSL Security
Introduction
In the last few years the Mac has grown in popularity in the home market. However, the Apple Mac has long been a fixture in a variety of industries, in particular publishing and media. This has led to the need to connect it to the company email system, which very often is MS Exchange. I personally have had to meet this requirement on a couple of occasions and frankly found things somewhat convoluted. In this article I will therefore attempt to describe the required steps to help make your life a little easier!
There are a variety of methods to access Exchange from a Mac. Access via web browser to Outlook Web Access (OWA) is possible although only with the cut down experience of the simple client not the rich Internet Explorer (IE) dependent view that is possible on a windows machine. Another common method is access via IMAP and POP3 which is something I have discussed in previous articles and which is part of the method used by Mac Mail. Perhaps the most comprehensive solution is Entourage 2004 which is part of the MS Office 2004 Suite for Mac and gives access to a wide variety of the features found in MS Outlook on the Windows platform.
Finally, now there are so many comprehensive virtualization options for OS X another option is simply to run a copy of Windows in a virtual machine thus negating the issue altogether!
Configuring the Clients
I will begin this section by looking at Mac Mail. Mac Mail makes use of both IMAP and WebDAV, the latter via the OWA component of Exchange. One thing to bear in mind is that given the changes in Exchange 2007 OWA, WebDAV is now only supported through the legacy /exchange virtual directory which is what Mac Mail uses.
Given that Mac Mail makes use of both IMAP and WebDAV, I first did some preliminary configuration on the Exchange server. First, I made sure that Exchange Rollup 3 patch was installed (as a minimum). Prior to Rollup 3, there were various IMAP performance problems which have caused problems for some people accessing Exchange from Mac Mail. Having completed the patching, I ensured that the IMAP service was started and that it was enabled for the test users. Detailed steps are available in my IMAP article. I then ensured that the relevant certificates were set up for Exchange to allow SSL access. Finally I tested all this using Windows Live Mail.
To prepare the Mac side of things, I had to ensure that my internal Root CA which issued my SSL certificate was trusted. I did this by following the instructions in the KB article here. As discussed in the KB article you can check that your CA is listed using the Microsoft Cert Manager shown in Figure 1. I should also point out, that the if using an Internal Certificate Authority then the same steps are required to ensure prompt free access to OWA from the Apple Safari browser.
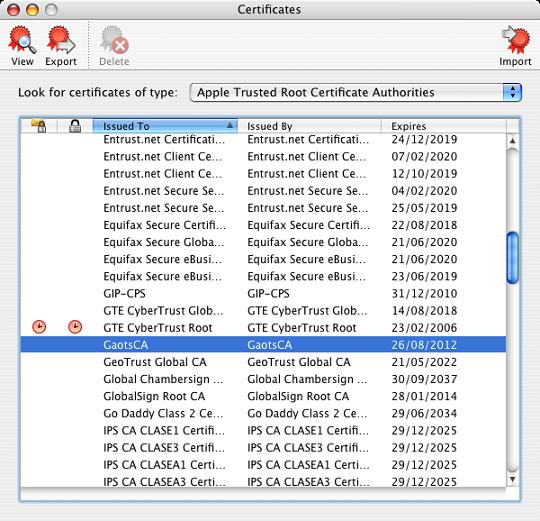
Figure 1: Using the Microsoft Cert Manager to view trusted Root CAs
Note:
Of course if you make use of a commercial CA then you will not need to add that to the trusted Root CAs list.
At this point we are ready to open Mac Mail from the applications folder. On doing so, a wizard will start and you should click “Continue” to progress to entering settings. On the first page you select the type of account and enter name and address details as shown in Figure 2.

Figure 2: The first page of the account setup wizard
Click “Continue” again to move on to the next page and enter details about your incoming mail server including the user name and password. Although you are not prompted for the domain name, I found that entering the user name preceded by the domain name “domain\user” did not work, so stick to entering just the user name. On this page you should also enter the OWA server in FQDN format (with no http or virtual directory specified). These settings are shown in Figure 3.
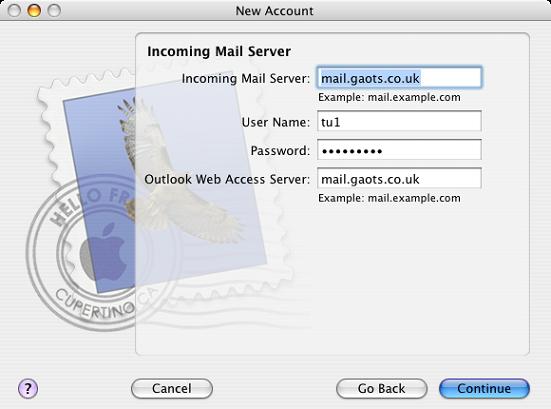
Figure 3: Setting incoming mail server properties
Next we set up outgoing mail settings. Enter your outgoing SMTP server, in this case the same CAS server as for incoming and enter authentication details, again not prefacing the username with the domain name as shown in Figure 4.
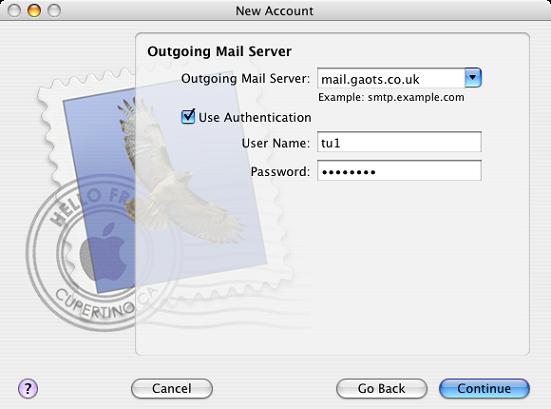
Figure 4: Setting outgoing mail server properties
When you click continue, as on the incoming mail server section, Mac Mail will check to ensure that your login credentials are correct. At this point you will receive an Account Summary which you will notice shows that SSL is enabled for both incoming and outgoing mail. At this point click “Continue” and then on the next page click “Done” to begin using your new account. You should now find that any mail in the account is downloaded to your client and that you can send mail.
Having completed the basic setup there are a few tweaks which you can carry out to enable some useful functionality such as viewing other folders in your inbox and being able to make use of the GAL (Global Address List). To make these changes you need to access the properties of your account which is done by selecting the “Mail” menu and selecting “Preferences”. Select the “Account” tab and you will be presented with the screen shown in Figure 5.
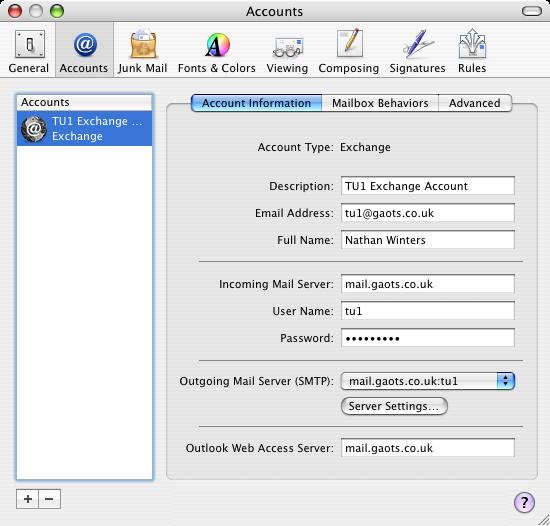
Figure 5: The Account Information Screen
To set up access to other folders in your inbox, move to the “Advanced” area of the “Accounts” tab. In the bottom half of the window, in the “IMAP Path Prefix” box enter “INBOX”. In the “Domain Name” box enter the name of the domain, in my case “GAOTS” as shown in Figure 6. The IMAP Path Prefix section basically tells the client to use the INBOX as the root of the mailbox and then show you all the folders under that. This does prevent you from seeing the Junk Mail folder as that is at the root of the mailbox on the same level as Inbox. I have played around with this setting for a while but found no way to show both the Root level folders and the subfolders of the Inbox.
Note:
Before you close the Preferences window, be sure to move off the section you were editing and, when prompted, click “Save” to save your settings.
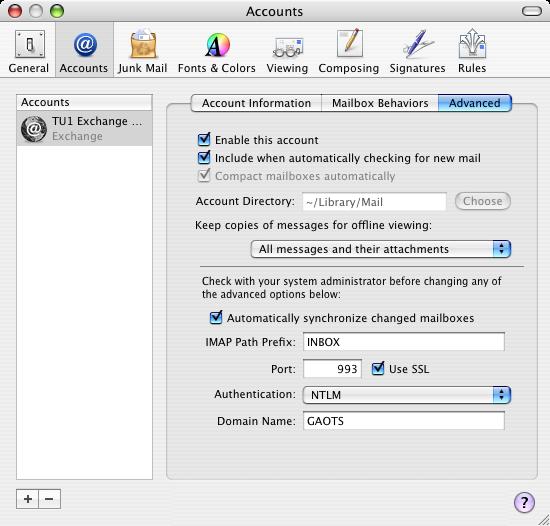
Figure 6: The advanced mailbox settings area
The final piece of configuration we can do in Mac Mail is to allow GAL access. This is done on the “Composing” tab of the preferences window. In the Addressing section next to “Automatically complete addresses” click “Configure LDAP”. On the next page click the + sign to add a new LDAP server. Enter the name of a GC/DC in your forest and then set up the search base. The search base is entered as an LDAP common name (CN) which specifies in which area of the directory users will be searched for. In my case, I have specified an OU called “testusers”. My complete Search Base string is as below:
ou=testusers,dc=gaots,dc=co,dc=uk
Finally, enter authentication details and click “Save” and then click “Done”. The settings are shown in Figure 7. Having completed the configuration above, address auto-complete will now also present addresses from your GAL for you to chose from when composing a mail.
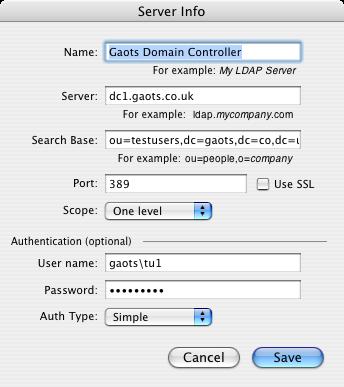
Figure 7: LDAP server settings
Summary
I hope this introduction and configuration section has given you a good start on how to set up access to Exchange from your Mac. In the concluding part of this article, I will complete the configuration section by discussing Entourage 2004 setup and will then finish by showing the pros and cons of each solution.
If you would like to read the nexy part in this article series please go to Accessing Exchange 2007 from your Apple Macintosh (Part 2)