Introduction
Updating systems is an essential step in an enterprise environment. Today’s environments demand that the solution to managing patches be an automated controlled process. It is thus vital to have a patch management system (such as Microsoft’s Windows Server Update Services aka WSUS or VMware’s Update Manager) so the updates can be rolled out in batch to a (select) group of systems in your environment.
In part 1, we will discuss the old school way of patching an ESX host, but also look at VMware’s own Update Manager (introduced in VI 2.5) to baseline and patch your ESX hosts.
Patching the ESX host the old way
Before Update Manager was available, a plethora of tools were used to patch an ESX host. The most basic tool used is the built-in command esxupdate. We will not go in to details on how to use it. Suffice to say that it needs a tarred patch (called ESX-1002969.tgz or similar) to work and you need to execute it on the Service Console command prompt once the host is put into maintenance mode.
Because this is a rather manual process there were (and still are) a number of community tools freely available such as:
Next to these more complex patching systems, it is also possible to write a (simple) bash script to run and update your system such as the one below:
#!/bin/bash
# esxAllPatches.sh — auto unpack and update esx 3.0.2
# by Vincent Vlieghe
# Version 14/01/2008
mkdir /var/updates
function installPatch
{
tar -xvzf /tmp/ESX-$1.tgz
mv /tmp/ESX-$1 /var/updates
esxupdate -n -r file:/var/updates/ESX-$1 update
rm -rf /var/updates/ESX-$1
rm /tmp/ESX-$1.tgz
}
# Patches 15/11/07
installPatch 1002424
installPatch 1002425
installPatch 1002429
# Patches 30/11/07
installPatch 1002431
installPatch 1002435
installPatch 1002434
installPatch 1002426
installPatch 1002430
installPatch 1002428
#remove remaining entries & directories
rm -rf /var/updates
reboot
Update manager: what is it?
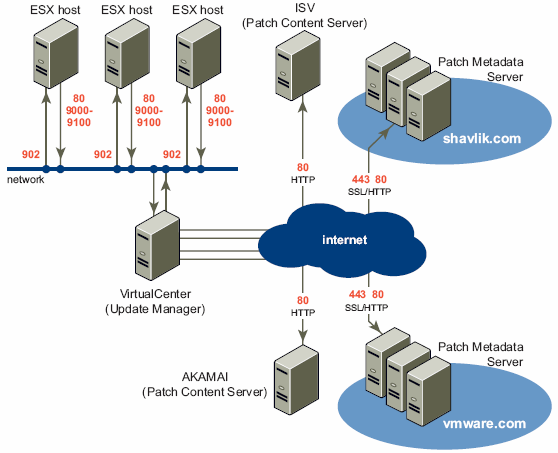
VMware’s Update Manager is used to create baselines and install software patches/upgrades for ESX hosts and Windows and Linux virtual machines running on them. It is a simple (Jetty) web server service and a download client. The update manager component is installed on a Windows 2003 or Windows XP machine that has access to the internet. It uses port 80 (443) to connect to the VMware (ESX) or Shavlik (guest) to obtain patch metadata.

Figure 1: Update Manager architecture as per the Update Manager manual
All configuration data (next to some options in the HK Local Machine registry hive) is saved in a file called vci-integrity.xml located under \Program Files\VMware\Infrastructure\Update Manager. Make sure you use the VI Client plug-in for Update Manager (as discussed later in the article) to change the global configuration settings!
Update Manager: installation and configuration
Ok, let’s look at the installation steps. The first thing to note is that it needs a separate database to function. You have only a few options: SQL Express, SQL Server or Oracle. You could use a SQL Express edition that comes with the installation package, but we suggest avoiding this in a production environment. As a first step you should ask your DBA to create a new database, install the SQL Native client for SQL Server 2005 on the Update Manager server and then create a data source name (DSN) pointing to the SQL database created.
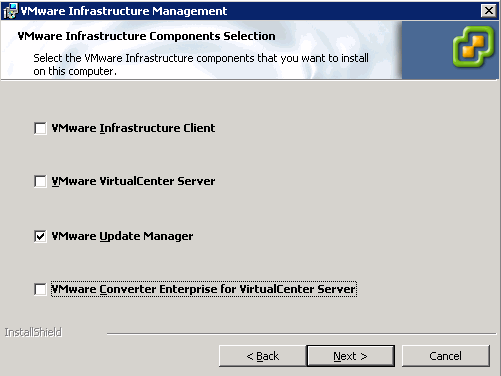
The Update Manager component can be installed on the VirtualCenter server itself or on a separate server. We would suggest the second scenario: you install the Update Manager component on a separate server in a separate domain (DMZ maybe) and connect to the VirtualCenter server. There must be 18Gb+ of free storage or the installer will complain. During installation, select Custom and check VMware Update Manager (figure 2 below)
Note:
To determine the disk and database size needed for your environment, make sure to use the VMware update Manager Sizing Estimator.

Figure 2: Components selection window
The next window is an important one: the credentials are used to connect to VirtualCenter itself and register the extensions used by Update Manager.

Figure 3: Link Update Manager to your VirtualCenter host
Another important step in the installation procedure is determining what ports to use for the Update Manager. If the default settings are kept during the installation, the Update Manager Web server listens on 9084 TCP and the Update Manager SOAP server listens on 8084 TCP. Both are accessed through a reverse proxy that listens on the standard ports 80 (and 443). If you have IIS installed for example (let’s say you combine WSUS and VMware update Manager on the same server), you must change port 80 to something else.
It is also possible to configure the Proxy server and port. The strange thing is that when using the Update Manager plug-in in the Vi Client you can use authentication (fill out a username/password)… Why is it not present in this window?

Figure 4: Port and proxy settings window
As a final step you must configure the location for downloading all patches. We suggest putting all patches on a separate (large enough!) partition.
Note:
If you want to change your patches download location after installing Update Manager, refer to the following KB article.
Once the installation finishes, launch your Vi Client, go to Plugins => Manage plugins and click the Download and install… button. After restarting Vi Client, go back to Plugins => Manage plugins and enable the VUM client. Once you click this button, a connection will be established to you Update Manager Server.
Note:
If you get an error downloading and installing the VUM client, go to \updateManager\VMware-UMClient.exe on the VirtualCenter media and install it manually

Figure 5: Plug-in manager
A new icon will appear in you VI Client toolbar, called Update Manager

Figure 6: Update Manager in the Vi Client toolbar
Once this is done, you will notice a number of extra Update Manager tabs in the VI Client (for hosts and guests).
Using Update Manager
Update Manager is rather simple to use. You need to create 1 or more baselines, attach these to your ESX hosts, Scan the ESX host and remediate it when not compliant.
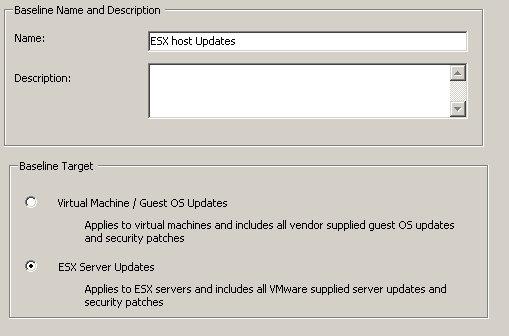
Let’s start with creating a baseline for our ESX hosts. Click the Update Manager icon. On the Baselines tab right-click an empty space and select New baseline… Note that you have to specify a baseline target: ESX server itself or VM updates. In this article, we will focus on patching ESX hosts so we select ESX server updates.

Figure 7: Creating a baseline
As you can see on Figure 8 you get a number of options based on product type, severity, language and update vendor. Note the Released date field. ESX update releases are cumulative. A new update release contains all fixes from the previous update release. The after field should thus be set to the release date of the latest version: when you apply ESX 3.5 U2 you should set the after date to the date it was released.
So in our example we select 13 August because that is the release date of ESX 3.5 U2. If you don’t set the after date, Update Manager will show that Update 1 is not present and so the ESX host is NOT compliant. This is a known issue.

Figure 8: Selecting baseline options
The next step is to actually use the baseline: left-click on an ESX host in the VI Client and on the Update Manager tab attach the baseline.

Figure 9: Attaching a specific baseline to an ESX host
Once connected, right-click the ESX host you want to patch and select Scan for Updates in the menu. The scan will complete and will state if it is compliant or not.

Figure 10: Compliant or not, that is the question
Now, right-click the ESX host you want to patch and select Remediate… in the menu. Sit back and relax as the machine is put into maintenance mode and patched (and hope nothing goes wrong during the process…)
What about VirtualCenter and VCB?
Yes, a good question: Upgrading/updating your ESX host is usually not the only thing on your task list. The first step in a large scale upgrade project (such as 3.0 to 3.5 or 3.5 to 4.0) is upgrading the VirtualCenter and the VMware Consolidated Backup (VCB) to the latest version. This is (of course) a manual process. We suggest testing, testing and testing in a design environment.
Conclusion
In part 1 of this article series, we described how to install and use Update Manager, a feature set introduced in VI 2.5. Using update Manager is far easier then running custom scripts or using community tools. The great thing about it is… it works quite well. Stay tuned for our next article on patching virtual machines and other extra tools!


