Authenticating Linux against Active Directory
One thing to keep in mind is that – even when signed on in active directory – it doesn’t offer a complete single sign on – yet. You will still have to provide a user name and password if using a windows based proxy server such as ISA server. You will probably still have to use a user name and password if using a windows based mail server (Although Evolution supports GSS API and through this you should be able to eliminate this sign-on – I will be trying this out at some point).
However it does mean that you can use the same account name and password to log on to your Linux or Windows machine, and it also means you can change your password in Linux. Also, in case your company requires this, network administrators will be able to logon to your machine with their administrator credentials. So the Linux machine no longer is an ‘island’. It is also possible to extend active directory to allow for home directories etc to be managed in active directory.
Alternatives
There are 2 alternatives to authenticate against Active Directory:
- Using the kerberos client (requires Active Directory)
- Using Winbind & samba client
In my opinion, option 1 is the cleanest. I definitely found it more simple to setup. Option 2 offers some additional features, notably the use of th net command through which you can enumerate domain users and more. However on most workstations this will not be required. Therefore, if you have active directory i recommend option 1.
Installation description on Suse Linux 9.1
On Suse Linux, setting up the Kerberos client is straightforward. Follow these steps:
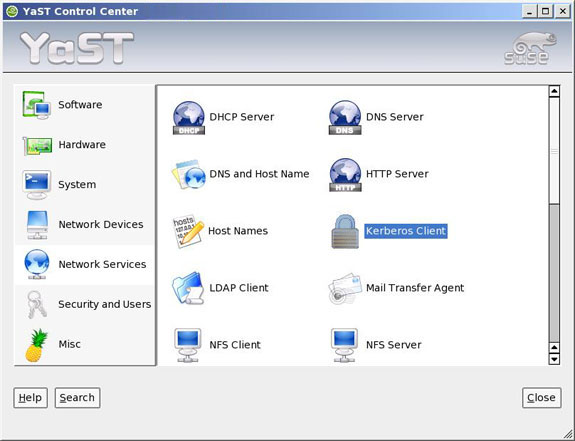
1. Go to Yast, Network Services and click on the kerberos client. Now the Kerberos client configuration will appear
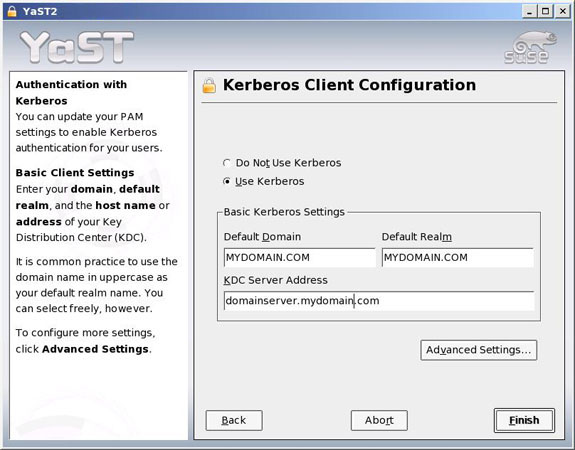
2. Enter your active directory domain name, both in the default domain and in the default realm fields. Enter the name in capital letters. In the KDC server address box, enter the fully qualified domain name of one of your domain name servers, i.e domainserver.mydomain.com. Click OK to finish.
Yast will now edit the /etc/krb5.conf file for you. A realms & domain_realm section will be created with your default realm, KDC server and realm name. For example:
[libdefaults]
clockskew = 300
default_realm = MYDOMAIN.COM
[realms]
MYDOMAIN.COM = {
kdc = domainserver.mydomain.com
default_domain = MYDOMAIN.COM
kpasswd_server = domainserver.mydomain.com
}
[domain_realm]
.MYDOMAIN.COM = MYDOMAIN.COM
Of particular mention is the clockskew line. This indicates how sensitive kerberos should be for differences in times between the server and the client. You can increase this value but its best to ensure that server and client have the same time by using an NTP server
3. Test your kerberos client with Kinit. Open a shell and type in kinit. By default, your user name will be taken and the default domain/realm name appended. This means that your linux user name has to match a user name on active directory. If this is not the case specify the username on the command line, i.e.
kinit <myusername>
[email protected]’s Password:
You will be prompted for your windows/active directory password
If all went according to plan, you should get the following text:
kinit: NOTICE: ticket renewable lifetime is 1 week
4. Your ticket has been issued. You can type ‘klist’ to see where your ticket is stored and to see detailed of the ticket.
5. Once you have verified that your kerberos client set-up is working, you can let other applications know that they can use the kerberos login, and do not have to ask you again for a logon and password. The programs that will make use of the kerberos login are references in the /etc/pam.d directory. To do this:
a. Edit the /etc/security/pam_unix2.conf file. (make a backup first!) The location of this file depends on the distribution you are using. In SUSE its located in the security subdirectory. Add the following lines:
auth: use_krb5 nullok
account: use_krb5
password: use_krb5 nulllok
session: none
6. Restart your machine. At the login prompt you should be able to login using your windows username and password. You will notice that there is a delay in the authentication process – this is because authenticating against the windows server is of course slower then against a local file.


