Automating the Configuration of the Firewall Client: Part 1
Configuring DHCP and DNS
By Thomas W Shinder, M.D.
I recently did an article on how to automatically deploy the Firewall client software. Because that article turned out to be so popular, I decided that we should carry on in the great tradition of automation and discuss how to automatically configure the Firewall client.

Automating the Firewall client configuration has a lot of advantages. The biggest advantage is that you don’t have to worry about telling users what server name to use when they plug their portable computer to another segment. The Firewall client software will be able to automatically detect the appropriate ISA Server and connect to that Server.
We’ll focus on the following topics in this article:
The terms Autoconfiguration and Autodiscovery will be used somewhat interchangeably in this article, but they’re not exactly the same. Autodiscovery informs the Firewall client of the location of the ISA Server that it should use, and once discovered, Autoconfiguration will take place. In Part 1 of this article, we’ll focus on more on Autodiscovery and cover the Autoconfiguration features in more detail in the second part of the article.
Manual Configuration of the Firewall Client
You can configure the Firewall Client via the Firewall Client Options dialog box. You’ll notice after installing the Firewall Client that a new icon appears in the system tray. If things are working right, the icon should look like an electrical plug with a green, up-pointing arrow. The Firewall Client has not connected to the Firewall Service on the ISA Server if there is a red down-pointing arrow.
You can configure the using the Firewall Client icon in the Control Panel, or you can right click the Firewall Client tray icon and click the Configure command. You’ll end up seeing what appears below.
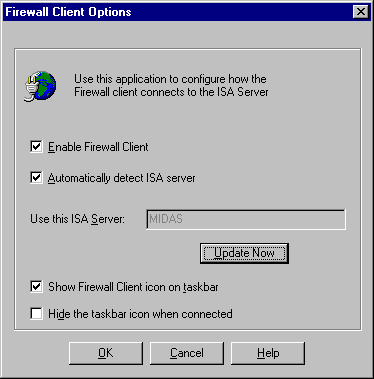
The Enable Firewall Client checkbox enables and disables the Firewall Client software. I find it helpful to disable the firewall client when doing basic network troubleshooting. You’ll see some funny things in your packet traces when the Firewall client is enabled because it’ll intercept all TCP/UDP communications to non-LAT hosts.
The Automatically detect ISA server checkbox allows the Firewall Client to use DHCPINFORM messages to query a DHCP Server for the Autoconfiguration URL. We’ll talk more on how to configure the 252 DHCP Option that allows the Firewall client to detect the ISA Sever later in this article.
The Use this ISA Server text box allows you to manually enter the name of the ISA Server to which you want the Firewall Client to connect. You can also enter an IP address instead of a name. Note that this option is not available if you select the Automatically detect ISA Server option. There is a small issue with entering an IP address. If that IP address doesn’t resolve to the name of the ISA Server, it won’t work! And when the name is resolved, the name will automatically replace the IP address. This isn’t necessarily a bad thing, since using IP addresses to identify the ISA Server’s internal interface wouldn’t be the best option, as IP addresses are always subject to change.
The Show Firewall Client icon on taskbar checkbox determines whether or not the Firewall Client icon will appear in the system tray. If you don’t want the icon to appear in the tray, you can right click the icon and select the Hide When Connected command. If you want to hide the icon via a Registry entry you can go to:
HKLM\Software\Microsoft\Firewall Client
Double click on the HideIcon value in the right pane and change the value to 0. If you need to disable the icon on a large number of machines, you can use Windows 2000 Group Policy and script the running of a .reg file that will disable the tray icon automatically.
The Hide the taskbar icon when connected hides the taskbar icon when the Firewall Client successfully connects to the ISA Server’s Firewall Service. The icon will appear with a red down-arrow if the connection is lost. That’s a helpful feature, since when the user calls and says “I can’t connect to the Internet”, the first thing you want to do is ask whether there is a green or red arrow on the Firewall client icon.

Automating Configuration of the Firewall Client
You might want to automate the configuration of the Firewall Client. The Firewall Client supports a process known as Autodiscovery where the Firewall Client is able to query either a DHCP Server via a DHCPINFORM message, or query a DNS Server for the CNAME record wpad.
The following network client operating systems support Firewall Client Autodiscovery:
Note:
Both Windows 95 and Windows NT are not included on this list.
Configuring the DHCP Server to Support Firewall Client Autodiscovery
The first thing you need to make sure of is that your DHCP clients can contact a DHCP server. All DHCP messages are broadcast messages, so the DHCP server and client must be within broadcast range, or you must have a method in place, such as a DHCP Relay, to pass the DHCP messages from one segment to another. The DHCPINFORM packets must be able to reach the DHCP server from the DHCP client.
You need to create a WPAD 252 DHCP Option on your DHCP server. Perform the following steps to create this record:
- Open the DHCP console via the Administrative Tools menu on your Windows 2000 Server. Note that you do not need to use a Windows 2000 DHCP Server to enable Autodiscovery. However, you must be able to configure the appropriate DHCP Option as outlined in these steps.
- Make sure that there is a scope configured for each network ID for which there are Firewall Clients. (Note the Firewall Clients need to be DHCP Clients to use this method.) You can configure this option to be used on a per scope basis or a per server basis by configured Scope or Server Options, respectively.
- Right click on your DHCP server’s name in the left pane of the console and click the Set Predefined Options command. Click the Add button. You should see something like what appears in the figure below.

- In the Option Type dialog box, type in the following information:
Name: WPAD
Code: 252
Data Type: String
Click OK.
- In the Predefined Options and Values dialog box type in the string value:
http://ISA_Server_Name:Autodiscovery_Port_Number/wpad.dat
Your dialog box should look like the one in the figure below.

- Where the Autodiscovery Port Number is the one defined in the ISA Server settings (as seen in the figure below). The default port number for publishing Autodiscovery information is port 80.

- Click OK to make this new DHCP Option available for assignment.
- In the left pane of the DHCP console, right click on the Scope (or Server) Options node of interest, and then click on the Configure Options command.
- On the General tab, scroll down the list of DHCP Options until you get to 252 WPAD. Put a checkmark in the checkbox for this option, and then click OK. The new option will appear in the right pane as a new Scope Option.
Now DHCP clients configured as Firewall clients from the network ID matching the scope will receive the URL from the DHCP server and will be able to obtain Autoconfiguration information from the ISA Server.
NOTE:
In this example I used the NetBIOS name to describe the server name in the URL. You can get away with using a NetBIOS name if your NetBIOS and DNS host namespace as the same and your clients are configured with the appropriate primary domain name. For example, the clients on our domain tacteam.net are configured with tacteam.net as their primary domain name. Because EXTERT2 represents an unqualified request, the DNS client resolver will formulate the request and send it to the DNS server to resolve the name EXTERT2.tacteam.net and it will resolve to the internal interface of the ISA Server because that name is entered into the DNS zone database. You can also use a FQDN in the 252 entry and not have to worry about resolving unqualified names and client primary domain membership.
Configuring DNS For Automatic Firewall Client Discovery
You can configure DNS to provide Autodiscovery information for your Firewall Clients. When configuring DNS, the ISA Server must listen on port 80 for Autodiscovery requests. If you change the Autodiscovery listening port, then you will not be able to use DNS to provide Autodiscovery information to the Firewall client.
- Open the DNS console via the Administrative Tools menu.
- Expand the Server name, and then expand the Forward Lookup Zones node in the left pane. Right click on the domain in which your ISA Server belongs and click New Alias.
- In the New Resource Record dialog box, type wpad in the Alias name text box and type in the FQDN for the ISA Server in the Fully qualified name for target host text box. Your entry should look like what appears in Figure XXX. Be sure to include the trailing period. Then click OK.

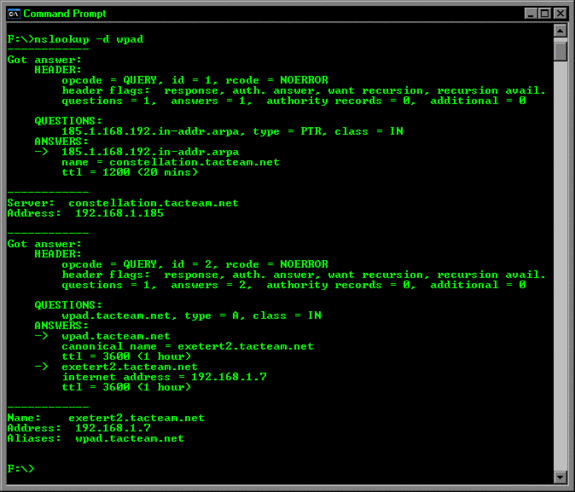
- From the command prompt of the DNS Server, type the command:
nslookup wpad
and press ENTER. The wpad CNAME entry should resolve to your ISA Server as appears in the figure below.

Or you can use debug mode and find something like the following:
WARNING:
Firewall Clients that use DNS to resolve the name of the wpad alias must be configured to query a DNS Server on the internal network. You will not be able to use a public DNS server to query for your wpad CNAME record. An exception to this is when you publish your internal DNS Server to make it available to Internet hosts. However, I can’t think of any practical utility to such a configuration.
There are a couple of problems associated with using DNS for the wpad entry. First, you must use port 80 on the ISA Server to publish Autodiscovery information. This is in contrast to the situation you have with DHCP, where you can configure Autodiscovery to be published on any port number. Another issue with using DNS is that you need to configure a wpad entry for each ISA Server client domain. If you have Firewall Clients in multiple domains, you will need to create the wpad entry in each of those domains.
I consider the DNS method to be inferior to the DHCP method because of the above reasons and more. Think about how your network topology is configured. Do you configure your domain membership around your IP addressing scheme? That’s unlikely. What is the relationship because the location of the internal interface of the ISA Server to the domain membership of a particular host? Domain members can be located anywhere on the globe. But, all the domain members will be configured to use the same ISA Server. On the other hand, the DHCP 252 Option can be server specific. The relationship between the location of the DHCP server, the Firewall client computer and the ISA Server is more likely to be a useful one when it comes to Firewall client Autodiscovery.
In the second part of this article I’ll cover some details regarding Autodiscovery and the Web Proxy client configuration and the many problems you’ll run into along the way when you use DNS for Autodiscovery.
Conclusion
In this article we examined some techniques you can use to automatically configure the Firewall clients. This is a real time saver since you won’t have to handle calls from users wanting to know the IP address or name of the local ISA Server. The Firewall client will be able to get the address of the appropriate ISA Server based on the client’s location.
In part 2 of this article, we’ll look at how to configure Firewall client Autodiscovery during Firewall client setup, how to configure the information sent via Autodiscovery and how to configure the browser on the Firewall client machines.


