A major pain point for companies with many applications is deployments. Depending on your line of business, you usually need to deploy applications during a downtime period. In other words, late at night when you won’t impact users by the downtime. For some DevOps teams, this can lead to many late nights and overtime to ensure deployments are successful. Multiple late nights and overtime can put a drag on the team and expenses. To combat this, you can use a blue/green deployments method to switch deployments and releases to a daytime task.
This article will show you how to use the Azure App Service to create a secondary deployment slot for your production servers and then swap between the two. This will allow you to do deployments anytime during the day because you’ll have two production environments running. Once you complete your validations, you’ll be able to simply swap the servers and make your new version live without disruption. How is this possible? Let’s get an overview of how to get started.
Blue/Green Deployments Overview
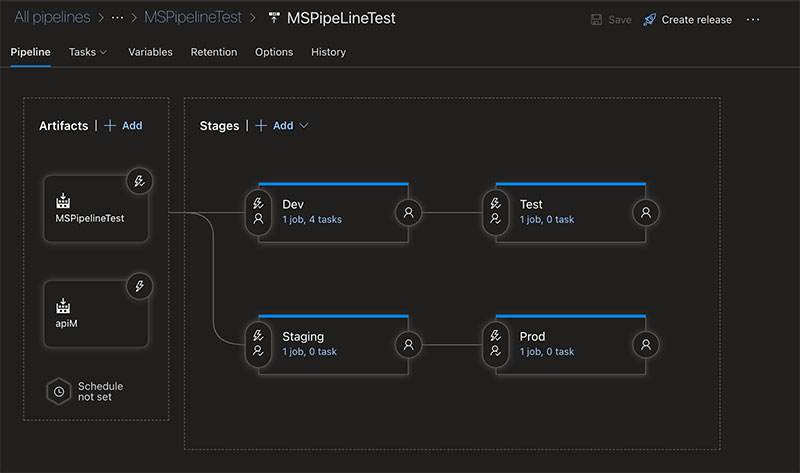
How does a blue/green deployment work, you ask? Simple. In a standard Azure DevOps environment, you generally have 4 environments: Dev, Test, Stage, and Prod. To create a blue/green deployment strategy, you’ll need to add 2 extra stages: Staging-Blue and Prod-Blue. You can see this change in the image below.
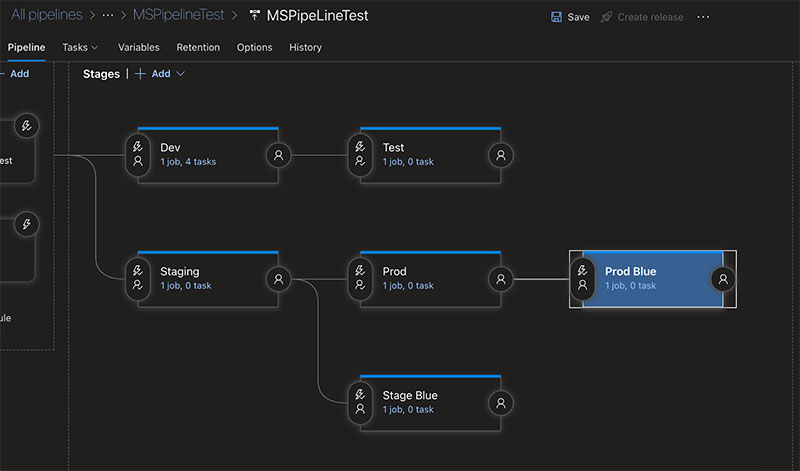
When you start, you’ll want to have mirror images of both stage and prod. For naming conventions, you can call your original staging and prod: “staging-green” and “prod-green”.
Essentially, you push new versions to the blue stage and prod versions. Then, you do testing to ensure all new features are working as expected and the process didn’t introduce any new bugs. Keep in mind, you haven’t done anything to your current production website; it’s still running as normal.
Once the testing is complete and you’ve validated all new changes, use the app services to redirect traffic to Prod-Blue. That’s the location of the new site version. This will allow your team to deploy during on hours and remove many of the late-night deployments many IT professionals dread. Now, let’s take a look at how you can set up your blue/green deployments using Azure App Services.
Setting up Your Blue/Green Deployments
You can complete the entire blue/green deployment process in 7 steps:
- Go to the Azure Portal and select app services
- Choose which application you want to create a blue/green deployment for
- Create a new deployment slot for the specific application (blue)
- Deploy your new application version to your new slot
- Test and validate that all changes are working as you expect them to
- Swap your slots, make blue live, and take green offline
- Deploy yo green and take blue offline for your next deployment
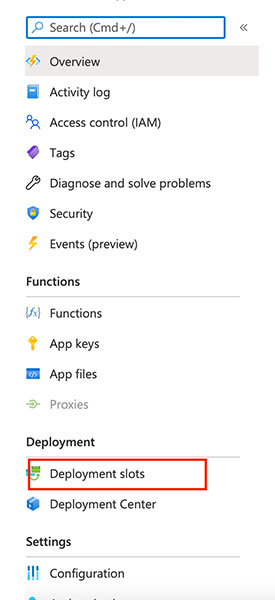
To get started, you need to log in to your Azure Portal and go to App Services. From there, you’ll need to open the application you want to set up blue/green deployments for and then select Deployment Slot.
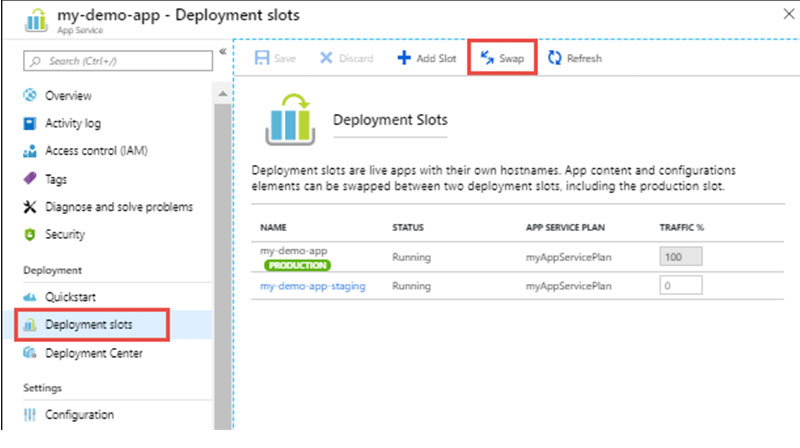
Once you open the deployment slot, you can add a new slot for your blue prod. After you populate it with the required info and create it, you’ll notice you have zero traffic on it. That’s exactly what you want to see because this is the new prod site your team will push its changes to.
Not all settings will be copied over when you create a cloned slot.
Pro Tip
Ensure you configure all the settings the same as the original before you make any swaps. Refer to this list for all the settings you need to set manually:
- CORS
- TLS/SSL
- Web job schedulers
- IP restrictions
- Publishing Endpoints
- Custom Domain names
- Scale settings
- Always on
- Diagnostic log settings
Simply go to the settings tab on the new deployment slot and update these settings. Now, let’s move on to see how you can deploy your app’s latest version.
Deploy the Latest Version to Prod-Blue Then Swap
After updating all settings, you want to deploy your latest app version to Prod-Blue. Then, your team will want to manually validate the changes, and your QA team should run its testing suite for this particular release.
At this point, you’ve validated and tested all changes. Then, you can go to the slots and swap them, so all the traffic redirects away from prod green to Prod-Blue. Having two production environments, you can keep one site live while preparing your new version to deploy with all the changes.
To switch from one to the other, just click on the swap button. Your new release is now live with all your changes. It’s that easy! It only takes seconds, and you can do this during any time of day without disrupting the website.
Next, I’ll clear up some common confusion on what happens the next time you have a deployment. Now, your live site is on Prod-Blue, and you’ll push your new version to prod green.

What’s Next? Prod Green
Now, you’ve completed your blue/green deployments with Azure. At this point, you might ask how to deploy next if prod blue is now your live production site. The next time you do a deployment, you’ll deploy to prod green. In the steps above, you swapped the production slots to direct traffic away from green to blue. Now you’ll deploy to green, do testing and validation, and then swap sites, so traffic is directed away from blue to green.

This cycle of moving back and forth between blue and green will continue. You’ll always manually switch one out for another. This process has some hurdles you need to know so you can mitigate them.
Challenges to Blue/Green Deployment Adoption
While blue/green deployments have great advantages. That’s not to say they don’t come with challenges. Automating deployments with two different production environments can incur additional costs. Say you are using AWS to build out all your infrastructure, then you might be looking at doubling your capital expenditures to maintain duplicate production environments. You also might be increasing the overall time you spend to maintain your infrastructure, which ties up personnel resources.
Another challenge you might face is creating an automated pipeline that can handle a roving live production environment. You’ll need a good dashboard to keep track of your pipeline movements and changes.
Finally, you might get some push back from management with policies or the infamous, “that’s the way we have always done it”.
Final Thoughts
Azure DevOps has made blue/green deployments incredibly easy to do. So easy, it’s just a click of a button! We use App Services to create a new production slot. In turn, this production slow will serve as a parallel production site. As such, it’ll have all the new changes up and ready for testing and validation while the site is running. This is done to prevent any disruption to the application. Once you’ve successfully validated the application, you can swap from green to blue with the click of a button. Once your team makes the switch, you’ll never want to go back to the late nights to deploy during a downtime window.
FAQ
Can I use pipelines to do blue/green deployments?
Sure, you can use this method as well. You need to create two prod environments. Push the new code to one and then manually change the traffic to the newly deployed site with the load balancer. That’s after running tests and validations, of course.
What other ways can I do blue/green deployments with Azure?
Besides the method covered in this article, you have several other options. You can use Azure’s Traffic Manager and take advantage of its weighted round-robin routing method. The other method is to use an application gateway with two backed pools. In this scenario, you’ll need to set rules to switch between the two backend pools.
How are rollbacks handled?
Easy. Just swap back to the previous prod site. For example, you pushed new changes to Prod-Blue and you made it live, but you forget to validate and find a bug. Just click the swap button to go back to green and then work out your bugs on blue. When you’re ready, simply swap back! Version control and rollbacks are important in this line of business!
Can slot swapping be automated?
Yes, you can use PowerShell to automate almost anything. Be sure to check out the Microsoft documentation, to learn more on how to use powershell in your Azure Pipelines to swap out slots for blue/green deployments.
Can slot swapping be used in Kubernetes?
Yes, you can use Kubernetes to manage your images as well as do blue/green deployments. Microsoft and GitHub have some tips and tricks on how to get this to work. You can read more about it on GitHub.
Resources
Working With Azure Webapp Services
Learn more about using Azure’s webapp services here.
Azure DevOps Service Connections
Explore what Azure services connections can do for you and your applications here.
Move From Azure Portal/Powershell to Azure DevOps
Experience the change when moving from Portal to DevOps and unleash your true potential here.
Azure Blueprints: Building and Automating Better and Faster Deployments
Learn more about improving your deployments by using automation on Azure here.
Integrating Azure DevOps With Your macOS: Step-by-Step Guide
Learn how to integrate Azure into Mac OS for all the mac users out there right here.