Welcome to Azure Devops! Azure DevOps can be a one-stop-shop platform for managing source code for applications. Here you can store your code, create automation pipelines, and deploy applications. In addition, you can run automated tests, and much more.
If this is your first time using Azure DevOps or want a refresher, this series of tutorials is for you. In brief, I’ll get you onboard the CI/CD process. To start with, you’ll learn how to create a repo for your code, where other developers can access it and make changes to it. By creating a build pipeline, you’ll be able to start the process of using CI/CD. This allows development teams to increase their working efficiency. This is through taking many of the manual tasks and having them automated.
In this series, you’ll create a repo and a YAML build pipeline first. Next, you’ll establish a release pipeline. Finally, you’ll be setting up quality assurance (QA) testing. These pipelines will be simple and get you familiar with the basics.
First, what is a repo?

What’s a Repo?
A repository or ‘repo’, is a centralized location where your application’s source code lives. This allows developers to make changes to it using version control tools, like Git or Azure DevOps.
Some management tools, like Git, enable both private and public collaborations. This is especially useful for both larger open-source projects and proprietary development. That said, Azure DevOps gives you formal support offerings, a plus in a business setting.
If you don’t use a repo, you’ll have difficulty organizing even smaller team projects. In essence, duplication occurs along with teams working on obsolete code. To stop these problems in your development process you must use a repo.
Let’s now dive into creating your first repo and linking it to a build pipeline.
Creating Your First Repo
The first thing you’ll do is create a new repo:
- Click repos on the left-hand menu.
- Go to the dashboard and select repos. A list of repos that are in your project will appear.
- Go to the bottom of the drop-down and select new repository.
- Once you click new repository, you’ll get a dialog box that asks what kind of repo you want–either Git or TFVC. Often, you’ll want to create a git repo unless your team lead directs you differently.
- Name your repo. In this case, you can call it ‘Test’, but you’ll want to follow your company’s naming conventions.

Once you click create at the bottom of the dialogue box you’re taken to your newly created repo. This is empty except for the automatically generated readme file and a Git ignore file if you chose to include one.
You’ve now successfully created a repo in Azure DevOps. Now for the next step, let’s create a build pipeline to go with this repo.
Create a Build Pipeline
Now that you have created your first repo, you’ll need to create a build pipeline. A build pipeline is going to take all the manual tasks that you need to compile and run your code.
The Compiled Program
This build pipeline will create an artifact; this is your compiled program. In general, this artifact will only be useful in your release pipeline. I’ll talk more about release pipelines in the next article.
Step 1: Creating the Build Pipeline
The first step to creating your build pipeline is quite simple. Right now, you should still be on your newly created repo. At the very top of the page, you should see a blue button that says “set up build”. Click it and this will take you to the next step.

Step 2: Configuring the Build Pipeline
In this step, you configure your pipeline. At this stage, you have two main options that are most commonly used. The “Starter pipeline” will provide you with a boilerplate YAML pipeline to get you started. For this tutorial, you’ll use this option for its setup convenience. Before we move on, though, it’s important to go over a few of the options provided with this option.
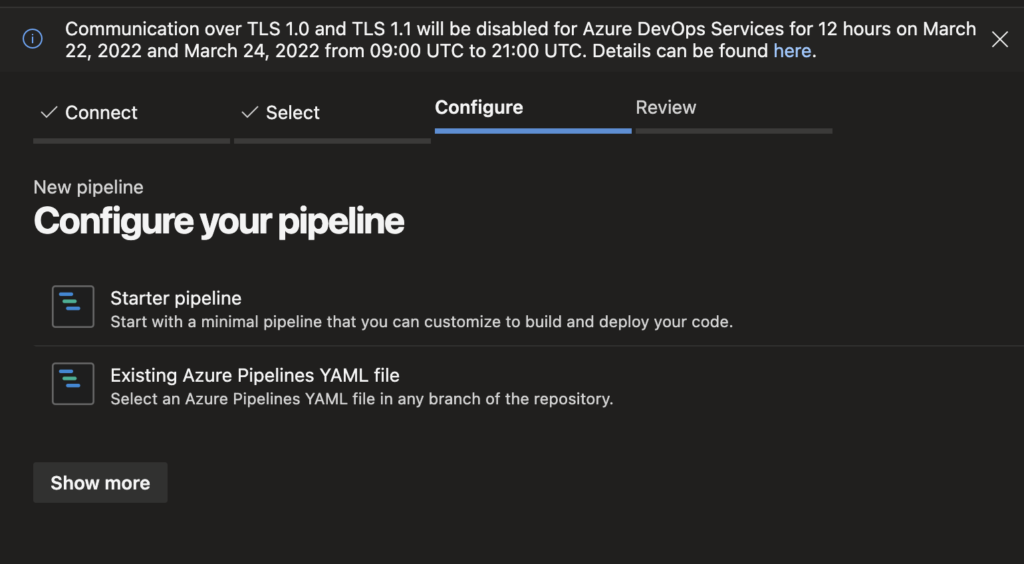
If you already have YAML pipelines, you can click on the second option “Existing Azure Pipelines YAML file”. This will allow you to import your pipelines or templates.
If you click “show more”, you’ll have a long list of pipeline options that include: .NET, ASP.NET, C, C++, Docker, Kubernetes service, Go, Gradle, HTML, Python, etc.
Step 3: Running the Build Pipeline
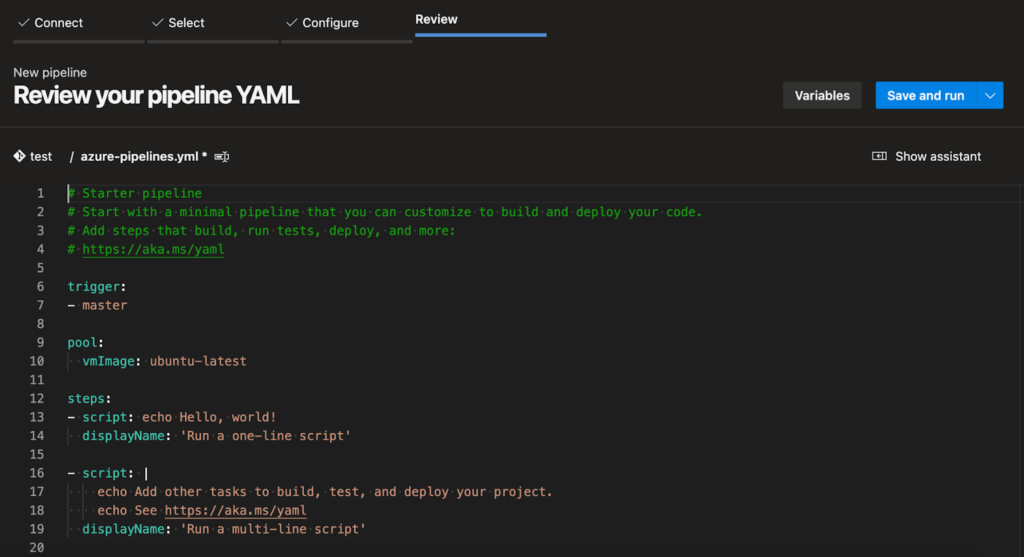
Once you click on “starter pipeline” you’ll get a YAML file with your starter pipeline as shown in the screenshot below.
When you click “save and run” you’ll need to make a commit to push to master to get your pipeline added. Once you do that you can run it; it’s that simple.
Now, let’s walk through the key “steps” you can change so you can optimize your YAML.
YAML Walkthrough
YAML allows you to add or change steps to optimize your workflow. In this section, I’ll provide you with the key steps you need to know. Firstly, let’s go through one of the most important ones.
Trigger
This is what kicks off the pipeline’s workflow. The trigger is set to master in this example. Whenever a pull request (PR) is made to master, this pipeline will run.
Pool
Another useful step is “Pool”. This can be filled with many functions such as vmImage and pipeline agents. In this example, it’s pulling a base image for the latest Ubuntu operating system.
Steps in General
Above all else, you need to remember that “Steps” are the tasks the pipeline will execute. For example, the first script in this example will print “Hello World”. The “displayname” is the name of the task. You can see display names or task names in the console as the pipeline runs. The second script will print a message and a link to follow.
In this example, you can see how simple pipelines and steps are. So, congratulations! Now you can set up pipelines. This will be useful for all Azure DevOps you create in the future.
Final Words
In this tutorial, you created your first repo and set up a build pipeline. This also allows you to create your project and automate any manual tasks. In addition, you became more familiar with YAML and how to read the code which makes up your pipeline.
I’ll cover how to set up a release pipeline in Part 2, so stay tuned. You’ll also learn about handling the different environments.
FAQ
What’s TFVC?
TFVC stands for Team Foundation Version Control. It’s a version control system like Git but it’s Microsoft’s proprietary version control system. This integrates seamlessly into all Microsoft’s software, which can be useful. If you’re running your projects on Team Foundation Server, then you can use TFVC. That said, most of the time you’ll mostly use Git for version control due to it being free.
What’s YAML?
YAML is like JSON and another human-readable data-serialization language. It’s compatible with almost all kinds of development systems. While the syntax is like JSON, it doesn’t use quotes like JSON and white space is important to syntax. In Azure, both YAML and JSON are used extensively in DevOps.
What’s pipeline automation?
Pipelines are a series of tasks in DevOps that are performed to build a repo or release new changes. In essence, pipelines use scripts to automate tasks called steps. Pipeline automation gives IT professionals more efficiency and more freedom when developing applications.
What’s Azure Devops?
Azure DevOps is a platform for hosting all your software development and release management needs in one platform. In this way, you can create repos using this software to manage your source code. Additionally, it helps you to share projects with teams and not work on older versions of code by accident.
What’s CI/CD?
Continuous integration and continuous delivery are at the core of the DevOps process. The idea is that software development becomes one seamless and iterative workflow. It allows teams to develop code, test it, and roll it out to users. As the code is being used in production, development teams are working on future updates. This ensures patches and security are always current or quickly updated.
Resources
Using Environment as Variables in your Azure DevOps Pipeline
Learn how to use your environments as variables to easily make changes in your pipelines here.
Using Azure DevOps Repos in your Azure DevOps Cloud Shell
Explore the advantage of integrating your repos into your cloud shell here.
Customize your Azure Devops Work Items to Improve your Projects
Learn how to customize your Azure DevOps experience to better meet your team’s needs here.
Azure Security: Building a Secure Subscription with Azure DevOps
Learn more about securing your IaC with Azure DevOps here.
Important AWS, Azure, and Google Cloud Launches
Learn more about some of the newest features from the main tech providers here.