It may have once been considered an impossibility, but Microsoft now plays nice with Linux. And Linux is a first-class citizen in Microsoft Azure. In this article from March, Anderson Patricio walks us through the ins-and-outs of how Azure supports the Linux operating system. This tutorial is perfect for any Azure admin looking to learn more about Linux or for anyone studying for their Linux certifications, and that is why it is one of TechGenix’s 20 Best of 2020 articles.
Linux is a first-class citizen in Microsoft Azure. In this article, we will see how the process of adding data disks to a Linux VM in Microsoft Azure works and how we can manage the disk using Linux commands. The goal is to get an understanding of how Azure supports the Linux operating system and brush up on your skills for the Linux certifications (Red Hat or Linux Foundation Certified System Administrator).
We will focus on the most orthodox methods to manage a disk in Linux by using a single disk, partitions, and file system partitions. For virtual machines that require more performance, IOPS, and throughput, the use of Logical Volume Management (LVM) or RAID is the recommended approach to take advantage of Azure. We will have another article here at TechGenix to go over that process.
Azure disks in a Linux VM and adding data disks
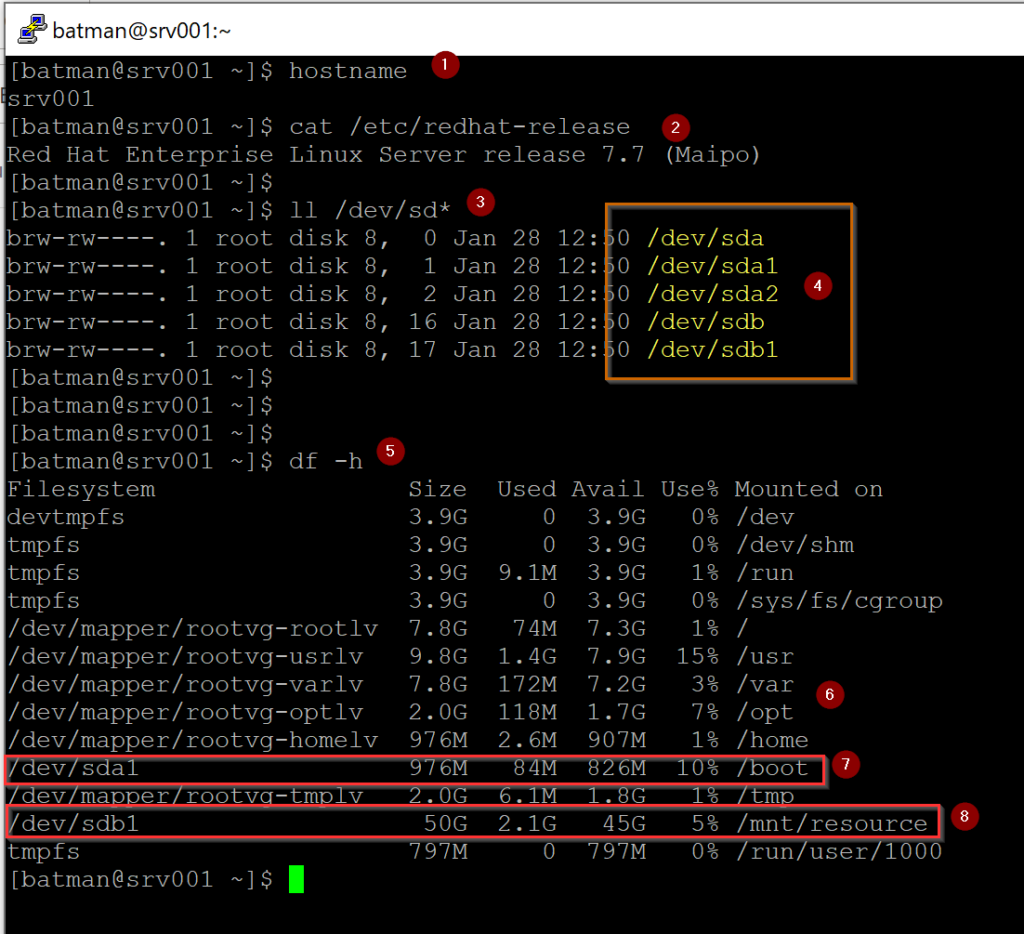
The first step is to understand how the Azure disks are represented to a VM in Microsoft Azure. In this article, we are using Red Hat Enterprise Linux (7.7), and the initial Azure disks (operating system and temporary) will be represented as /dev/sda and /dev/sdb.
All partitions being created from those disks will receive an incremental number (1, 2, 3, and so forth). In the image below, we have the result from the code that we listed below.
The first command (Item 1) will list the current VM name. The second command will provide the current version of the operating system (Item 2). The command to list the existing disks (Item 3) will show all disks that came with the provision of the VM (Item 4). Finally, we will use the df utility (Item 5) to report the file system (usage and mounted), and it will give us a clue where the disks are being used.
Note: Red Hat uses the Logical Volume Management to organize the operating system structure.
hostname
cat /etc/red-hat-release
ll /dev/sd*
df -h
The process of adding disks to an Azure VM is the same independent of the operating system. We are going to add two disks: diskMBR (32GB) and diskGTP (64GB).
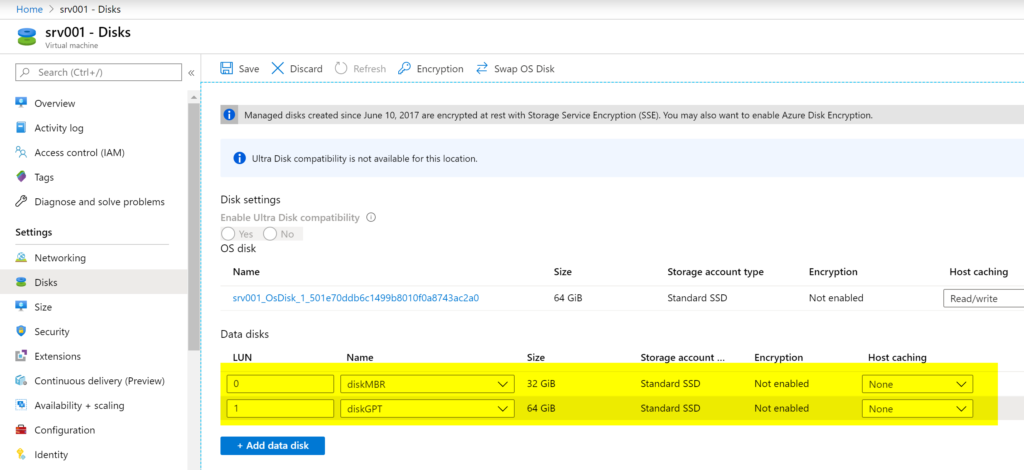
As soon as we Save the new configuration, the disks will appear automatically on your operating system, as depicted in the image below.
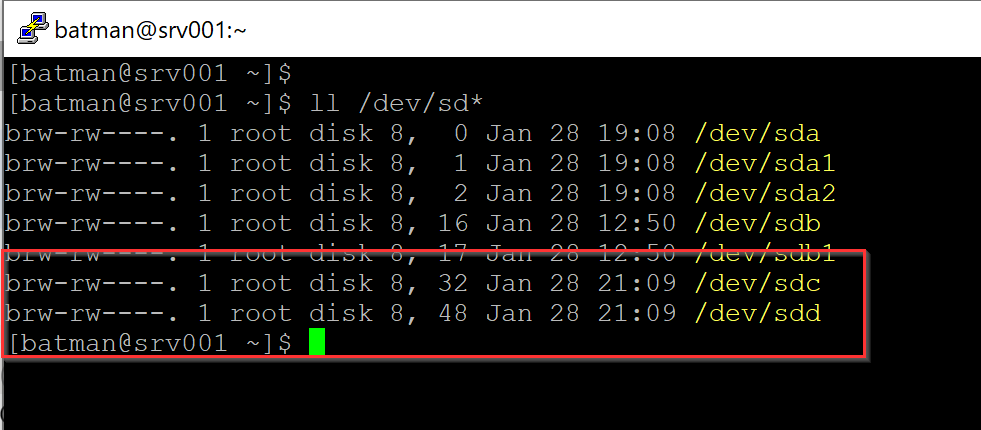
If we want to see which disk it was assigned, we can use sudo fdisk -l /dev/sdX, and it will provide more information. In our article, the MBR (Master Boot Record) disk has 32GBs. Thus sdd and the GPT disk have 64GB, which is sdc.

Managing partitions
A Linux administrator, when using a single disk, has to decide the partition method to be used, and nowadays, it could be either MBR or GPT (GUID Partition Table). The first is older, and it is dated from the decade that this author was born, and DOS 2.0 was on its heydays (just to give the reader an idea!).
The partition may help to address some common issues, such as the use of different file systems, logical separation of data, and so forth.
The MBR is older, and it has some limitations, such as the maximum of four primary partitions in a disk, or three primary and one extended that allows 12 logical partitions. However, the maximum partition size is 2TB. The GPT is more flexible, allowing 128 partitions out of the box and virtually 8 zebibytes (ZiB).
We are going to show how to manage both partitions in this article. To manage MBR partitions, we can use the fdisk utility. The fdisk utility does not commit the changes as we define them. We will apply all the required settings, and at the end, we will commit them in a single shot.
The first step (Item 1) is to pass the disk that we are going to work as a parameter for the fdisk utility. To print all existing partitions in the disk, we can type p (Item 2).
To create a new partition, type n (Item 3), a new set of questions will be queued up. First, we need to define the partition type, select p (primary, Item 4), and partition number (in our case, the first one, thus value 1, as shown in Item 5). Hit enter to define the primary sector available, and then set the size (in our case 10GB, Item 6), we will type +10G. Finally, to commit all changes performed so far, type w and hit enter.
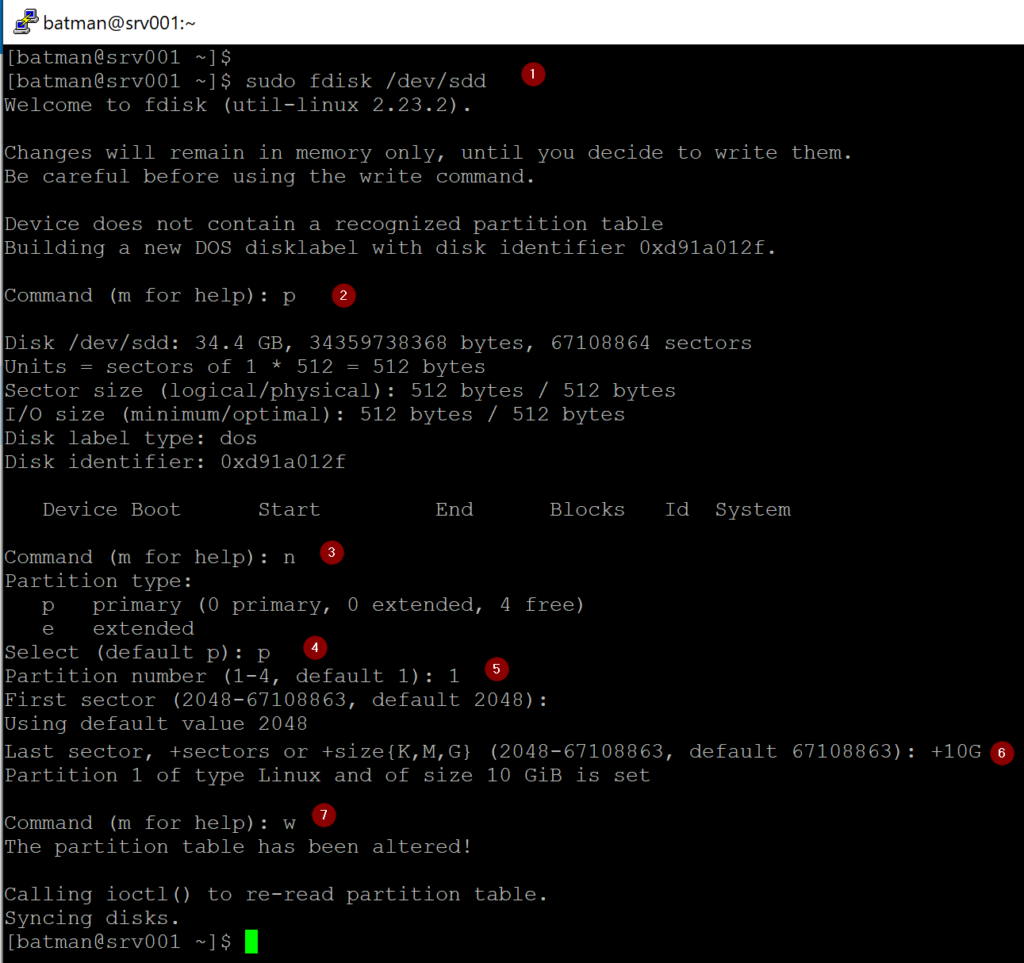
After managing a disk partition, it is a good practice to execute partprobe, which informs the Linux kernel about partition table changes, and it will trigger a kernel read of the partition table, and any eventual changes will be synchronized.
We can repeat these steps to create additional partitions to the disks.
What about the GPT partition? The process is identical, and the only difference is that we use another utility called gdisk. The options are the same, however. Here is a good summary of the differences in the management process between those two types of partitions.
| MBR | GPT | |
| Utility name | fdisk | gdisk |
| List the partition from the command line | fdisk -l /dev/sdd | gdisk -l /dev/sdd |
| Print existing partition within the utility | p | p |
| Create a new partition from within the utility | n | n |
| Write the changes from within the utility | w | w |
Formatting and using a new Linux partition
Now that we have our disks divided into logical partitions, we can assign a file system partition to start using it. There are plenty of file systems available in any given Linux operating system.
The most popular nowadays are ext4 and xfs. Red Hat uses ext4 as default file system partition.
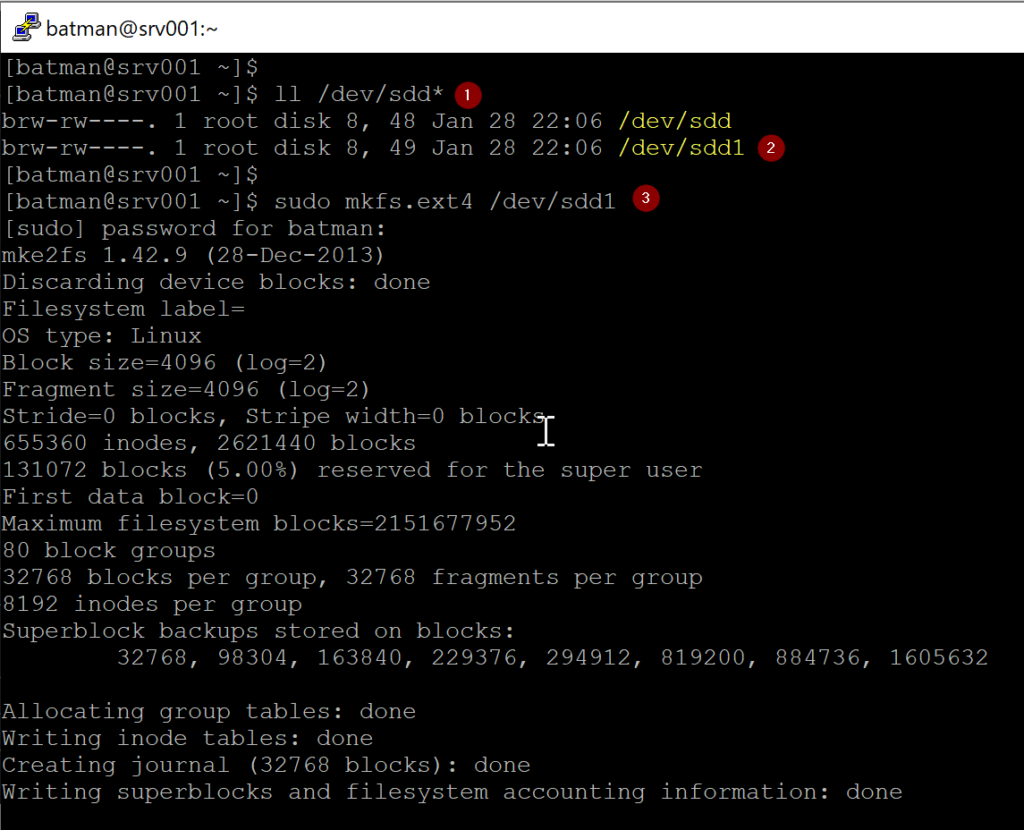
Our first step is to make sure that we have a partition and we know its identification. In the previous step, we created the first one on the /dev/sdd disk. W can list all sdd* files in /dev to have a complete list (as depicted in the image below). We can see the /dev/sdd1 being listed.
To create an ext4 partition on that disks, we need to execute the command sudo mkfs.ext4 /dev/sdd1, wait a few moments, and the partition will be formatted and released to be used.
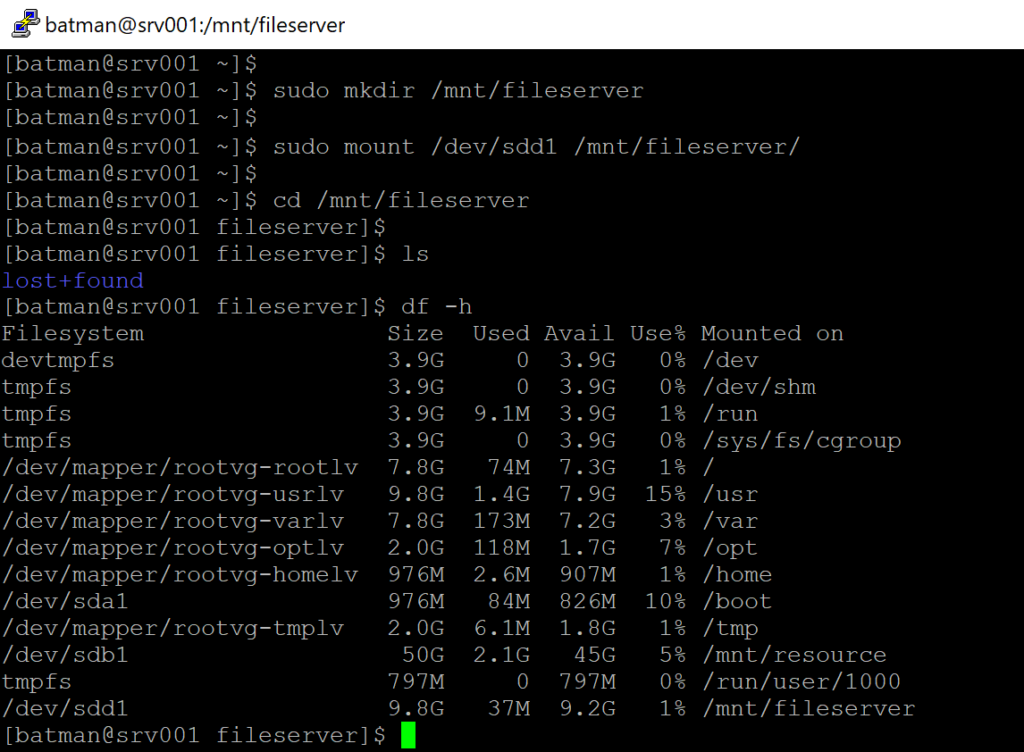
Our next logical step is to mount and use that partition. We will start by creating a folder where we are going to mount our new partition.
sudo mkdir /mnt/fileserver
The second step is to mount our new partition into the new folder.
sudo mount /dev/sdd1 /mnt/fileserver
To make sure that everything is mounted correctly, we can run the following command. The df utility will list all mounted partitions in the current Linux, including their size and mount points. We can see that our 10GB partition is being associated with the /mnt/fileserver.
df -h
If you want to unmount the partition, the following command can be used. We should do that because we will test a persistent mount in the next section.
sudo umount /mnt/fileserver
Creating a persistent mount
The /etc/fstab is a configuration file responsible for mounting file ystems automatically when the system starts up, including the partitions required used by the system.
When using Microsoft Azure, you leverage the fabric redundancy to protect your data. To improve your disk performance (when using premium disks), you should disable the barrier, and that is done by adding barrier=0 (if using ext3/ext4) on your /etc/fstab. If you are using the XFS file system, then you should use the nobarrier instead.
Although we can use the /dev/sdd name, that name may change from time to time, especially when disks are being added and removed. To avoid issues of that nature, we should use the UUID that is unique for each disk, and it is stored in the metadata of the file system.
The first step is to retrieve the UUID, and it can be completed by using the sudo blkid command. Copy the content between quotes from the desired disk, in our case /dev/sdd1.

The second step requires a change in the /etc/fstab, and we will be adding a new line to the file. The file starts with the UUID=<UID>, the mount point, the file system type, the mount point options including the best practice for Azure premium disks, dump frequency (when dump utility is used), and the file system check order.
UUID=83122d46-5d85-4d65-a1c6-e46e5c936734 /mnt/fileserver ext4 defaults,barrier=0 0 0

To validate if the new partition will mount as expected in the next restart, run both of these commands. The first one will mount anything that is defined in the /etc/fstab, and the second will list all mounted file systems in the system. The result should be the new mount point being listed.
mount --all
df -h
Azure and Linux: Now you know the file system basics
If you are either exploring Microsoft Azure or studying for your Linux certification, this article covered the basics to manage disk partitions and file system volumes in a Red Hat Enterprise Linux. We validate how it is going to be the experience of the Linux administrator when adding Azure disks to the running VMs.
Featured image: Shutterstock


Hello,
I really enjoying the tutorial. I’m a beginner on cloud. I’m trying spin up a resource VM with partition coming (/, /boot, /var /tmp, /home) with different partition mounted in fstab through vm deployment and I’m getting stock. any ansible, terraform, or azure template coding to help achieve that.
Thanks