Introduction
If you have read my three part article series covering how to deploy, configure and manage a Clustered Continuous Replication (CCR) cluster, you learned that this feature takes the new Exchange Server 2007 log file shipping and replay (aka continuous replication) features and combines them with the functionality provided by the Microsoft Windows Cluster Service (MSCS). As most of you probably know, a traditional two node active/passive cluster provides redundancy on the hardware level, but you still have a single point of failure when it comes to the store. A CCR cluster eliminates this single point of failure by asynchronously updating a second copy of one or more database with the changes which have been made to the active copy of the database as shown in Figure 1 below.

Figure 1: Cluster Continuous Replication Cluster Scenario
If one or more of the active databases for one reason or the other should fail, the passive database copy/copies will take over, and thereby act as the first line of defense against corruption and data loss. This means that you no longer rely as much on frequent full backups as was the case in the past. But although daily backups are no longer required, you should still periodically take backups of the databases in your CCR cluster (Microsoft best practice is a full weekly and daily incremental backup cycle, which significantly reduces the total volume of data that must be backed up), as there’s still a chance you could lose both the active and passive database copies.
One cool benefit of the continuous replication functionality used by CCR is that it gives you the ability to offload backup workload to the passive node. Since this approach has close to no performance impact on the active node (as no I/O activity takes place here), you could for example take a full backup of all databases during working hours without impacting the end-user with a mailbox stored on the clustered mailbox server. This practically gives you a 24 hour backup window, instead of the usual 6-12 hour backup window most of us deal with in the organizations around the world today.
Keep in mind that you can only benefit from this feature when using the Volume Shadow Copy Service (VSS) technology to back up the databases. That is, you cannot perform streaming backups of passive databases using the Extensible Storage Engine (ESE) application programming interface (API).
Unfortunately the Windows Server Backup (aka NT Backup) tool isn’t capable of performing backups using the Volume Shadow Copy Service (VSS) technology, which means you must use a backup product from a 3rd party vendor, or Microsoft’s own backup solution, the Data Protection Manager version 2 (DPM v2), which currently is in beta.
Backing up the Databases via the Passive Node using DPM v2
For the purpose of this article, I’ll use the Microsoft Data Protection Manager version 2 (DPM v2) product to demonstrate how you can perform a backup of the databases via the passive node.
Note
If you want to test the procedures contained in this article using DPM v2 in your own lab environment, you can apply for the DPM v2 beta via the Microsoft DPM site at link: http://www.microsoft.com/systemcenter/dpm.
Bear in mind that a step by step guide on how to install DPM v2 is outside the scope of this article, you can instead find the relevant deployment documentation on the DPM v2 connect site when you have been granted access to the beta program.
Alright, with DPM v2 properly installed your first task is to deploy the DPM agents to both the active and passive node in the Exchange Server 2007 CCR cluster. This is a straightforward task, which can be accomplished by clicking Install in the Action pane under the Management section in the DPM Administrator Console. When the nodes have been restarted the Agent Status for each node should be displayed as OK as shown in Figure 2.

Figure 2: DPM Agents installed on the CCR Nodes
Next we need to create a protection group for the CCR cluster. We do this by selecting Protection, then clicking Create in the Action pane. This will launch the Create New Protection Group wizard. On the Welcome page click Next.
On the Select group members page expand the clustered mailbox server object, then check the respective storage groups as shown in Figure 3 below.
Now click Next.
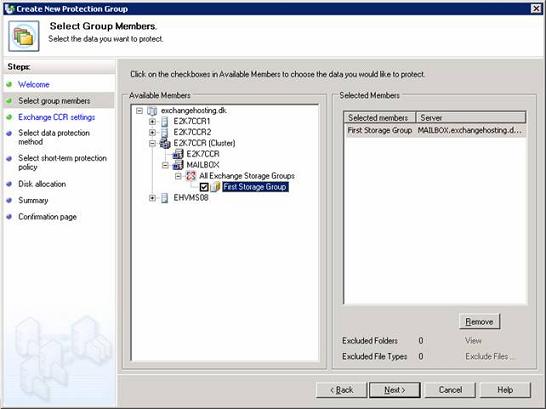
Figure 3: Selecting the Storage Groups
On the Exchange CCR Settings page, select the passive CCR node in the Preferred backup node drop-down box as shown in Figure 4, then click Next.
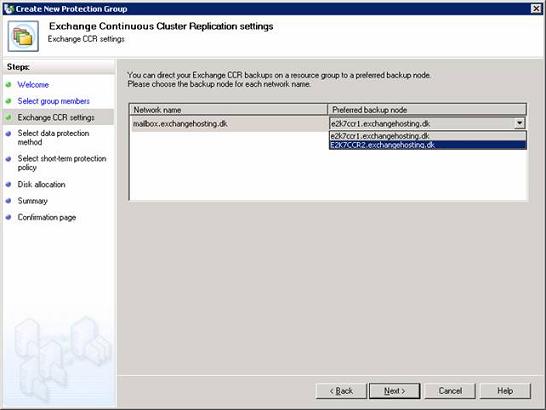
Figure 4: Selecting the Passive Node in the CCR Cluster
On the Select data protection method page shown in Figure 5, specify a name for the protection group, then select whether you want to backup to tape or disk.
Click Next.

Figure 5: Entering the Protection Group Name and specifying the Protection Policy
On the Select short-term protection policy page (Figure 6); specify the retention range in days and the synchronization frequency in minutes or hours.
Note
For detailed information about DPM protection polices, see the DPM documentation guides on the DPM connect site.
Click Next.

Figure 6: Specifying the Retention Range and Synchronization Frequency
On the Disk allocation page click Next, then specify whether the data protection manger should begin now or should be scheduled for later (Figure 7).
Now click Next once again.

Figure 7: Choosing the Replica Creation Method
On the Summary page (Figure 8) verify the information is correct, then click Create Group.

Figure 8: Verifying the Information on the Summary Page is Correct
Now wait for the respective tasks to complete, and then finally click Close (Figure 9).

Figure 9: Waiting for the tasks to complete on the Confirmation page
The Data Protection Manager will now initiate and then begin to create the first replica of the selected Storage Groups. Depending on your hardware specs and the size of each database within the Storage Group, this can take some time.
Note
While you wait you could try to switch to the active node in order to verify no additional performance load is experienced.
When the replica has been created the Status will change to OK as shown in Figure 10.

Figure 10: Database have protected successfully
Now verify that the transaction logs have been truncated on both the active and passive node.
Restoring a Storage Group using DPM v2
In order to restore one or more Storage Groups to the latest recovery point, you can do so in a few simple steps under the Protection section. Showing you these steps are outside the scope of this article, but again the documentation guides on the DPM v2 connect site contain great information on how this is accomplished.
Conclusion
There are many reasons why you would want to deploy a CCR protected clustered mailbox server over a single mailbox server or a Single Copy Cluster (SCC) for that matter. In the context of Exchange database backups, one major benefit of CCR is that not only the active node, but also the passive node supports Volume Shadow Copy Service (VSS) for backing up the Storage Groups. This means that you no longer need to schedule your Exchange backup window to occur in non-working hours, but instead you can perform a full backup of all Storage Groups in the middle of the day.
Although I used DPM v2 for demonstration purposes throughout this article, most 3rd party backup vendors will also let you do VSS backups of the database copies stored on the passive node.