If you missed the previous parts in this article series please read:
If you would like to be notified of when Don Parker releases the next part in this article series please sign up to our WindowSecurity.com Real Time Article Update newsletter.
In the last part of this article series we will look at our newly created malware via a variety of ways. First we shall view it via a hex editor, which will allow us to view its contents safely ie: not actually executing it. From viewing it in a hex editor we will come away with some key information. From there we will use the tool LordPE and Procdump to dump the actively running trojan server from memory. This will allow us to look at the malware while it is running. Lastly, we will also take a look to see how the UPX packed malware looks like at the hex level. This will allow you to recognize UPX packing for what it is. On that note, on with the show.
Practice safe hex
I remember seeing a t-shirt with the above “Practice safe hex” somewhere online before. The spirit of the play on words is quite true! When you open up an executable with a hex editor you are not actually executing the program, but rather simply looking at its contents. That is where the “safe hex” part comes in. Using a hex editor to first take a look at a suspected malware program is very much recommended. By doing so you can confirm several aspects such as whether or not the program is indeed a PE format ie: Microsoft Windows executable. Is the malware packed, assuming packing headers have not been destroyed, as well as pull out some other information via the ASCII embedded in the executable itself. Seeing is believing as they say, so please take a look at the screenshot below.

Figure 1
All Microsoft executables conform to the Portable Executable (PE) file format, and as such they have the ASCII characters “MZ” at the beginning of the file. We can see in the above screenshot that the “MZ” is indeed there. We can now say definitively that this malware program is indeed a Microsoft Windows based one. The reason I point this out is that there are also executables for the Linux world. The file format for Linux is called Executable and Linking Format (ELF). You would see this “ELF” in a Linux based program were this one. So by simply opening up a program with a hex editor you are able to determine whether or not it is a Windows based.
Well we also know that we took two Microsoft Windows based executables earlier on and binded them together using YAB. That does beg the question then of “are there then two PE headers in the binded malware program?” An excellent question indeed, and one that we will answer right now. What I just did was take the binded malware file and opened it up via my hex editor. I noticed though that it was packed with UPX.

Figure 2
We see in the above noted screenshot that the ASCII strings “UPX0” and “UPX1” appear. This tells us that this executable has something within it that was packed using the UPX packer. This is done in order to try and slim down the size of the binded program. So should you see these strings embedded in a suspected malware file then you will realize you need to uncompress it with UPX. Let’s do so right now.
Figure 3
Shown in the above screenshot is the proper UPX syntax to decompress a UPX packed file. What we shall now do is take a look at the now unpacked file with the hex editor to see what is going on. Take a look at the below noted screenshot.
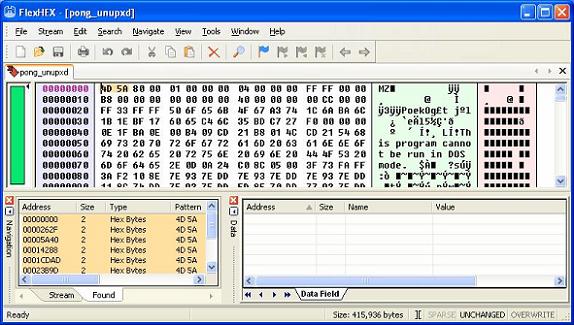
Figure 4
What we see in the bottom left hand corner are nine instances of the byte pattern “4D 5A” of “MZ” as represented in ASCII. This tells me that there may very well be more then one executable in this file. What I now do is click on each instance and check out to see if it is a random hit or if it is another PE header.

Figure 5
We can see in the above screenshot that we do indeed have a second PE header in this malware file. This tells us that someone has binded or grafted another executable onto an exisiting one, much as we did earlier ourselves. This here is definitive proof that something is not right. You could pretty much make a large wager that what you are looking at is malware.
What we just covered now was how to recognize a Microsoft Windows executable or PE at the byte level and confirm it for what it is. Further to that, we also took a look to see what UPX packing looks like, and also how easy it is to unpack. This can be considerably more difficult though if the UPX headers are deliberately destroyed in order to complicate analysis. We shall now move on to quickly cover the use of LordPE and Procdump to dump the memory of a running malware process.
LordPE and Procdump

Figure 6
The screenshot above displays the LordPE dialog box. This tool is very simple to use for the purpose of dumping a processes running memory. You can see highlighted is the process for “msiexec16.exe” which is the Optix Pro trojan server running away quite happily on my VMware image. What we shall now do is right click on that process and then click “dump full”, you will then be prompted to name the dumped file. Give it a name and where you want it saved to. You have now successfully dumped the memory of that running process. What you now need to do is open up that executable program with a hex editor. Once you have opened the program up you would then take a look through it for some interesting ASCII strings.
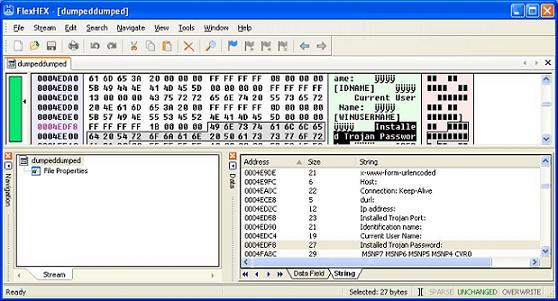
Figure 7
We can see in the above noted screenshot that there are indeed some alarming strings to be found. This type of static analysis (static meaning you have not actually executed the malware file) is helpful to give you an idea of what the malware is capable of doing, and what it may also be. The tool LordPE is also quite helpful should you come across a malware packed file that you are unable unpack. Quite often malware authors will deliberately destroy certain parts of the executable to hide what tool was used to pack it with. Should that be the case and you are unable to figure it out then simply run the program and then dump the memory. As they say “crude yet effective”. Procdump itself works much in the same fashion as LordPE. Please note that I was not able to find a readily available link for Procdump so I would encourage you to Google around for it.
Wrapup
We have seen over the course of this article series that things are not always as they may seem to be. To effectively administer your network as a sys admin that often means you will have to analyze certain suspect files. That can be done as we just saw with tools such as a hex editor, and others ones like LordPE. Further to that it is always helpful to know how malware authors do their work. To enlighten ourselves we then went about building our own little malware sample by using the Optix Pro trojan server and the binder called YAB. By doing this ourselves we gained a much deeper understanding of just how it is done. Armed with that knowledge you are now able to put on a highly effective demonstration for your end-users about the dangers of malware. As always, I sincerely hope this article series was of use to you. Till next time.
If you missed the previous parts in this article series please read:
If you would like to be notified of when Don Parker releases the next part in this article series please sign up to our WindowSecurity.com Real Time Article Update newsletter.