Introduction
Although VPN’s are considered as an extension of a private network, in reality they are nothing close to the equivalent of a private network. This is so because you can’t compare physically connected devices in a closed environment to a remote connection.
Some advantages of a VPN connection are as follows:
- Expensive long distance leased lines are not required, thus lowering costs
- Compared with alternatives, it is relatively easy to setup on both the client and server side
- Flexibilty; for the simple reason that you can connect to a VPN server from anywhere in the world that has internet access.
However, it does have a couple of disadvantages, namely:
- If a fast and reliable internet connection is not available then the performance of the VPN connection can be negatively effected. Unfortunately, this is something out of the organization’s control
- Due to all the encryption that takes place, although compressed, one may notice a slight decrease in speed.
A VPN is composed of two parts:
VPN Server
The VPN Server is the machine that accepts VPN connections from VPN clients. A VPN server provides remote access connections or router-to-router VPN connections. In Windows 2003, this can be setup from the RRAS (Routing and Remote Access Server) Administrative Tool.
VPN Client
The VPN Client can be the remote user who wishes to connect to the VPN Server to establish a session on the network. The interface required by the VPN Client can be that of a dial-in modem or a dedicated connection to the internet (ADSL for example).
The diagram below illustrates the basic anatomy of a typical VPN connection.

The cloud in the middle signifies the public intranet, which in the case of a dedicated connection to the internet interface, the VPN client uses to connect to the server.
A step-by-step guide
The following is a step-by-step guide of how to setup a client based VPN connection using the Point to Point Tunneling protocol.
The first thing you must do is right click the My Network Places icon and select Properties.

This will bring you to the Network Connections window which displays a list of your current network connections. Double click the New Connection Wizard icon.

You are faced with three options – choose the second one, “Connect to the network at my workplace” and click Next.

Now choose the second option, “Virtual Private Network connection” and click Next.
This will bring you to the window in which you should enter the name of the company or server you will be connecting to. After you have typed the name in, press Next.

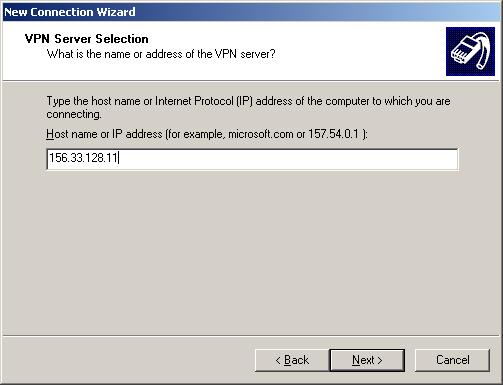
This will bring you to the following window in which you must enter the host name or IP address of the VPN server. Tip: Entering the IP address is recommended (the IP address can be obtained from the server administrator).
And finally, the “Connection Availability” window will allow you to select who is authorized to use the VPN connection. “Anyone’s use” will permit anyone who logs onto the system to use the connection, whereas “My use only” will limit it’s use to you only.

Once you click Next and Finish, your new connection will be visible in the Network Connections window (as seen below).

Right click the new connection and select properties to open the properties window. Here, you can configure, amongst others, the network settings and general options.
Select the Networking tab and in the “Type of VPN” drop down list, choose PPTP VPN. It is not necessary to configure any other options on this page, unless otherwise specified by the VPN server administrator.
File and Printer Sharing for Microsoft Networks is the service required for you to be able to share files and printers once a connection has been established to the organizational network.

Now move onto the Options tab. You are able to configure dialing and redialing options on this page.

If you are using the same logon at your company network as you are for the VPN server, then select the “Include Windows logon domain” check box.
Go to the security tab and verify that the screen looks like the one below. Only select the first check box if the local computer you are logged on to has the same log on account and password as the account you have on the VPN server.

If you select the General tab you can change the IP or Host Name of the VPN server and select whether or not you want another connection to be established first before initiating the VPN connection. You would do this if, for example, you had an ADSL connection you wanted to connect to first before dialing into the VPN server.

Press OK to close the window and return to the network connections window.
If you double click your VPN connection the logon window will appear.

Enter your username and password and click Connect.
After the authentication process is complete, you will be logged on to the VPN Server and two computers will appear at the bottom right hand corner of your screen (default).

Congratulations! You have now successfully been connected to the VPN server.
This was just one of the ways of utilizing the VPN connectivity service offered by Microsoft Windows 2003.
With it’s latest operating system, Microsoft has either introduced or bettered a broad range of services which are intended to make the life of the system’s administrator easier. The idea is for it to be more efficient, reliable and scalable while providing good, all round functionality. RRAS, for example, has been improved and provides great possibilities for companies who wish to implement a demand-dial router, a multiprotocol router or a remote access server.


