If you would like to read the next part in this article series please go to Configuring Certificate-Based Authentication for Exchange 2010 ActiveSync (Part 2).
Introduction
Certificate-based Authentication is ideal for ActiveSync devices because, if like most organizations, your users have to change passwords regularly, this can cause confusion and even account lockouts each time users change their password. If you provision devices centrally, using certificates rather than password can allow administrators to make sure ActiveSync devices will work without user intervention once they are out in the field. Finally, using certificate-based authentication helps ensure that end-users don’t connect personal devices to your organization – although features like ActiveSync device policies and quarantine features can help with this too.
Of course it’s not all simplicity when it comes to certificate-based authentication – the provisioning process is more complicated as the certificate needs to be on the device and configured correctly; a well-setup Exchange organization using password-based authentication benefits from AutoDiscover to allow end-users to easily setup their own devices by just using their email address and account username and password.
In part one of this article we’ll look at what’s involved in configuring Exchange to allow certificate-based authentication for ActiveSync devices including:
- A quick overview of the certificate authority we’ll be using for this multi-part article.
- How to allow administrators to request certificates on behalf of end-users to simplify provisioning.
- Configuring the underlying IIS features on each Exchange 2010 Client Access Server.
- Creating a second IIS site to optionally allow certificate-based authentication to be in use within your Exchange organization at the same time as password-based authentication.
- And, finally – enabling certificate-based authentication for ActiveSync.
In the second part of this series, we’ll then look at how to deploy certificate-based authentication for two different mobile device types; iOS devices like the iPhone, iPad and iPod touch and Android devices using Nitrodesk’s TouchDown ActiveSync client.
Our example Certificate Authority
For this article, we’ve got a rather simple public key infrastructure configured to allow us to easily issue certificates for end-users authentication and publish those certificates to corresponding users in Active Directory.
As shown in the diagram below, we’ve got a standalone Root Certificate Authority, which remains offline for security reasons, which we’ve used to issue a signing certificate to our Enterprise sub-ordinate Certificate Authority to allow it to issue certificates to end users:
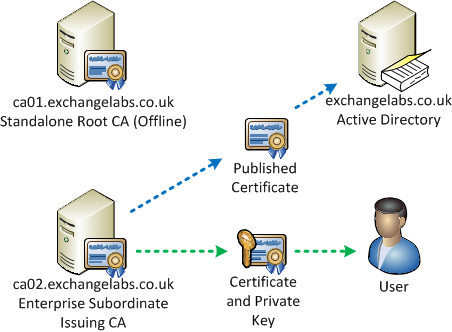
Figure 1: Overview of our example PKI infrastructure
When we request a certificate as a user (or on behalf of a user), we’ll generate a new private key and the Enterprise subordinate CA will issue a certificate. This certificate is kept with the private key to use to authenticate, and published to Active Directory to associate it with the user.
The private key in particular must be kept secure as this is the one thing that proves to our servers that the end user is authorised to access ActiveSync because it’s the only way of decrypting data encrypted using the public part of the pair. That certificate and private key we’ll generate will be exported to our mobile devices as a Personal Information Exchange (.PFX) file.
Enabling an Administrator account to request certificates on behalf of other users
If you’re planning to issue ActiveSync devices to users centrally, generating those certificates for end-users can be a challenge. An ideal way around this is to request a special Enrollment Agent certificate that you can use on a secure workstation to generate certificates on behalf of your users.
The first step to allowing this special type of certificate to be issued is to enable the specific certificate template on the Enterprise subordinate Certificate Authority.
First, open the Certification Authority Snap-in on the CA, and right-click Certificate Templates then choose New>Certificate Template to Issue:

Figure 2: The Certification Authority Snap-in
Then, select the Enrollment Agent from the list of Certificate Templates:

Figure 3: The Enrollment Agent Certificate Template
From the CA perspective, that’s pretty much it for our simple PKI infrastructure. We’ll now be able to request an enrolment certificate from our administrative workstation.
Both to request an enrolment certificate, and to request subsequent end-user certificates for ActiveSync authentication, we’ll need to use the Certificates Microsoft Management Console (MMC) snap-in, focused on the current user’s certificate store.
To do this, open a blank MMC by navigating to Start>Run then launching mmc.exe. From the file menu, choose Add/Remove Snap-In, and then select Certificates. When prompted choose Current User, then choose OK:

Figure 4: Selecting the Certificates snap-in
With the Certificate snap-in for the current Administrative user now open, we can request a special enrolment certificate by right-clicking on Personal, then choosing All Tasks>Request New Certificate:

Figure 5: Requesting a new certificate
Next, after choosing our certificate enrolment policy (for example Active Directory Enrollment Policy), we can request an Enrollment Agent certificate from our Enterprise sub-ordinate CA:
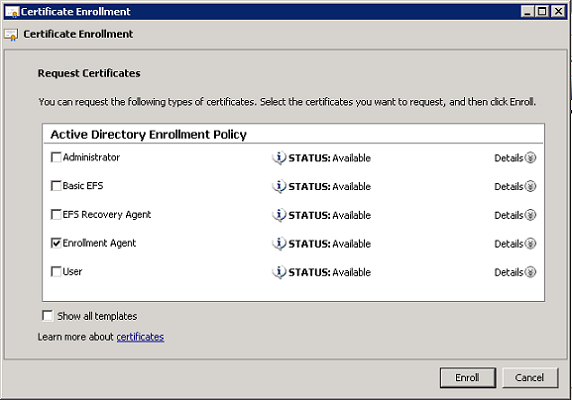
Figure 6: Requesting an Enrollment Agent certificate
We’ll then be able to use this certificate in the second part of this article when we move onto deploying certificates to end-user devices.
Configuring an additional ActiveSync Virtual Directory (Optional)
If you’ve already implemented ActiveSync within your organization, then in addition to deploying this in a test environment, you might wish to provide a separate certificate-based authentication endpoint for mobile devices whilst you transition.
To configure an additional ActiveSync virtual directory, we need to perform the following steps:
- Add an additional IIS site, bound to a dedicated IP address, listening on port 443.
- Use the Exchange Management Shell New-ActiveSyncVirtualDirectory cmdlet to create a new virtual directory within our new IIS site, using the parameter –WebSiteName to specify the name of the new IIS web site.
- Add an additional DNS name and name to our SAN certificate (e.g. certmail.exchangelabs.co.uk)
- If required, publish the new site using TMG or your firewall solution of choice.
Installing additional IIS Features
Before we can authenticate using certificate-based authentication to Exchange Server, we need to make sure the correct IIS role features are installed and enabled on each (typically internet-facing) Client Access server that ActiveSync clients will authenticate against.
The feature we need is IIS Client Certificate Mapping Authentication and we can check and install this feature using either Server Manager or PowerShell.
To use Server Manager, navigate to the IIS Role, then right click and choose Add Role Services, then ensure IIS Client Certificate Mapping Authentication is selected:

Figure 7: Adding role services for IIS using Server Manager
Alternatively, launch PowerShell and enter the following cmdlets:
Import-Module ServerManager
Add-WindowsFeature Web-Client-Auth
Once complete you’ll see the results within the PowerShell session:

Figure 8: Adding role services for IIS using PowerShell
Next, we’ll need to enable certificate-based authentication in IIS for the server itself. The first step it to open IIS, then navigate to the server node. Select Authentication under the IIS heading, then after selecting Active Directory Client Certificate Authentication, choose Enable:

Figure 9: Enabling Certificate Based Authentication in IIS
The second step is to enable certificate-based authenticate for the website we’ll be using for ActiveSync itself. To quickly perform this step, open up an elevated command prompt and enter the following command, substituting Default Web Site for the site you’ll be using for certificate-based ActiveSync authentication:
C:\WINDOWS\SYSTEM32\INETSRV\APPCMD.EXE set config “Default Web Site” -section:system.webServer/security/authentication/clientCertificateMappingAuthentication /enabled:”True” /commit:apphost
If you’re performing this configuration against a default installation, then it’s likely you won’t need to change the configuration, however in our example the site name has been changed to “Certmail”

Figure 10
Configuring ActiveSync for Certificate-based Authentication
Finally for this article, we’ll move onto enabling certificate-based authentication for our ActiveSync virtual directory on each Exchange 2010 client access server that ActiveSync clients will connect to.
To perform this step, open the Exchange Management Console and navigate to Server Configuration>Client Access, then select the Exchange ActiveSync tab:

Figure 11: Client Access configuration for ActiveSync
In the example above, you’ll see two Microsoft-Server-ActiveSync virtual directories – this is because we’ve configured a separate one as described above for Certificate-based authentication leaving the original untouched until we’ve moved all devices to certificate-based authentication.
To reconfigure our chosen virtual directory to use certificate-based authentication, we’ll first double click the ActiveSync virtual directory you wish to only accept certificate-based authentication for, and then select the Authentication tab. Unselect Basic authentication, and then select the Client certificate authentication radio icon Require client certificates and press OK:

Figure 12: Choosing the ActiveSync authentication method
After ensuring client certificates are required, we’ll then open up an elevated command prompt and enable certificate-based authentication at the IIS virtual directory level for ActiveSync, replacing Default Web Site with the name of the site we’re using for our ActiveSync virtual directory (similar to what we’ve done in the previous section):
C:\WINDOWS\SYSTEM32\INETSRV\APPCMD.EXE set config “Default Web Site/Microsoft-Server-ActiveSync” -section:system.webServer/security/authentication/clientCertificateMappingAuthentication /enabled:”True” /commit:apphost
For our example, we’ve replaced the Default Web Site with our Certmail IIS Site for ActiveSync:

Figure 13: Enabling Certificate-based authentication at the IIS level
Finally run iisreset /noforce at an appropriate time to restart IIS and ensure all changes are applied.
Summary
In part one of this article we’ve looked at the CA requirements for certificate-based authentication with ActiveSync, and performed the relevant IIS and Exchange Server configuration to allow mobile devices configured to use certificates to connect.
In the next part of this series, we’ll go through the steps to issue a certificate, and then look at how to deploy certificates to both Android and Apple iOS devices.
If you would like to read the next part in this article series please go to Configuring Certificate-Based Authentication for Exchange 2010 ActiveSync (Part 2).