This article is based on Windows 2003 Enterprise Edition (Build 3790) and Microsoft Exchange Server 2003 (Build 6944.4).
Introduction
There are many ways in Exchange 2003 to configure your organization for receiving and sending e-mails. The default Virtual SMTP Server created in every Exchange Organization is good enough to connect the entire organization to the Internet. The virtual Server handles these connections. Generally, all that you require for mail to flow is the connectivity to the Internet and an MX record that points back to the server that is running Exchange 2000 or Exchange 2003 in your organization.
The question is: Why do we need a SMTP Connector?
The answer:
- You are connecting to a Microsoft Exchange Server 5.5 computer in another routing group (site), and want to use SMTP.
- You want to configure either server-side or client-side ETRN/TURN.
- You want either to send or not to send ETRN/TURN.
- You want to request ETRN/TURN when sending messages.
- You want to request ETRN/TURN from different servers.
- You want to configure outbound security, and to do it once and affect many outbound servers.
- You want to permit high, normal, or low message priorities for a domain.
- You want to permit system or non-system messages.
- You want to schedule the SMTP connector.
- You want to use different delivery times for oversized messages.
- You want to queue mail for remote triggered delivery.
- You want to send HELO instead of EHLO.
- You want to specify a specific address space.
- You want to set delivery restrictions.
An SMTP connector requires an SMTP virtual server. Settings on the SMTP connector override are comparable to settings on the virtual server. When you restrict the size of messages on the virtual server, any connector automatically inherits that limit.
Let’s begin
The first step is to open the Exchange System Manager (ESM) and navigate to the Connectors Container in the First Administrative Group in this example. When you can’t see the Administrative Groups you have to go into the properties of the Exchange Organization object and enable the view of “Administrative Groups” and “Routing Groups”.
Important: Unless you activate the view of Routing- and Administrative Groups in ESM you can’t create a Routing Group Connector. This is also true when your Administrative Group has only one Routing Group.
In the Context Menu of the Connector Container click New – “SMTP Connector”.
Figure 1: Creating a SMTP Connector

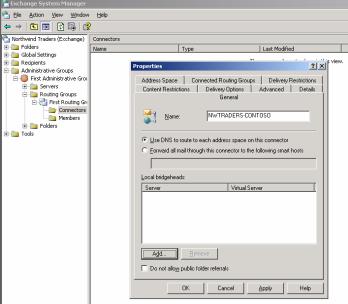
Now we have to give a Name to the new Connection. I recommend naming the connector after the two endpoints which this connector connects.
Next we have to select “Use DNS to route to each address space on this connector”. DNS is the recommended configuration for Exchange.
It is also possible to “Forward all mail through this connector to the following smart hosts”. When you prefer this type you must type the host name into the field or the IP address of the Smart Host in Brackets (this prevents Exchange from trying to resolve the IP Address with DNS).
Figure 2: General settings
Select a Bridgehead Server for the virtual SMTP Server Instance. Every SMTP Connector must be associated with a virtual SMTP Server instance.
Figure 3: Select a Bridgehead Serve

The next step is to configure a Address Space for the SMTP Connector. There a several Address Space types available. We select “SMTP” and specify the Address “contoso.com”. In the future this connector will accept e-mails for *@contoso.com. You can use wildcards like *.com and many others.
The Connector scope makes it possible for you to restrict the scope of the selected Routing Group or the entire Organization.
To optimize and customize the Exchange Routing process you can assign logical costs to every address space.
Figure 4: Select a Address Space

In the Delivery Restrictions field you can specify from which Recipients you accept and reject messages. You can specify “Black-” and “White-Lists”.
Figure 5: Configure Delivery Restrictions

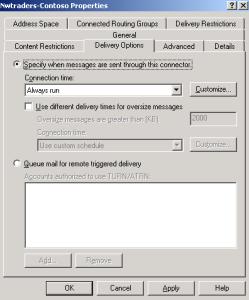
In the Delivery Options Field you can specify when messages are sent through this connector.
A nice feature is to specify a different delivery time for oversize messages.
Figure 6: Configure Delivery Options
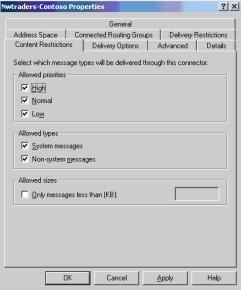
In the Content Restrictions field you can select the allowed priorities for e-mails sent through this connector. You can specify a message Priority in Outlook.
It is possible to choose which allowed types of message are delivered through this connector. This makes it possible to create two connectors. One connector for only Non-system messages and one connector for System messages for a better control of message delivery.
At last you can restrict the maximum message size for this connector.
Figure 7: Configure Content Restrictions
In the Advanced Tab you can configure the SMTP Connector for the extended SMTP commands (HELO/EHLO). The Default is EHLO. Older e-mail Systems don’t understand the EHLO syntax and use HELO instead of EHLO.
Figure 8: Configure Advanced Options

Conclusion
With the help of an SMTP Connector you have complete control over the message flow in your Enterprise. The SMTP Connector is a flexible and powerful component in an Exchange Organization.
Related Links
Exchange 2003 Online help
www.microsoft.com/exchange
http://support.microsoft.com/default.aspx?scid=kb;en-us;314961
http://support.microsoft.com/default.aspx?scid=kb;en-us;265293
http://support.microsoft.com/default.aspx?scid=kb;en-us;294736


