Introduction
Those familiar with VirtualizationAdmin.com site are no strangers to the fact that virtualization is everywhere… every operating system distributed has to consider either being a guest Virtual Machine (VM) on a server, or host VM’s and many of them are in fact building upon the base OS to accommodate. That being said, many people have requested information on how to configure a virtualized environment using their Apple computers as a host to other VMs. There are many users of Apple systems today and it’s a widely used system, especially MacBook Pro laptops, iMac’s and Mac Pro desktops. What if you wanted to run Windows, Linux or some other OS (and the applications that run on it), you can use your Apple system to facilitate it.
Similar to how Windows XP runs on Windows 7 via virtualization so that you can access and use your old applications via Virtual PC, Apples can run virtualization software so that you can run Windows for example to work with Microsoft Office documents. There are many reasons as to why you may want to virtualize with an Apple, so in this article the fundamentals of virtualization, setting up your Apple and creating VMs are covered so that you can get started.
Note:
This article does not cover the iPhone or the newly released iPad, which currently does not support a virtualized environment but Citrix, VMware, Parallels and other application developers are currently working on it. Visit the links section at the end of this article to learn more about it. .
Download and Preparation
Virtualization is the process of creating, using your computer, as a host to running other desktop environments – called Virtual Machines, or VMs for short – and it does this by running the new system (VM) using the resources on your computer.
Since virtualization is so intensive, you must prepare your system to be able to use it. Your systems resources will be taxed, so make sure you scale up your system to handle the load. Make sure that your system has enough disk space, memory and that the CPU is able to handle virtualization, which most any chip that is sold does in fact do.
There are many ways you can create a virtualized environment and today, you can do it with just about any operating system you primarily use. When using Apple MAC OS X, Leopard or Snow Leopard are the current offerings available and both are supported. To get started, first make sure that your Apple operating system version matches the requirements of the software you are going to install to create a virtualized environment. To find out what version of Apple Mac OS X you are running you can go to the Apple menu and select About This Mac from the dropdown menu. Consult the Link section at the end of the article for compatibility information from Apple if you are unsure.
Once you know what version of OS X you are running, you can then download the appropriate virtualization software package and get started. There are few vendor options available to choose from. For one, the older Apple Boot Camp, is now dwarfed now by Parallels. Parallels Desktop 5 is the current industry leader on Apple-based virtualization offerings. Although VMware and Citrix are both working on Apple virtualization projects, Parallels is currently the leader.
Installation
Parallels can be downloaded for trial use by going to the Parallels web site. This site can be found in the Links section of this article. Once downloaded, you can begin your installation. Make sure you already checked your system requirements, scaled up your computer to handle the load of running VMs and that the software is compatible with your version of OS X.
To install, run the downloaded package and follow the prompts to install Desktop 5. Figure 1 shows the Mac Installer for Parallels Desktop 5. The left side of the figure shows many steps you will take to install and prepare this application for use. Click Continue to proceed.
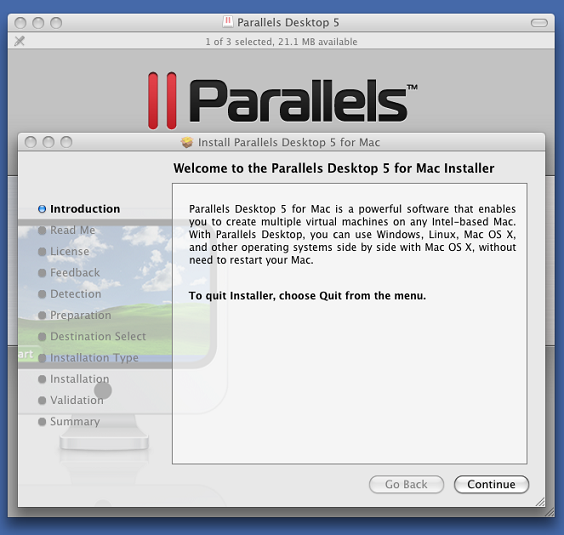
Figure 1: Installing Parallels Desktop 5 on your Mac
Next, you will be warned that this application will use 371 MBs of disk space on your current hard drive. As mentioned earlier, make sure that you have plenty of space for configuring VMs; each VM will take up space on your hard drive. Figure 2 shows the Standard Install of Desktop 5 and the disk space requirements needed. Click Install to get started.
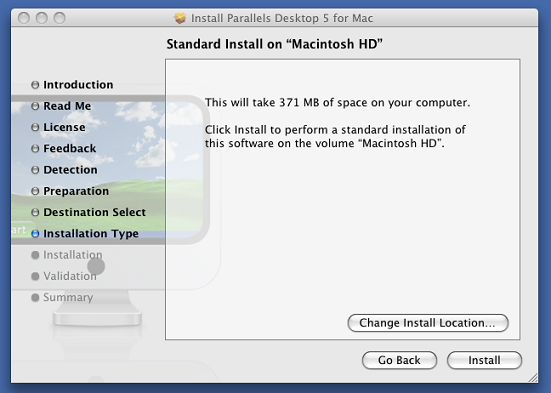
Figure 2: Installing Desktop 5 and Verifying Disk Space Requirements
Next, log into your Apple system so that you can approve the installation process. Here, you can log in with the credentials supplied when you installed your Apple system. Figure 3 shows the login process.

Figure 3: Log into your Apple System to Approve the Installation
Once you log in, the installation will complete. To use Desktop 5, you can browse to your Applications folder as seen in Figure 4. In the Applications folder, you will find the launcher for Parallels Desktop. By clicking on this icon, you will launch the application.

Figure 4: Launching Desktop 5 from Applications
To make a shortcut to this application, simply drag the icon to the Dock as seen in Figure 5. This will create a shortcut so that you can launch Desktop 5 directly from the Dock without having to browse through the Applications folder.

Figure 5: Create a Shortcut to Desktop 5 in your Dock
Next, you can click on either link to open Parallels Desktop. In Figure 6, if you have not activated Desktop 5, you will be asked to do so. You cannot start VMs or do other tasks without activating the product. If you are using a demo version, when you signed up for the download on the Parallels web site, you will be emailed a trial key for use. If you have the full version, you will be sent a full license key for use. Click on Activate Product to enter your key.
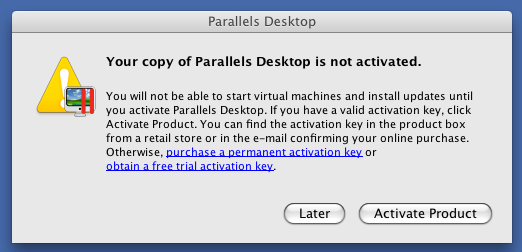
Figure 6: Activating Parallels Desktop
Figure 7 shows the activation process for Desktop 5. Here you can add your key and get to work. You can use a trial, purchase a full version or hit Cancel to quit.
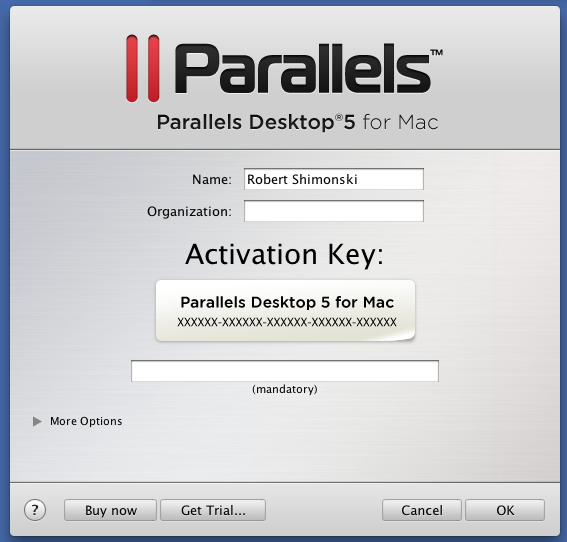
Figure 7: Entering the Activation Key for Desktop 5
Once you click OK and activate your product, you will be ready to get started setting up your virtualized environment. Your next step is to create a virtual machine or VM on your system within Parallels. In the next section we will look at how to set this up.
Creating Virtual Machines (VMs)
Now that you are ready to create a VM, you can launch Parallels Desktop 5, as seen in Figure 8, and either create a new VM or import VMs you already have configured. For example, if you had an older installation of Parallels, or someone wanted to share a VM with you, you can import it. This is the launch pad view which you can turn off as seen in the dialog box. You can also choose to Watch Video Tutorials to learn more about this process. Parallels offers extensive online documentation and help to support you if needed.

Figure 8: Getting Started with Parallels and Creating a Virtual Machine (VM)
To create a VM without using the launch pad, you can go to your Apple menu and make sure that Parallels is the active application. In Figure 9, you can see that by going to File – New (Import of Open as well), you can create a VM here.

Figure 9: Creating a VM from the Parallels Desktop Menu
If you select to create a new VM, the New Virtual Machine Assistant Wizard as seen in Figure 10 will walk you through the process. Here you can select the operating system source. This means, if you want to install Windows or Linux as a VM, you will need the OS installation files to do it. If you have a DVD, you can select it, or an alternate location, such as your disk drive for ISO files as an example.
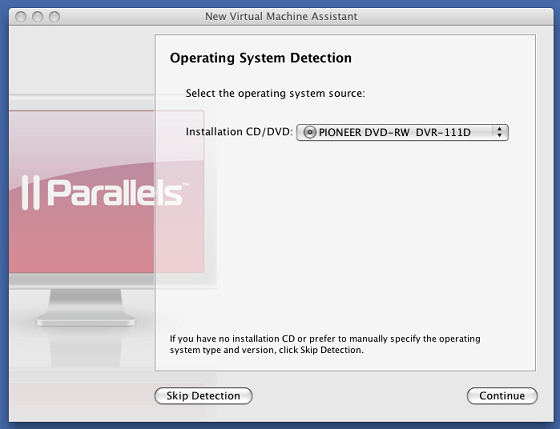
Figure 10: Using the New Virtual Machine Assistant Wizard
Once you select the source location, click Continue to begin. Figure 11 shows the windows to select the operating system type and version. There are many options to choose from such as Windows versions 7, Vista and XP, Windows Server versions or Linux distributions such as Ubuntu, Fedora or RHEL.
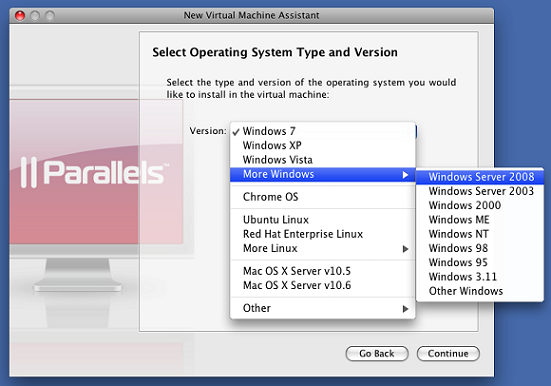
Figure 11: Selecting the OS for your new Virtual Machine
In this example, we will select Fedora Linux as the OS to install into the VM. Figure 12 shows the selection of Fedora Linux. Click Continue to proceed with the installation process.
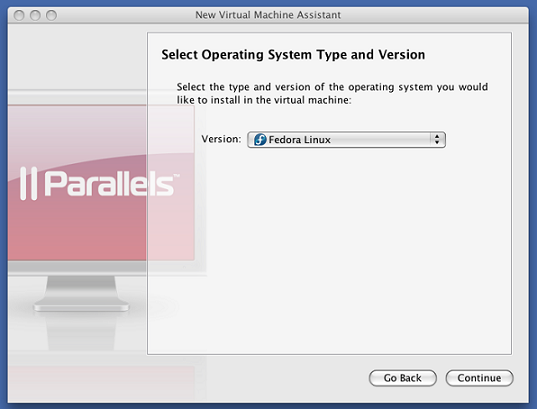
Figure 12: Installing Fedora Linux from Red Hat on your Mac System
If you do not have the installation DVD, you can use an ISO file as seen in Figure 13. You can download Fedora on Red Hat’s main web site (found in the Links section of this article) and either create a DVD, or stage the ISO file to be mounted by Parallels when the VM installation is completed. Figure 13 shows the ISO file location, and the file used is a bin (or binary) file.
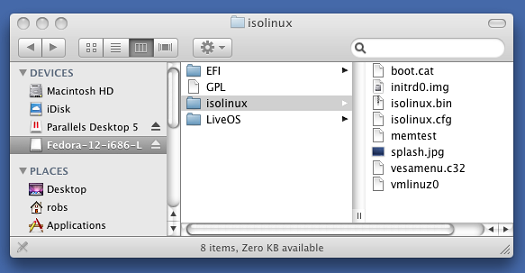
Figure 13: Selecting a Linux ISO for use with your VM
Now that you have your ISO staged, you can click on one of three options as seen in Figure 14. You can choose Express Linux, Typical or Custom for your Virtual Machine Type. Here we will use the Express Linux option, which will create a Red Hat or Ubuntu VM and automatically install the OS on it. By selecting Typical or Custom, you can either choose an installation using the most typical settings, or customize them to your liking.

Figure 14: Selecting your Virtual Machine Type
Next, once you click Continue to move on, you will then need to login with a username and password credential so that you can create and use your new VM. Figure 15 gives you the opportunity to configure these settings and get started customizing your new VM.
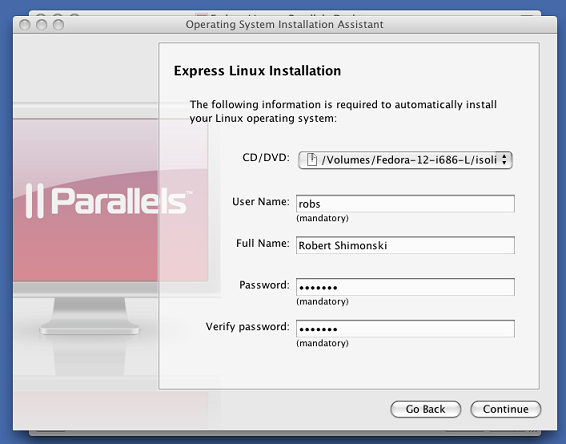
Figure 15: Preparing to create your new VM with the OS Installation Assistant
Once credentials are supplied, you can then customize the hardware used for your new VM. Since Virtual Machines share the base system’s hardware, you will need to make sure that you have plenty to spare. Figure 16 shows CPU and Memory Options where you can adjust the amount of processing power and memory usage for your VM.
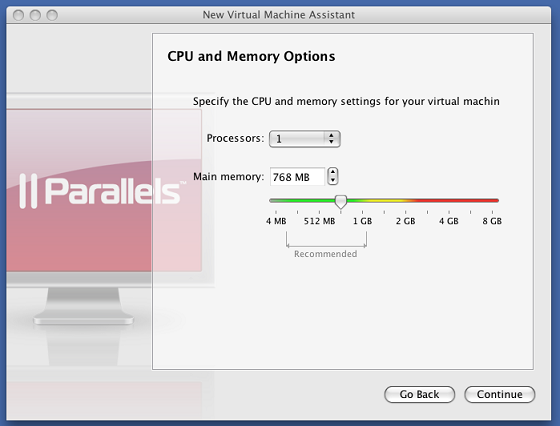
Figure 16: Configuring CPU and Memory Options
Here you can select the amount of processors as well as how much main memory the VM will consume. Parallels New Virtual Machine Assistant will provide you with recommended settings if you are unsure as to how much you should use. However, you should always do research and make sure that you in fact provide enough resources for your VM to function, by limiting resources too much; you may or may not be able to launch and use your new VM.
Figure 17 shows the Hard Disk Options you can configure. For example, you can use a new image file, existing image file, Boot Camp partition, or choose to not use the hard disk at all.

Figure 17: Configuring Desktop 5 Hard Disk Options for your VM
Click Continue to proceed. Next, Figure 18 shows the New Virtual Hard Disk settings you can configure for your VM. Since you are using a portion of your main system disk, you need to section off a segment of it for VM use. You can adjust the capacity or set other options such as Split the disk image into 2 GB files, Set the disk to expand, or just us Plain disk which uses the full size of the system disk. Here, the option for expansion is selected.

Figure 18: Setting New Virtual Hard Disk Options
Click Continue to proceed. Next, Figure 19 shows the Network Type dialog box where you can configure how your new VM will be connected to a network. You can select Shared Networking, Bridged, Host-Only and/or No Networking. Shared allows you to use the Apple hosts network settings to make network connections, where Bridged allows the VM to appear as its own separate networked entity. Host-Only allows your VM to be contained to the host (Mac), and the VMs configured on it.

Figure 19: Selecting the Networking Type for your VM
Click Continue to proceed. Next, Figure 20 shows Optimization Options. Here you can specify whether the base system (Mac), or the VM will be allocated the most resources. The recommended setting is to allow for the VM to be allocated more resources which will help to increase the performance of the VM, but may impact your host system. By selecting Mac, you will allocate more resources to OS X.
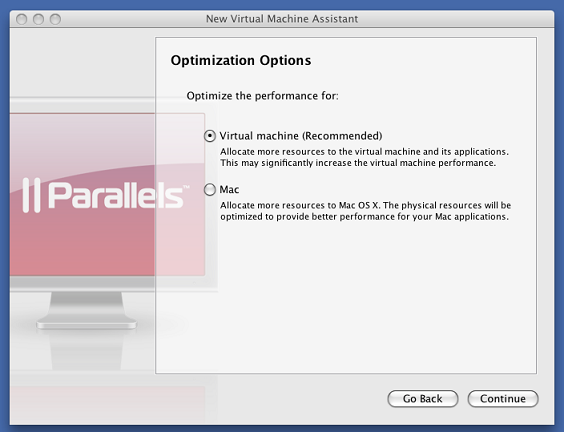
Figure 20: Setting Optimization Options for your VM
Click Continue to proceed. Next, Figure 21 allows you to specify the name of your VM and the location so that other users of the host can find it. It’s recommended that you name the VM something that you will be able to identify what it is, this way if you create multiple VMs, you can launch them quickly by looking at the VM name in order to identify what it is.

Figure 21: Configuring the VMs Name and Location Settings
Click Create to proceed. Next, Figure 22 shows the final dialog where you can finish up the creating process. Here you can also select Boot Options for your VM. Click on the drop down arrow to view your options and configure them.
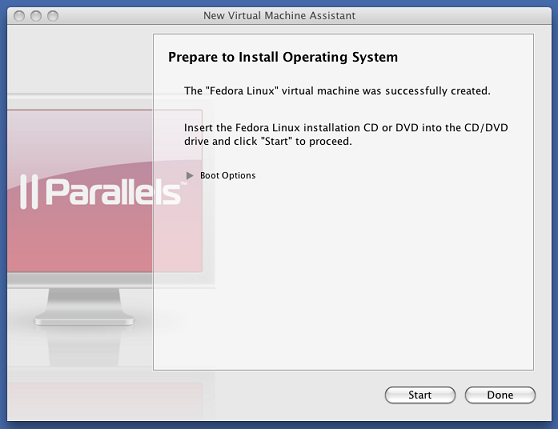
Figure 22: Preparing your VM for OS Installation and Setting Boot Options
Click Done to finish the VM OS installation. Next, Figure 23 shows the Parallels Desktop VM we just created. Note that when you open and launch your VM, your host system may suffer a performance hit, so try to monitor your systems closely when first setting up and configuring your VMs.

Figure 23: Launching your new Linux VM
From here, you can manage your new VM’s OS just like you would if it were installed on physical hardware. For example, you can log in, run applications and do whatever a normal desktop would do, from your Mac desktop. The bottom toolbar for the VM window offers tools, options such as a shutdown button and more.
You will find VMs handy, for example, Figure 24 shows a reboot of the Linux VM, where Parallels manages the startup and boot process. Simulating a failed disk drive, you can troubleshoot OS problems from boot up.
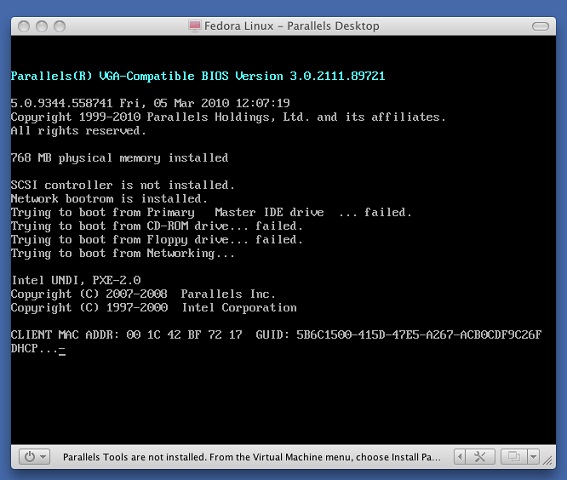
Figure 24: Starting up your New Linux VM
Once you have your VM (or multiple VMs) configured and operational, you can now work with many different OS versions directly on your Apple Mac. Try other OS versions and check out how Parallels allows you to work with them directly on your Mac.
Note:
Parallels Tools (as seen at the bottom of Figure 24), are used to optimize the management of your VMs. These tools allow for easier anagement and configuration of your VMs.
Summary
In this article, we looked at using virtualization software (Parallels) to create a virtualized environment on your Apple-based system. We looked at virtualization options, preparation, installation and configuration and use of VMs. For more information, please visit the Helpful Information and links section and read up on each vendor’s official documentation.
Helpful Information and Links
In this section of the article, you can find more information on virtualization, where to find and download software and support articles to help you learn more. Other tools and stories are also included here that you can investigate to help you learn more about these systems.
- Citrix embraces Apple with iPhone virtualization, app store for corporate IT
- Apple Taps Virtualization
- Apple Virtualization Page
- Apple to Allow Virtualization of Leopard
- VMware – Apple’s Leopard Gets Virtualized
- VMware Fusion 3.0.1
- VMware Announces New Product for Apple Mac OS X Users
- VMware Fusion vs. Parallels Desktop vs. Apple Boot Camp
- Parallels Home
- Parallels Desktop 5 for Mac
- Red Hat Home
- Citrix Brings Microsoft Office to the iPad
- Citrix Takes Virtualization, Conferencing Tools to iPad
- Citrix plans for Windows 7 virtualization on iPad
- Microsoft and Apple agree: Blanket virtualization is a no-no
- Apple reiterates: no interest in virtualization for Leopard
- Virtualization running on iPad
- Topic: x86 guest virtualization on XServe G5 PowerPC
- Parallels: Apple Servers Meet Bare Metal Virtualization
- New Virtualization Software Lets Mac OS X and Windows Share Desktop
- Apple XServe


