Configuring ISA Server Arrays
by
Kai Wilke
Thomas W Shinder
ISA Server can be installed as a single server or as a multi server array. The single server configuration is the most commonly used setup because only a few organizations have demand for the high availability and high performance provided by Web Proxy arrays. However, in mission critical networks you can use ISA Server arrays to enhance availability and performance on demand. An ISA Server array is a good “Scale Out” method to accomplish the enterprise needs for firewalls and proxy servers.

To setup an ISA Server array you have to use the ISA Server Enterprise Edition for installation. Furthermore, you will need Active Directory because ISA Server arrays, like Exchange 2000 Servers, store much of their configuration information in the Active Directory. This is a very reliable and fault tolerant method to distribute configuration information between the ISA Server array members or between different Arrays. However, before you can store ISA Server array configurations into Active Directory you have to add new ISA object classes to the schema.
Security note:
Schema modifications are NOT a day-to-day operation and should planned and tested carefully because this step is not reversible and it will impact your entire forest! To lower the risk, you can setup a dedicated Active Directory Forest for the ISA Server Arrays to avoid schema modifications at your corporate forest. If you want to force user authentication by using ISA Server access policies you can also create one-way trusts to your corporate domains to include corporate user accounts. This workaround will also grant the ISA Server forest only minimal permissions at the corporate forest.
After adding the new schema classes, you’re ready to use ISA Servers in array mode. The Array mode gives an administrator an easy mechanism to control two or more ISA Servers as a single unit. This is a big advantage for scaled out ISA Server solutions because if you change the Array rule set it’ll be applied to all array members. Moreover you can use Enterprise Policies for large enterprise networks to apply protocol rules, site and content rules, and policy elements to more than one ISA Server Array at the same time. Finally, you got the capability to create a single ISA Server report job to display the average load of all your servers at one time.
Note:
Only by using ISA Server Arrays you will get a support for using CARP (Cache Array Routing Protocol) to enhance availability and performance of a scaled out ISA Server solution with transparent web proxy capability. CARP is a mathematical algorithm that allows equal distributing of web requests between two or more ISA Servers to enhance performance. The main advantage over other load balancing solutions is that CARP avoids duplicated cache contents between the Array members. CARP can do this by using the destination URL as a base for the mathematical calculation instead of using only IP addresses like normal NLB does . This guarantees that only a single server is responsible for a specific Website. In addition, CARP provides a high degree of fault tolerance because if one of the Web Proxy services becomes unavailable, the client request will be automatically redistributed to the remaining web proxy services.
In this article we’ll focus on the steps necessary to create an array and how to configure ISA Servers as array members. However, the configuration and use of CARP will be discussed in a separate article.
Steps to configure ISA Server arrays:
Prepare the schema master for schema updates
You should create at least a system state backup from a domain controller of your choice before you modify the Active Directory schema. The reason for this is that schema modifications are not reversible and if you run into troubles with your Active Directory database you must have an approved disaster recovery plan.
Note:
Making a backup of the Active Directory is MANDATORY before you install the schema update. A very common question on the ISA Server Web boards and mailing list is “how do I remove the ISA schema from the Active Directory”. The answer is you restore the Active Directory from your backup!
Before you can add the new classes to the schema you have to take make some settings on the domain controller which is the schema master FSMO. We will now show you the necessary steps to prepare the schema master.
- First, you should log on locally at the schema master as a user who is member of the Enterprise Administrators group. The user account must also be a member of the Schema Administrators group to get the necessary permissions to add the ISA schema classes.
- Next, you must open a MMC console with a Schema snap-in applied. If you can’t select the schema snap-in within the selection field you have to install the “Adminpak.msi” or register the schema snap-in manually by using the command line tool regsvr32.exe and execute the command regsvr32 schmmgmt.dll
- After opening schema snap in right click on Active Directory Schema and open the Operation Master properties
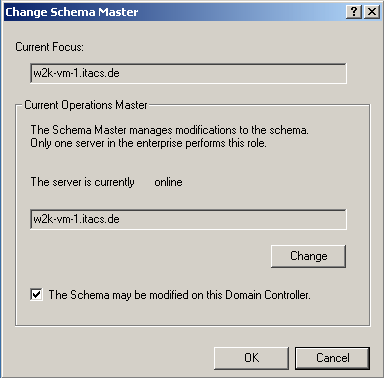
- You have to take sure that you can modify the schema on the schema master by placing a checkmark into the “The Schema may be modified on this Domain Controller” checkbox.
Update the schema with new ISA Server classes and configure the default enterprise policy settings
- To add the new ISA Server schema classes you have to start the ISA Server setup on the schema master
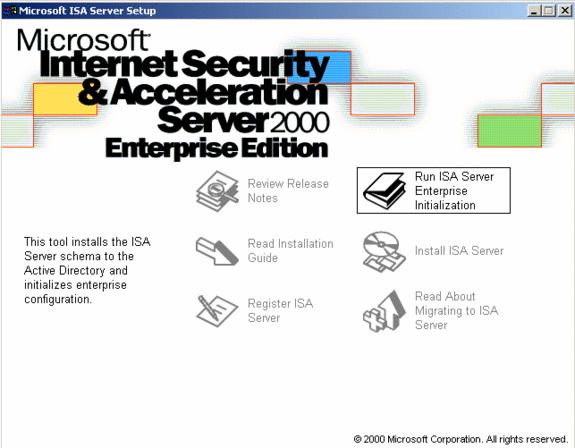
- Now you must select the “ISA Server Enterprise Initialization Wizard” to initialize the schema classes to Active Directory
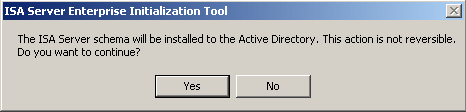
- The warning message makes it clear that schema modifications are not reversible. Before you click on the “Yes” button, cross your fingers, and make sure that you have a good disaster recovery plan to roll back the schema modification if you will experience complications with your Active Directory database.

- At the following window you have to configure the default enterprise policy setting. These settings will be applied if a member of the “Domain Administrators” group will create a new array. Because only members of the “Enterprise Administrators” group have the permission to select the array policy settings if they are creating a new array. You can choice between two administration models for your default policy setting. The setting “Use array policy only” gives you the capability to manage one or more ISA Servers with only one ISA Server rule set. The “Use this enterprise policy” mode allows you to use a divided administration model. In this case only a member of the Enterprise Administrators group can grant internet access by creating “Site and Content Rules” and “Protocol Rules” at Enterprise-Level. However, by checking the checkbox “Allow array-level access policy rules that restrict enterprise policy” you can allow members of the Domain Administrators group to create additional rules which are restricting the enterprise-level rules. But anyhow in this case a Domain Administrator can’t create allow rules to grant users internet access. In addition you can select if creating of publishing rules is enabled and you can also force packet filtering for your arrays. Make your selection and click on OK.

- After the setup has added the new schema classes you will see the message above. If you have only one domain controller in your forest you can safely ignore this message. However, most organizations are using arrays to enhance availability and therefore you should have a minimum of two domain controllers to avoid a single point of failure. Because if all domain controllers become unavailable then the ISA Servers can’t read the configuration from Active Directory and it will interrupt the entire array function. In addition you should never modify the Active Directory schema at work time. Because every schema modification will reset all Global Catalog Servers of your entire forest and the new replication of all information from any domain and site may overload your network and slow down the entire response time of your domain controllers.
Creating a ISA Server array
You are able to create a new ISA Server array after you have prepared the Active Directory with the new schema classes. There are two ways you can use to create new arrays. The fastest method is to create a new array at array member setup. The second method is to create the array before you set up the first array member. We’ll discuss the second method because it’s the best choice in large enterprise networks. The reason for this is that if you create the array before you setup the first array member, you’ll have enough time to replicate the array configuration between all the domain controllers to minimize setup complications. We’ll show you now the necessary steps to create an array.
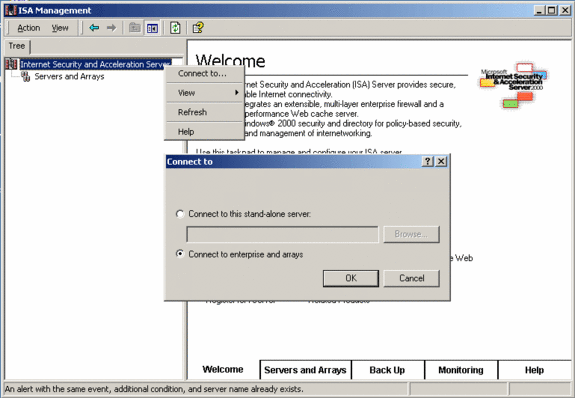
- Log on as Enterprise Administrator at a domain computer of your choice and install the ISA Server Management snap-in. Before you can create an ISA Server array, you must first connect to your Active Directory by using the “Connect to…” wizard and select “Connect to enterprise and arrays”
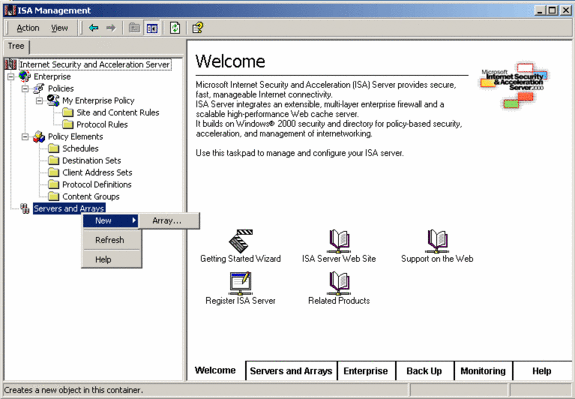
- You will see your Enterprise Policies underneath to the Enterprise node after you have successfully connected to your Active Directory. The enterprise policies are divided into two parts. The fist part is the Policy node and you would see there the default enterprise Policy you have already created by the enterprise initialization wizard. In the second node you can find the enterprise Policy Elements. These elements give an administrator an easy deployment mechanism of often needed policy elements because all your custom created policy elements can be used by many ISA Server arrays at the same time. To create a new array, just click with the right mouse button on the Servers and Arrays node and start the New Array Wizard
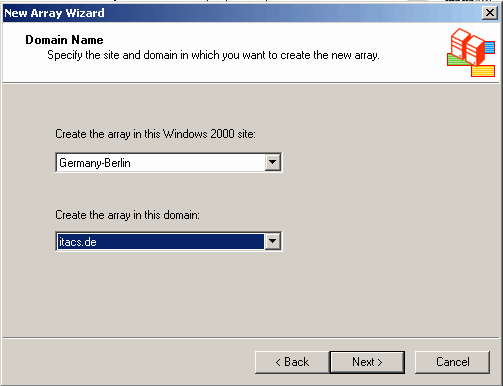
- First, type in a name for the array you want to create. The second step is to choose the domain and site in which you’ll want to create the array. A requirement for an array is to make sure that all members of your array are in the same Active Directory domain and site. In addition, you should not change the site name in which you are setting up the array or move array members to different sites. If you do, the array configuration may be lost or damaged. As a supplemental note: If you want to use the Microsoft Network Load Balancing protocol you have to place all array members into the same non-switched network segment.
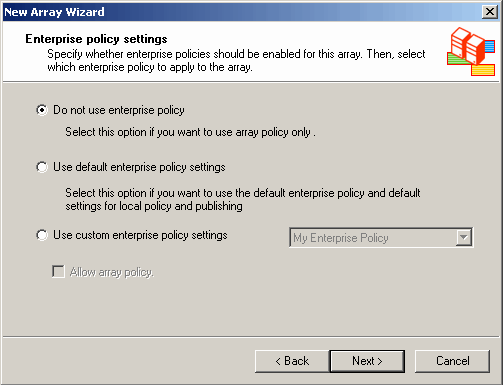
- Now you got the chance to choose the policy mode for your array. You can do this because are logged on as member of the Enterprise Administrators group. If you had logged in as a member of the Domain Administrators group, then you could not select the array mode setting and the default enterprise policy settings will apply automatically. The array mode choice is very important because it will decide if you are use Enterprise Policies or only Array Policies. In general, you should only use enterprise policies if you need a divided administration model for security reasons, or if you want to configure two or more ISA Server arrays with a single access policy or shared enterprise policy elements. Otherwise, you should choose “Do not use enterprise policy” to get nearly the same administration model like the standalone ISA Server setup does; In which members of the Domain Administrators group are responsible for creating site and content or protocol rules which are granting internet access. This allows you to create caching arrays without the onus of having to apply an enterprise policy.
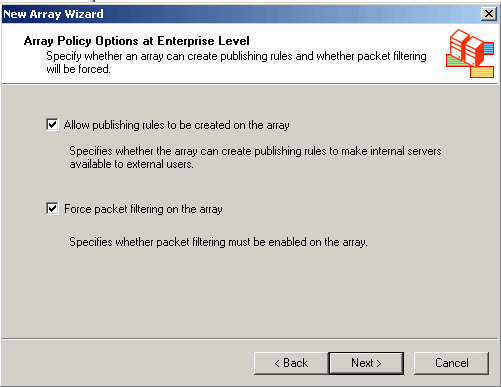
- Only if you have logged on as a member of the Enterprise Administrators group can you change the Array Policy Options at Enterprise Level. Make your selection if you want to allow publishing rules or if you want to force packet filtering and go ahead.
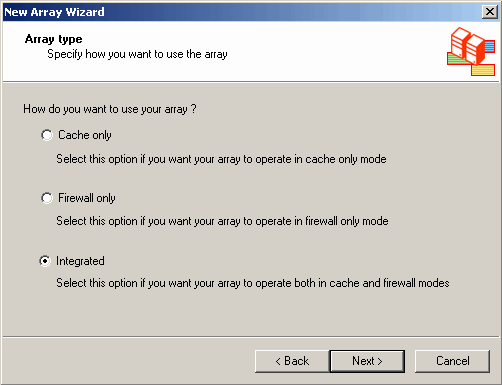
- Now you have to select the Array type for your ISA Servers. You can select the from Cache only, Firewall only and Integrated. If you want to use different Array types in your organization, then you should create two or more separated Arrays because all members of an Array must use the same Array type.
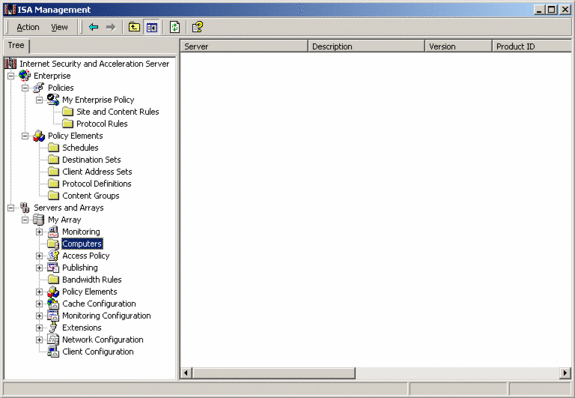
- After you have finished the New Array Wizard you should see your newly created Array within the ISA Server Snap-In. You can see by clicking on the Computer node that your Array has no ISA Servers as array member right now.
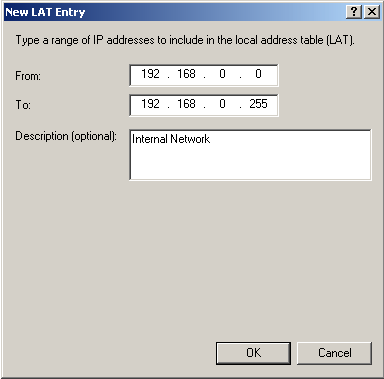
- Now you can start to configure the ISA Servers array policy rules. However, if you have created a Firewall or Integrated Array type you have to construct the ISA Server LAT correctly before you can add ISA Servers to the array. The LAT must include at least all domain controllers IPs and all Intra Array IPs (internal IPs) addresses of your ISA Server.
Add ISA Server to an array
After you have successfully created your ISA Server array and maybe constructed the LAT, you can start to install the first ISA Server as an array member. To install an ISA Server as an array member you have to select the appropriate setup mode during installation. We’ll now show you the required steps to install an ISA Server array member.
- Before you install ISA Server, you should make some configuration changes to the underlying Windows 2000 Server. The configuration of Windows 2000 for using it as an array member isn’t must different than a normal standalone ISA Server and will have common network settings like IP Addresses, DNS Server, system hardening (but don’t use the Wizard!) and so on. However, to create an array member you must install the Windows 2000 Server as a member of the same Active Directory domain and site you have chose for your Array at the New Array Wizard. After you have finished the configuration of Windows 2000 you can start the array setup by using an ISA Server Enterprise Edition CD. To install an ISA Server member you must logon at the Windows 2000 Server at least as a member of the Domain Administrator group.
- After you have entered the ISA Server product key and agreed the license terms, you must select the ISA Server components you want to use for your array. If you want to use the Message Screener component on the ISA Server array itself, then make sure you install these component on all your array members similarly.
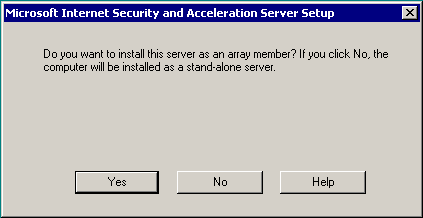
- At the next step the ISA Server setup wizard will ask you if you want to install the ISA Server as a standalone server or if you want to join the server into an ISA Server array. Click on YES and go ahead.

- Now you can select the ISA Server Array you want to join. You’ll see the array you created at array setup. You also get the option to create a new array. However, the better way is to create the array before you setup the first member because you got more time to replicate the configuration between all the domain controllers of your active directory site.

- After joining the ISA Server Array you have make some settings that are exclusively for the Array member you are installing right now. In ISA Server Arrays there are only a few differences between the array members. However, the cache size is one of the settings which can differ between the Array members because all Array members may have different hardware and different amounts of available disk space.

Congratulations! You have successfully joined the first ISA Server to the Array. Now you have to repeat the steps 1-5 of the Add ISA Server to an array section for all ISA Servers you want to make a member of the Array.


