If you would ike to read the first part in this article series please go to:
Planning the Required Storage with Storage Calculator
Capacity requirements for the DPM storage pool are variable and depend primarily on the size of the protected data, the daily recovery point size, expected volume data growth rate, and retention range objectives.
Although it’s possible to manually estimate the size of the storage pool, there is a tool available to download, Storage Calculator, that will definitely ease the job (Figure 1).
Although this Excel spreadsheet was built for DPM version 2010, we can still use it while the DPM 2012 version isn’t publicly available.

Figure 1: Storage Calculator
The storage calculator also provides guidance on three aspects of a DPM 2010 protection strategy:
- Estimates how much storage is required to protect a specific Exchange Server 2010 deployment.
- Outlines the type and class of server, memory requirement, storage requirement and guidance for critical system parameters such as the page file size that are required to create a DPM server.
- Estimates backup window SLAs by providing the time needed for both Initial Replication and Incremental Synchronization.
The storage calculator can be used in the initial phase of your Exchange 2010 protection strategy to not only estimate the amount of storage you will require but to model your backup policies. You can conduct a what-if analysis to see the impact on backup SLAs by changing the storage IOPS and also by varying the network bandwidth available for backup and recovery. You can vary the storage consumption parameters – churn and the Retention Range – to see the effect on the storage requirement over time.
Configuring Disks for the DPM Server
After a fresh install of DPM 2012, it ¡®s time to configure the storage pool. DPM 2012 requires a disk that is dedicated to the storage pool. Although a pre-existing volume on a storage pool disk may have free space, DPM can use only space in volumes that it creates. To make the entire disk space available to the storage pool, delete any existing volumes on the disk, and then add the disk to the storage pool. Figure 2 depicts Disk 0 as a good candidate to configure as DPM storage.

Figure 2: Disk Management
The following procedures detail how to accomplish the previous mentioned tasks.
- Log on to the DPM server with a domain user account that has local administrator rights. On the Start menu, point to All Programs, point to Microsoft System Center 2012, Data Protection Manager and then click Microsoft System Center 2012 Data Protection Manager.
- In DPM Administrator Console, in the Management task area, on the Disks tab, in the Actions pane, click Add (Figure 3). In case a warning pops-up stating that the disk will be converted to dynamic, click Yes. The disk will show up as belonging to the DPM storage pool (Figure 4).

Figure 3: Add Disks to Storage Pool

Figure 4: DPM Storage Pool Disks
Installing Agents
- To install a Protection Agent, in DPM Administrator Console, in the Management task area, on the Agents tab, in the Actions pane, click Install (Figure 5). The Protection Agent Installation wizard appears and guides you through the process of creating the protection agent. On the Select Computers page (Figure 6), select one or more computers from the Computer name list, click Add, and then click Next.
NOTE: To protect an Exchange Server 2010 DAG node, you must install a protection agent, at least, on one node that holds a copy of the database to backup.

Figure 5: Install Agents

Figure 6: Select Computers
-
On the Enter Credentials page (Figure 7), type the user name and password for a domain account that is a member of the local administrators group on all selected servers and click Next. DPM will then try to detect clusters (Figure 8). In my test environment I got the error depicted in Figure 9, which I ignored. I couldn ¡®t determine if it was due to my specific environment or a bug in the Release Candidate.

Figure 7: Enter Credentials

Figure 8: Checking if any cluster node is present

Figure 9: Warning
-
On the Choose Restart Method page (Figure 10), select the method you will use to restart the computers after the protection agent is installed. The computer must be restarted before you can start protecting data. Click Next.

Figure 10: Choose Restart
-
On the Summary page (Figure 11), click Install to begin the installation. On the Installation page, the results appear on the Task tab to indicate whether the installation is successful or not (Figure 12). Click Close.
Figure 13 depicts an error I had when installing the agent on E2K10-MBX2 server. I got error 349, so I had to use a manual installation method, which I ¡®ll detail in the next chapter.

Figure 11: Summary
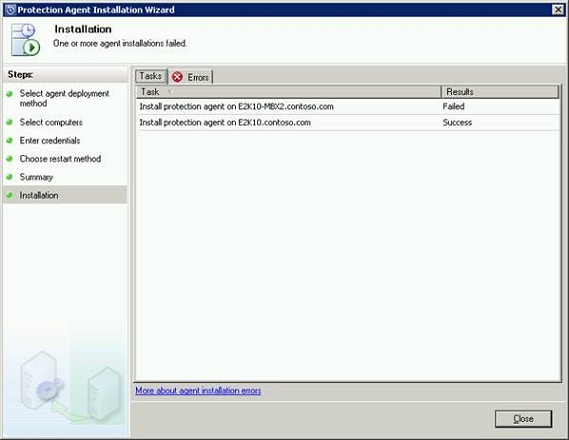
Figure 12: Agent Installation

Figure 13: DPM Agent installation error
-
After the protected server restarts, it will appear under Unprotected computers with protection agent (Figure 14). If the agent is installed, it will now appear on the Add/Remove Programs (Figure 15) and there will be a new service running on that machine (Figure 16).

Figure 14: DPM Agents

Figure 15: Programs and Features

Figure 16: DPM Agent Service
Manual Install and Attach DPM Agents
As mentioned in the previous chapter I had an error installing the agent on the E2K10-MBX2 server using the wizard, so I had to use the manual installation method.
In some circumstances, you must install the protection agent manually, for example, when the computer that you want to protect is behind a firewall, in a workgroup, or in a domain that does not have a two-way trust relationship with the domain that the DPM server is located in.
After manually installing an agent, you have to attach the computer in DPM Administrator Console.
- To manually install the protection agent on the targeted computer, open an elevated Command Prompt window, and then run the following command, as depicted in Figure 17 and Figure 18:
\\<DPMServerName>\Program Files\Microsoft System Center 2012\DPM\DPM\ProtectionAgents\RA\4.0.<build number>.0\amd64\DpmAgentInstaller_x64.exe <DPMServerName>

Figure 17: DpmAgentInstaller_x64.exe

Figure 18: Installing agent
- Open an elevated Command Prompt on the targeted computer, change the directory to <system drive>:\Program Files\Microsoft Data Protection Manager\DPM\bin and then run the following command (Figure 19):
SetDpmServer.exe ¨CdpmServerName <DPMServerName>

Figure 19: SetDpmServer.exe
-
In DPM Administrator Console, on the navigation bar, click Management, and then click the Agents tab. In the Actions pane, click Install. The Protection Agent Installation Wizard opens. On the Select Agent Deployment Method page, select Attach agents, select Computer on trusted domain, and then click Next (Figure 20).
-
On the Select Computers page (Figure 21), select one or more computers from the Computer name list, click Add, and then click Next.

Figure 20: Attach agents

Figure 21: Select Computers
-
On the Enter Credentials page (Figure 22), type the user name and password for a domain account that is a member of the local administrators group on all selected servers and click Next.
-
On the Summary page (Figure 23), click Install to begin the installation. On the Installation page, the results appear on the Task tab to indicate whether the installation is successful or not (Figure 24). Click Close.

Figure 22: Enter Credentials

Figure 23: Summary

Figure 24: Installation results

Figure 25: DPM Agents
Configure Exchange 2010 Protection Groups
- Before creating the Protection Group, since we’re protecting an Exchange Server, we must copy the ese and eseutil files (usually located at C:\Program Files\Microsoft\Exchange Server\V14\Bin) to the DPM Server. The versions of eseutil.exe and ese.dll that are installed on the computer running the most recent edition of Exchange Server must be the same versions that are installed on the DPM server.

Figure 26: ese and eseutil files on the DPM server
- To create a Protection Group, in DPM Administrator Console, in the Protection task area, in the Actions pane, click Create protection group (Figure 27). The New Protection Group Wizard appears and guides you through the process of creating the protection group (Figure 28). Click Next.

Figure 27: Create Protection Group

Figure 28: New Protection Group Wizard
-
On the Select Protection Group Type, select Servers and click Next (Figure 29).
-
On the Select Group Members page, verify that all computers and DAGs that store data you want to protect are displayed in the Available members box. In the Available members box, expand the server nodes to display the available data sources on each server and to see available Exchange mailbox databases. Place a check mark in the box next to each mailbox database you want to include. As you select data sources, your selections appear in the Selected members box (Figure 30). Click Next.

Figure 29: Select Group Members

Figure 30: Select Group Members
-
On the Select Data Protection Method page, select I want short-term protection using check box for short-term protection and then select the media you want to use from the drop-down list. Since we do not have a tape library attached to the DPM server, only Disk is available for short-term protection (Figure 31). Click Next.

Figure 31: Select Data Protection Method
-
On the Specify Exchange Protection Options page, select the Run Eseutil to check data integrity check box to check the integrity of the Exchange Server databases (Figure 32). This will offload the backup consistency checking from the Exchange Server to the DPM server which means the I/O impact of running eseutil on the Exchange Server during the backup itself is eliminated. If protecting a DAG, make sure Run for log files only is selected.
If you didn ¡®t previously copy the eseutil file, as mentioned on step 1, you ¡®ll see an error (Figure 33). Click Next.
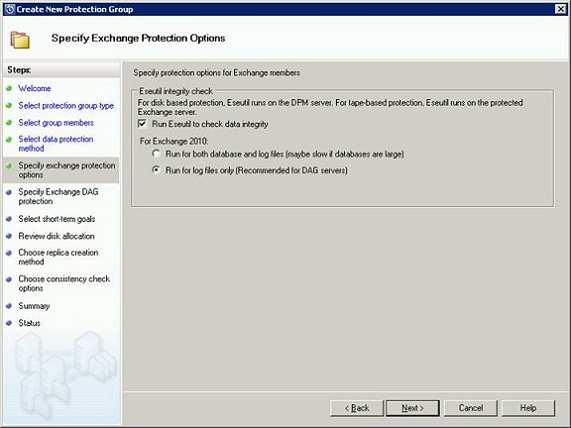
Figure 32: Exchange Protection Options
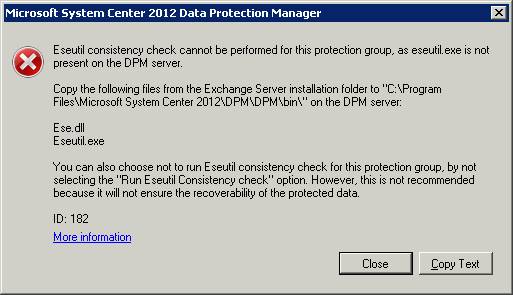
Figure 33: Error eseutil
- On the Specify Exchange DAG Protection page (Figure 34), select the databases for copy backup and express full backup. For protecting multiples copies of the same database, select only one database for express full and incremental backup and then select the remaining copies for copy backup.

Figure 34: Exchange DAG Protection
- On the Specify Short-Term Goals page (Figure 35), select the retention duration for data recovery in the Retention range box. In the Synchronization frequency section, select the frequency of the incremental backups or Just before a recovery point to configure DPM to perform an express full backup just before each scheduled recovery point. To modify the recovery point schedule for a data source, click Modify next to the desired data source. Click Next.

Figure 35: Short-Term Goals
-
DPM will display its recommended disk allocations (Figure 36). This step enables you to allocate how much of the disk storage pool will be used to protect these particular data sources. You should allocate the DPM replica volume to slightly larger than the amount you expect each data source to grow in the short term. Sizing the recovery point volume will determine how many previous recovery points are available for rapid, disk-based restore. To allocate disk storage, do one of the following: To accept the recommended allocations, click Next. To change a recommended allocation, click Modify, adjust the allocations, click OK, and then click Next.

Figure 36: Disk Allocation
-
On the Choose Replica Creation Method page (Figure 37), select when you want DPM to execute the initial replication of your data and click Next.
-
Select the Automatically option to have DPM replicate the data across the network. Select Now to have DPM immediately begin copying the data from the computers you are protecting to the DPM server; Select Later to start the initial copy at a later time if you want to schedule the job to run only during periods of light network traffic.
-
Select Manually to use tape, USB storage, or other portable media to transfer the baseline data to the DPM server.
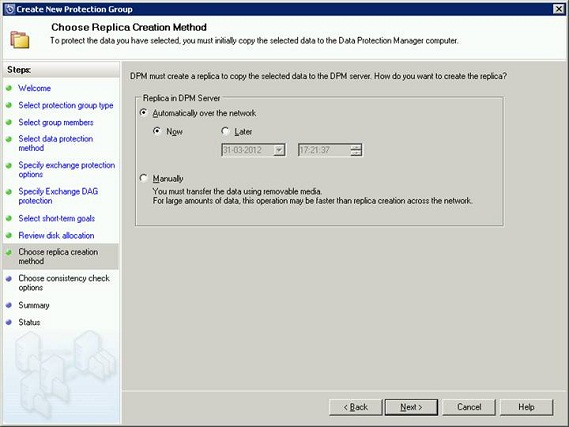
Figure 37: Replica Creation Method
-
On the Choose Consistency check options page (Figure 38), chose either the Run a consistency check if a replica becomes inconsistent or the Run a daily consistency check according to the following schedule. Click Next.

Figure 38: Replica Creation Method
-
On the Summary page (Figure 39), review the tasks that DPM is set to perform to create the protection group and then click Create Group. Review the confirmation page (Figure 40) and click Close.

Figure 39: Summary

Figure 40: Protection Group Creation Status
DPM will immediately create the first replica of the storage groups (Figure 41) and will show an OK protection status if it succeeds (Figure 42).

Figure 41: Exchange replica in progress
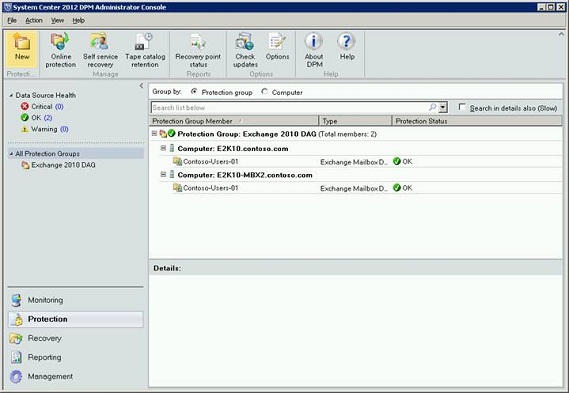
Figure 42: Exchange Protection Group
Summary
The configuration process covered in these 2 parts is enough to protect mailbox databases of Exchange Server 2010. In the next part we ¡®ll take a look into the protection options for other Exchange Server roles.
If you would ike to read the first part in this article series please go to:


