How many Windows desktops does your company support? How many servers does your company have to house applications, files, printers, etc? Now, consider that on all of these desktops and servers you must control the local groups that reside on them. I am sure that most of you answered well over 1000 desktops and servers. That is a staggering number, considering that some of the servers might be in remote locations and some of the desktops might be laptops which roam throughout the US or world. If you wanted to create a local group on all of these computers, how would you get that done? Script? What if you wanted to ensure that the local Administrators group to have specific domain groups, such as the Domain Admins? How long would it take to ensure that these settings are complete? With new Group Policy Preferences, these tasks are easy and certain to apply to all of the desktops and servers that are designed to receive the settings.

Group Policy Preferences Primer
Group Policy Preferences is the new type of Group Policy Object setting that is available if you have a Windows Sever 2008 server or Windows Vista SP1 computer. In order not to bog you down with the details of Group Policy Preferences, but still give you enough to control your local groups, let me summarize what you need to have in place to get things working.
To administer Group Policy Preferences you need to have a Windows Server 2008 server OR a Windows Vista desktop, which is running SP1 and has the RSAT installed. Both of these environments have the new Group Policy Management Console (GPMC) installed on them which is required to administer Group Policy Preferences. See my article on Vista and the RSAT at Microsoft Remote Server Administration Tools for Windows Vista.
Next, you need to have the client side extension (CSE) installed on your Windows XP SP2, Windows Server 2003 SP1, and Windows Vista SP1 computers. You can either download these from Microsoft and install them manually (Windows Server Group Policy Home), or get them from your WSUS server. After you have the CSE installed, these computers (and your Windows Server 2008 servers which have the CSE installed by default) are ready to receive Group Policy Preference settings.
Finally, you just need to create, link, and configure a GPO that is linked to an organizational unit containing the computer or user you want to target. Configure the Group Policy Preference that you want to have set and that is all.
For more information on Group Policy Preferences, refer to Windows Server Group Policy Home.
Creating New Local Groups
The creation of a new local group on numerous desktops can be a daunting task. Group Policy Preferences provide an easy way to accomplish this for nearly all of your Windows desktops and servers. You can create a new local group on a server or desktop by ether targeting the computer object or user object. In most cases when you want to create a new local group, you will target computer objects.
To accomplish this task, create and link a GPO to an organizational unit which contains the computer object you want to target. Edit the GPO and expand Computer Configuration|Preferences|Control Panel Settings|Local Users and Groups. Right click on Local Users and Groups, then select New – Local Group. This will open up the New Local Group dialog box, which is shown in Figure 1.
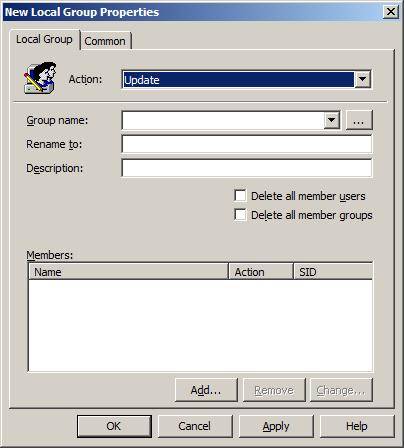
Figure 1: New Local Group dialog box when targeting a computer account
To create a new group, select the Create option on the Action drop down list. Then, type in the name of the local group, description for the local group, etc. Figure 2 illustrates an example of creating a new local group named LocalHelpDesk.
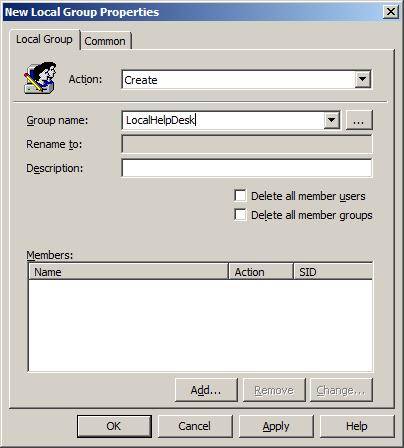
Figure 2: New local group named LocalHelpDesk created using Group Policy Preferences
Modifying Local Group Membership Using Group Policy Preferences
Whether you are creating new local groups or modifying existing groups, you can control the membership of the local group using Group Policy Preferences. Although this task can be accomplished using Restricted Groups which have been in Group Policy for some time (Computer Configuration|Windows Settings|Security Settings|Local Policies|Restricted Groups), using Group Policy Preferences to complete the task provides you more granular control.
Restricted Groups is a “delete and replace” control, which will take the current list of group members and delete them, before replacing them with the list of users and groups that are configured in the policy.
The Group Policy Preference for Local Groups is much different. Here, you have the ability to control which user and group accounts are added, which ones are deleted, and even control the removal of all users and/or groups before getting granular with you control. Figure 3 illustrates what a configuration might look like after you control your new LocalHelpDesk group.

Figure 3: Group members of local groups can be controlled granularly
Notice that the “Remove all user accounts” and “Remove all group accounts” check boxes can be left unchecked or configured. If you configure both of these check boxes the Local Group policy will behave just like Restricted Groups.
Another key point is the ability to control the addition or removal of a new user or group. Figure 4 illustrates what the setting looks like when you add in a new group to the Members list, giving you the ability to add or remove the group from the local group you are managing.
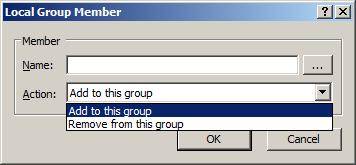
Figure 4: Members of the configured group can either be added or removed
Managing the Local Administrators or Other Local Group
If you want to manage an existing local group, you can do that easily too. We just looked at a situation where we modified the group membership. However, there is still more. Here I want to focus on the local Administrators group, which is essential for managing the local computer. If a user has membership in this group, that user can do anything to the computer, regardless of the desires and configurations from the domain. Thus, it is imperative that you manage the membership of this group.
In most instances administrators want to have the Domain Admins group and local Administrator user account have membership in the local Administrators group. In addition to this, administrators typically don’t want the user of the computer to have their user account have membership in the local Administrators group.
To make all of this happen within minutes of configuring the Group Policy Preference, configure a new Local Group policy under the User Configuration|Preferences|Control Panel|Local Users and Groups node instead of under the Computer Configuration. Figure 5 illustrates why you want to configure the policy under the User Configuration node.

Figure 5: Local Group policy under User Configuration node
Notice that the Local Group Policy in Figure 5 has a new check box, “Remove the current user”. This will take the user account that was used to log on to the computer out of the local Administrators group. As you can see, this is an extremely powerful setting. Combine this with the addition of the Domain Admins and local Administrator, which is also shown in Figure 5, and you have now accomplished something that could take you weeks in just mere minutes.