Creating Multiple Security Perimeters with a Multihomed ISA Firewall — Part 5:
Configuring the Server Publishing and Access Rules Supporting
Front-end Exchange Server Communications to the DC and Back-end Exchange
by Thomas W Shinder MD, MVP
|
Have Questions about the article? |

In this series on creating multiple secure zones using a multihomed ISA firewall, we began with a discussion on creating multi-perimeter networks and debunked the death of the DMZ concept. In subsequent articles we configured ISA Firewall Networks for the DMZ segments, created Network Rules connecting the Networks, discussed certificate naming infrastructure and deployment, and configured Web Publishing Rules allowing inbound connections to the front-end Exchange Server’s Web services.
If you missed the other articles in this series, check them out at:
- Creating Multiple Security Perimeters with a Multihomed ISA Firewall Part 1
- Creating Multiple Security Perimeters with a Multihomed ISA Firewall Part 2
- Creating Multiple Security Perimeters with a Multihomed ISA Firewall Part 3
- Creating Multiple Security Perimeters with a Multihomed ISA Firewall Part 4
- Creating Multiple Security Perimeters with a Multihomed ISA Firewall Part 6
If you would like to be notified when Tom Shinder releases Creating Multiple Security Perimeters with a Multihomed ISA Firewall Part 6, please sign up to our Real-time article update newsletter.
In this article we’ll carry out the following procedures to allow the front-end Exchange Server to accept incoming connections from Internet based hosts and allow the front-end Exchange Server access to the domain controller and back-end Exchange Server on the corporate network:
- Create the SMTP/POP3S/IMAP4S Server Publishing Rules
- Create the Intradomain Communications Access Rule Enabling Intradomain Communications between the Front-end Exchange Server and the Domain Controller on the Corporate Network
- Create the HTTP/POP3/IMAP4 and LinkState Algorithm Routing Access Rule Enabling Front-end/Back-end Exchange Server Communications
Create the SMTP/POP3S/IMAP4S Server Publishing Rules
In the last article we created Web Publishing Rules to allow incoming connections to the front-end Exchange Server’s Web services. In this article we’ll create Server Publishing Rules to allow incoming connections to non-Web based Exchange Server services. These include the front-end Exchange Server’s POP3S, IMAP4S and SMTP server services.
The figure below shows the incoming connections to these services from the Internet.
Figure 1

Table 1 lists the rules that the Mail Server Publishing Wizard will create to allow incoming connections to these services.
Name
Action
Protocols
From/Listener
To
Condition
Front-end Exchange Server POP3S Server
Allow
POP3S Server
External
10.0.1.2
N/A
Front-end Exchange Server SMTP Server
Allow
SMTP Server
External
10.0.1.2
N/A
Front-end Exchange Server IMAPS Server
Allow
IMAPS Server
External
10.0.1.2
N/A
Table 1: Server Publishing Rules enabling inbound connections to the Front-end Exchange Server’s POP3S, SMTP and IMAPS Services
Perform the following steps to create the SMTP, POP3S and IMAP4S Server Publishing Rules:
- In the ISA firewall console, expand the server name and click the Firewall Policy node.
- On the Firewall Policy node, click the Tasks tab in the Task Pane. Click the Publish a Mail Server link.
- On the Welcome to the New Mail Server Publishing Rule Wizard page, enter a name for the rule in the Mail Server Publishing Rule name text box. In this example, we’ll name the rule Front-end Exchange Server. Click Next.
- On the Select Access Type page, select the Client access: RPC, IMAP, POP3, SMTP option and click Next.
Figure 2

- On the Select Services page, put a checkmark in the Secure Ports checkboxes for the POP3 and IMAP4 protocols. Put a checkmark in the Standard ports options for the SMTP protocol. The front-end Exchange Server supports a secure channel to TCP port 25 and does not require that you used the reserved port for SMTPS. Click Next.
Figure 3

- On the Select Server page, enter the IP address of the front-end Exchange Server in the Server IP address text box. In this example, the IP address of the front-end Exchange Server is 10.0.1.2, so we’ll enter that into the text box. Click Next.
- On the IP Addresses page, put a checkmark in the External checkbox and click the Address button.
- In the External Network Listener IP Selection dialog box, select the Specified IP addresses on the ISA Server computer in the selected network option. Double click on the IP address that the name on the Web site certificate bound to these services resolves to for external hosts. In our example network, the SMTP, POP3S and IMAP4S services on the front-end Exchange Server have a Web site certificate with the common/subject name mail.msfirewall.org bound to them. Our external DNS zone for the msfirewall.org domain resolves the name to the IP address 192.168.1.70, so we’ll double click on that IP address. The IP address now appears in the Selected IP Address list. Click OK.
- Click Next on the IP Addresses page.
- Click Finish on the Completing the New Mail Server Publishing Rule Wizard page.
Create the Intradomain Communications Access Rule Enabling Intradomain Communications between the Front-end Exchange Server and the Domain Controller on the Corporate Network
The front-end Exchange Server is a member of the same domain as the back-end Exchange Server. In order to participate in intradomain communications required of domain members, an Access Rule must be created to allow the required protocols. One of the required protocols uses Kerberos. This is the reason for the ROUTE Network Rule setting a Route relationship between the authenticated access DMZ and the corporate network; Kerberos communications do not work correctly across NAT devices.
The figure below shows the communications path that will be allowed after creating our intradomain communications rule.
Figure 4

Table 2 shows the details of the Access Rule that will allow intradomain communications between the front-end Exchange Server and the domain controller on the corporate network. Note that you can fine tune this rule a bit but restricting the RPC ports used for intradomain communications. For more information on this topic, check out http://www.microsoft.com/technet/prodtechnol/exchange/guides/E2k3FrontBack/f9733398-a21e-4b40-8601-cfb452da82ad.mspx
Intradomain Front-end Exchange Server to Internal
Allow
Kerberos-Adm (UDP)
Kerberos-Sec (TCP)
Kerberos-Sec (UDP)
LDAP
LDAP (UDP)
LDAP GC (Global Catalog)
Microsoft CIFS (TCP)
Microsoft CIFS (UDP)
NTP (UDP)
Ping
RPC (all interfaces)
DNSFE Exchange
Domain Controller
All Users
Table 2: Access Rule enabling intradomain communications between the front-end Exchange Server and the domain controller on the corporate network
Perform the following steps to create the Access Rule allowing intradomain communications between the front-end Exchange Server and the domain controller on the corporate network:
- In the ISA firewall console, expand the server name and then click the Firewall Policy node.
- On the Firewall Policy node, click the Create New Access Rule link.
- On the Welcome to the New Access Rule Wizard page, enter the name for the rule in the Access Rule name text box. In this example we’ll name the rule Intradomain Front-end Exchange Server to Internal and click Next.
- Select the Allow option on the Rule Action page and click Next.
- On the Protocols page, select the Selected protocols option in the This rule applies to drop down list. Click Add.
- In the Add Protocols dialog box, click the All Protocols folder.
- In the All Protocols list, double click on the following protocols:
Kerberos-Adm (UDP)
Kerberos-Sec (TCP)
Kerberos-Sec (UDP)
LDAP
LDAP (UDP)
LDAP GC (Global Catalog)
Microsoft CIFS (TCP)
Microsoft CIFS (UDP)
NTP (UDP)
Ping
RPC (all interfaces)
DNS
Close Close. - Click Next on the Protocols page
Figure 5
Have Questions about the article?
Ask at: http://tinyurl.com/dqmxx


- Click Add on the Access Rule Sources page.
- In the Add Network Entities dialog box, click the New menu and click Computer.
- In the New Computer Rule Element dialog box, enter a name for the front-end Exchange Server in the Name text box. In this example we’ll name it Front-end Exchange Server. Enter the IP address of the front-end Exchange Server in the Computer IP Address text box. On our example network the IP address of the front-end Exchange Server is 10.0.1.2 so we enter that IP address. Click OK.
Figure 6

- In the Add Network Entities dialog box, click the Computers folder an double click the Front-end Exchange Server entry. Click Close.
Figure 7

- Click Next on the Access Rule Sources page.
- Click Add on the Access Rule Destinations page.
- In the Add Network Entities click the New menu and then click Computer.
- In the New Computer Rule Element dialog box, enter a name for the Domain Controller in the Name text box. In this example we’ll name it DC. Enter the IP address of the front-end Exchange Server in the Computer IP Address text box. On our example network the IP address of the DC is 10.0.0.2 so we enter that IP address. Click OK.
Figure 8

- In the Add Network Entities dialog box, click the Computers folder an double click the DC entry. Click Close.
Figure 9

- Click Next on the Access Rule Destinations page.
- On the User Sets page, accept the default of All Users and click Next.
- On the Completing the New Access Rule Wizard page, click Finish.
Create the HTTP/POP3/IMAP4 and LinkState Algorithm Routing Access Rule Enabling Front-end/Back-end Exchange Server Communications
The next step is to create an Access Rule allowing the front-end Exchange Server access to the back-end Exchange Server. The front-end Exchange Server needs access to the HTTP, POP3 and IMAP4 protocols. Note that even though the front-end Exchange Server receives encrypted communications from the Internet hosts, those communications are subsequently decrypted and forwarded to the back-end Exchange Servers in unencrypted fashion.
The figure below shows the path of the communications between the front-end and back-end Exchange Servers. Note that in the example used in this article series that the back-end Exchange Server is on a domain controller. This is not required and in most production environments the domain controller and back-end Exchange Server would be on different machines.
Figure 10

Note that you can encrypt the communications between the front-end and back-end Exchange Server by using IPSec. This is somewhat of a double-edged sword, because if you use IPSec to secure the communications between the front-end and back-end Exchange Servers, then the ISA firewall will not be able to use stateful application layer inspection to secure the communications. On the other hand, the communications moving between the front-end and back-end Exchange Server are available to anyone with a packet sniffer.
I prefer to not use IPSec because it obviates all security benefits you gain by using the ISA firewall. Remember, IPSec is only of value if someone compromises the network on which the front-end Exchange Server exists. If someone is able to compromise the front-end Exchange Server itself, the IPSec connection between the front-end and back-end Exchange Servers is of no help at all. The best solution is not to use IPSec for front-end and back-end Exchange Server communications, and enforce strong physical access controls on the physical network components.
Table 3 shows the details of the Access Rule allowing the front-end Exchange Server to communicate with the back-end Exchange Server.
Name
Action
Protocols
From/Listener
To
Condition
Front-end to Back-end Exchange Communications
Allow
Link State Algorithm Routing
IMAP4
POP3
SMTP
FE Exchange
Back-end Exchange Server
All Users
Table 3: Access Rule enabling front-end/back-end Exchange Server Communications
Perform the following steps to create the Access Rule enabling front-end/back-end Exchange Server communications:
- In the ISA firewall console, expand the server name and then click the Firewall Policy node.
- On the Firewall Policy node, click the Create New Access Rule link.
- On the Welcome to the New Access Rule Wizard page, enter the name for the rule in the Access Rule name text box. In this example we’ll name the rule Front-end to Back-end Exchange Communications and click Next.
- Select the Allow option on the Rule Action page and click Next.
- On the Protocols page, select the Selected protocols option in the This rule applies to drop down list. Click Add.
- In the Add Protocols dialog box, click the All Protocols folder.
- In the All Protocols list, double click on the following protocols:
IMAP4
POP3
SMTP - Click New and click Protocol.
- On the Welcome to the New Protocol Definition Wizard page, enter a name for the new protocol in the Protocol Definition name text box. In this example, we’ll name the protocol Link State Routing. Click Next.
- On the Primary Connection Information page, click the New button.
- In the New/Edit Protocol Connections dialog box, select TCP in the Protocol type list. Select Outbound in the Direction list. Enter 691 in the From and To text boxes for the port range. Click OK.
Figure 11

- Click Next on the Primary Connection Information page.
- Click Next on the Secondary Connections page.
- Click Finish on the Completing the New Protocol Definition Wizard page.
- In the Add Protocols dialog box, click the User-Defined folder and double click the Link State Routing entry. Click Close.
Figure 12

- Click Next on the Protocols page
Figure 13
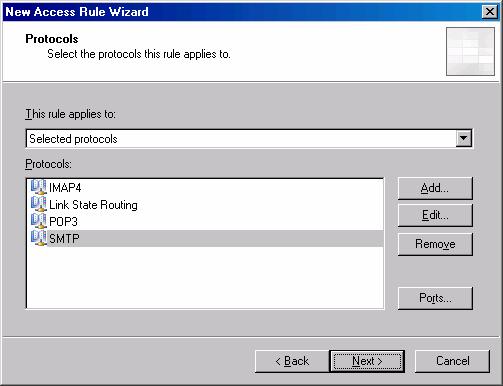
- On the Access Rule Sources page, click the Add button.
- In the Add Network Entities dialog box, click the Computers folder and double click the Front-end Exchange Server entry. Click Close.
- Click Next on the Access Rule Source page.
Figure 14

- Click Add on the Access Rule Destinations page.
- Click New in the Add Network Entities dialog box and click Computer.
- In the New Computer Rule Element dialog box, enter Back-end Exchange Server in the Name text box. Enter the IP address of the back-end Exchange Server in the Computer IP Address text box. In this example the IP address of the back-end Exchange Server is 10.0.0.2. Click OK.
- Double click on the Back-end Exchange Server entry and click Close.
Figure 15

- Click Next on the Access Rule Destinations page.
- On the User Sets page, accept the default of All Users and click Next.
- On the Completing the New Access Rule Wizard page, click Finish.
|
Have Questions about the article? |
Summary
In this article we went over the publishing and Access Rules required to allow the front-end Exchange Server access to both the domain controller and the back-end Exchange Server on the corporate network. The Server Publishing Rules allowed incoming POP3S, IMAP4S and SMTP connections to the front-end Exchange Server. Access Rules were created to allow the front-end Exchange Server access to intradomain communications protocols to the domain controller, and front-end/back-end Exchange Server communications.
In the next article in this series, we’ll create Server Publishing Rules allowing the server in the anonymous access DMZ to communicate with the back-end Exchange Server’s SMTP services and allowing Internet hosts access to the Secure Exchange RPC Services on the back-end Exchange Server on the corporate network. We’ll also create the Access Rules required to allow hosts on the corporate network access to resources on the anonymous access DMZ and on the Internet.
If you missed the other articles in this series, check them out at:
- Creating Multiple Security Perimeters with a Multihomed ISA Firewall Part 1
- Creating Multiple Security Perimeters with a Multihomed ISA Firewall Part 2
- Creating Multiple Security Perimeters with a Multihomed ISA Firewall Part 3
- Creating Multiple Security Perimeters with a Multihomed ISA Firewall Part 4
- Creating Multiple Security Perimeters with a Multihomed ISA Firewall Part 6
If you would like to be notified when Tom Shinder releases Creating Multiple Security Perimeters with a Multihomed ISA Firewall Part 6, please sign up to our Real-time article update newsletter.


