If you would like to read the other parts in this article series please go to:
- Customizing the Default User Profile in Windows 7 (Part 1)
- Customizing the Default User Profile in Windows 7 (Part 2)
- Customizing the Default User Profile in Windows 7 (Part 3)
- Customizing the Default User Profile in Windows 7 (Part 5)
- Customizing the Default User Profile in Windows 7 (Part 6)
Introduction
In the previous three articles of this series we have learned a seven-step process for customizing the default user profile in Windows 7:
- Create a Task Sequence for Deploying your Reference Build
- Create a Task Sequence for Sysprepping and Capturing your Reference Build
- Customize the Reference Build using Unattend.xml
- Deploy and Verify the Partially Customized Reference Build
- Further Customize the Reference Build Manually
- Sysprep and Capture the Fully Customized Reference Build
- Verify All Customizations Made to the Default User Profile
Tip:
It’s important to realize that the whole process above of customizing a master installation of Windows 7 and deploying it to target computers for verifying such customizations can be done within a virtual environment such as a Hyper-V system. Doing so makes it easy to quickly customize the default user profile and test each customization before deploying your customized master image to physical computers.

Now when we walked through how to use the above default user profile customization process in the last three articles of this series, we tried making five customizations automatically (by configuring the Unattend.xml file for the MDT 2010 task sequence we used for deploying the customized master installation to target computers) and five customizations manually (by making direct changes to the desktop of our master installation before we used MDT 2010 to sysprep and capture an image of the installation).
When we tried verifying our customizations by deploying the customized master image to a target computer, creating a new local user account based on the default user profile, and logging on using this new user account, we discovered that two of the ten customizations we made didn’t “take” on the target system. These two failed customizations were:
- Specify a home page for Internet Explorer (we tried using the answer file to do this)
- Pin a shortcut for Remote Desktop Connection to the Taskbar (we tried doing this one manually)
So the questions arises, were these two customization failures just flukes (aberrations) or are there some aspects of the default user profile in Windows 7 that simply can’t be customized?
Issue #1: Configuring the IE Home Page
I checked with the MDT team at Microsoft concerning the first issue and received two replies. First, even with ordinary “clean” installations where the default user profile had not been customized on the master installation, they reported they have seen some cases where the IE home page value specified in the task sequence Unattend.xml file being overwritten during first logon on the target computer but have “never found a cause for that” so this particular issue may simply be a bug in MDT that hasn’t been ironed out yet. One person suggested that this issue might be related to an IE update marked as needing configuration by Active Setup during next logon, but at this point there seems to be no clear answer to why this issue happens in some cases and not in others. If any readers have further insight into this issue, please feel free to contact me through my website www.mtit.com thanks.
Fortunately there are several workarounds for this issue. First, if you want to force users to use a particular home page for IE on their corporate users, you can use the following Group Policy setting to do this:
Disable changing home page settings
This policy setting is found under this location in the Group Policy tree:
User Configuration\Policies\Administrative Templates\Windows Components\Internet Explorer

Figure 1: Enforcing a home page for users using Group Policy.
Alternatively, if you just want to configure an IE home page for users but allow them to change this setting later if they desire, you can do this by creating a new Group Policy Preferences setting for Internet Explorer 8 and specifying a home page using this preference setting. To do this, right-click on User Configuration\Preferences\Control Panel Settings\Internet Settings and select New | Internet Explorer 8 and then in the Internet Explorer 8 Properties dialog that appears type the URL of the home page as shown here:

Figure 2: Configuring (but not enforcing) a home page for users using Group Policy Preferences.
Issue #2: to the Taskbar
Concerning the second issue, in order to customize your master installation by items to the taskbar, you must do this by editing unattend.xml instead of doing it manually. Let’s see how to do this using the procedure outlined in the previous articles in this series.Pinning Items
In the Deployment Workbench, begin by opening the properties of the task sequence you are using to deploy your master installation. Then select the OS Info tab of the task sequence properties and click Edit Unattend.xml to use Windows SIM to open the answer file associated with this task sequence. (You can refer back to figures 8 and 9 of the first article in this series if you need to).
Now, in the Windows Image pane of Windows SIM, expand Components, expand Microsoft-Windows-Shell-Setup. Then right-click on the TaskbarLinks component and add it to the oobeSystem configuration pass as shown here:

Figure 3: Adding the TaskbarLinks setting to the oobeSystem pass.
Doing this, will add TaskbarLinks configuration settings to the oobeSystem section of your answer file. Now click in the empty box to the right of the Link0 setting in the TaskbarLinks Properties pane and enter the following path to the box:
%ALLUSERSPROFILE%\Microsoft\Windows\Start Menu\Programs\accessories\remote desktop connection.lnk
Here’s what you should now see in Windows SIM:

Figure 4: Adding a shortcut for Remote Desktop Connection to the taskbar of the Public user profile.
What the above steps accomplish is to place a shortcut to Remote Desktop Connection on the taskbar of the Public user profile, which is found under C:\Users and has some its contents—such as Desktop, Taskbar and Start Menu—automatically merged with other user profiles on the computer. (In Windows XP, this user profile was known as the All Users profile and shared a similar function.)
Tip:
To verify that you entered the correct path, point to the Link0 setting and you’ll see a tooltip that should look like this:

Figure 5: The tooltip verifies that we entered the correct path.
Now save the changes you made to your answer file and then use MDT to deploy your customized master image to a computer. When the install finishes, you’ll be logged on as Administrator and you should see a shortcut to Remote Desktop Connection on the taskbar:
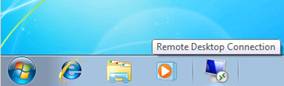
Figure 6: Shortcut to RDC on the taskbar of the master installation.
Next, use MDT to sysprep your customized master installation, capture its image, and upload the captured image to the Captures folder of your deployment share. Then import the captured image into the Operating Systems folder (or a subfolder of this folder) of your deployment share. Then create a task sequence (or modify an existing one) to deploy the imported image to target computers. Now when you use this task sequence to deploy your customized, sysprepped, captured and imported master installation to a target computer, you will be automatically logged on as Administrator. At that point, simply create a new local user on the deployed computer and verify that a shortcut for Remote Desktop Connection is pinned to the taskbar:

Figure 7: The customization worked.
Note that figure 4 above only shows settings for pinning three shortcuts to the taskbar i.e. Link0, Link1 and Link2. This is a limitation of using the above method—customizing the taskbar of the default user profile is limited to pinning no more than three shortcuts. You can read more about this approach in this post on the Ask The Core Team blog. If you need to pin more than three items to the taskbar, you’ll need to use a scripted solution such as this one by The Deployment Guys.
Conclusion
In this article we’ve examined a couple of issues associated with customizing the default user profile in Windows 7. But there are more issues we need to examine, and so we’ll continue along this line in the next article of this series.
If you would like to read the other parts in this article series please go to:


