My colleague David Barker recently was tasked with the job of migrating a datacenter under heavy time pressure, and I’m glad to report that everything worked out well in the end. David is a senior systems engineer with over eight years of experience with virtualization. He is also a VMware Certified Professional who has been awarded the title of vExpert by VMware, and he holds both VCP6-DCV and VCP6-NV certifications. David’s an avid blogger and you can also find him on Twitter. A while back David shared his thoughts here on TechGenix about how one can set up a fully functioning VMware home lab using components you can buy easily from Amazon, and as you can see from the comments on that earlier article it was quite popular with our TechGenix readers, many of whom work with the VMware platform at their company or organization. So, I asked David to help our readers again by sharing with us concerning his datacenter migration project and he graciously responded by describing the steps he followed and tools he employed. Let’s listen to David now as he walks us through what could have been a bad day but ended up being a breeze.
A possible nightmare scenario
Any admin’s nightmare is when your manager or director comes to you and says “we need to be out of that datacenter by the end of the month.” This recently just happened to me, however, instead we were closing an office. The office was hosting the development and QA environments for the business. There were around 80 virtual machines for this office that had to be moved to one of our main datacenters in another part of the U.S.
Now because this environment was 99 percent virtualized, I knew that Veeam was a great option to get this job done. So, we’ll go over the steps and workflow so that you can also move a datacenter using Veeam. The process is rather straightforward but there are some pieces that we need to keep in mind throughout.
The first thing we need to keep in mind here is the uptime needed during the move. Because this environment was dev and QA, the uptime wasn’t as important as, say, the production environment. Next, we need to evaluate the different networks, hardware and software versions in your other datacenter. Veeam can map different networks and re-IP your virtual machines during the move, but we will talk about this later. Other things to be mindful of are the vCenter versions you’re running and on what hardware in the two datacenters, as this may cause some issues depending on if you’re running any additional solutions or not (for example, SRM, NSX, etc.).
Steps in the walkthrough
With all that, let’s get to the nitty-gritty. The basic outline of this process is as follows:
- Backup VMs in the source datacenter with Veeam to some sort of portable drive. I’ve normally just used a basic NAS device for this such as a QNAP or Seagate.
- Move your backups to the new datacenter. Usually, this is a shipping thing, but I have done one move where it was in the same state so it was a drive.
- Restore your VMs on the destination side with Veeam.
- Create your replication jobs on the destination side inside of Veeam.
- Failover VMs to the destination vCenter.
- Do some virtual machine maintenance. We’ll go into this later.
The first thing we need to do is get the initial backup going. Again, I’ve just used a local NAS to get this done, which has made it pretty simple to move the device between the two datacenters. We can create the new backup device under backup infrastructure in the Veeam console.

Once we have our backup device available, we can create a new backup job and point it to the new backup device we created in the previous step.

Now that the backup job is created, we just need to run it. Depending on the size of your backups and network connection of the NAS, this can take some time. In my case, I had a NAS connected over a 1GB connection and it took approximately 18 hours to back up 12TB of data.
Once this is complete, the NAS device needs to be shipped to its destination. So, there is another day to two days of lead time — another piece to keep in mind when planning a completion date for your move. Once your device arrives and you get it plugged into your network, then we move to the restore process of the backups. We first need to add our NAS to the destination Veeam instance the same way we did before on the source side. Once we have that added in, we want to import the backups into Veeam.

After our backups are imported, we can restore the VMs to our destination vCenter so we can get our replications setup.
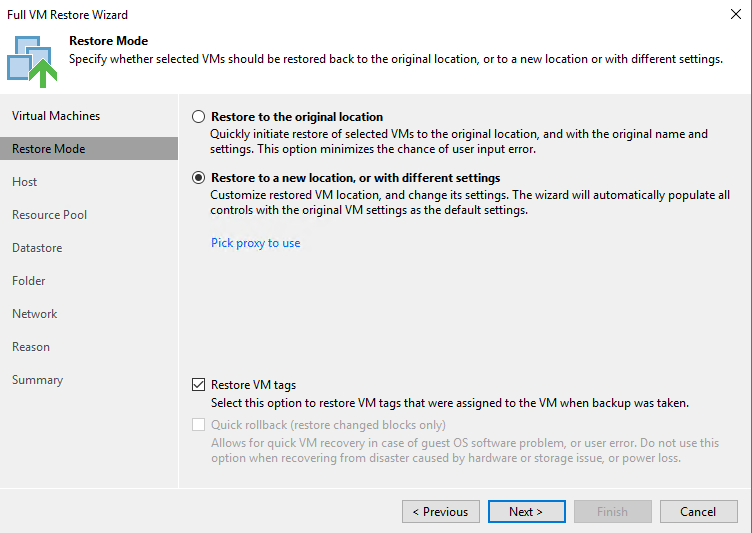
This is another time-consuming step that should be planned into your timeline. For instance, I had a SQL server with about 4TB of data that took almost three days to restore on its own. One good thing is you can run a few in parallel with each other depending on your proxy setup in Veeam, but this can help cut some time down.
After all the VMs are restored, we can set up our replication jobs to use our restored VMs as seeds. This will dramatically reduce the amount of time it takes for the replication job to run.

A few things to note here on the above screenshot. We want to enable “Low connection bandwidth” as this will allow us to select our restored VMs as seeds. Next, you can select “Separate virtual networks” if you want to map your existing portgroups to new ones on the destination side. This step is not mandatory but will help with a lot of manual work after the failover. The final checkbox is “Different IP addressing scheme,” which will allow us to have Veeam change the IP of the VM on failover.
The initial replication will take some time as it has to run through a digest of each disk and get the CBT data on the VM. Again, another piece to add to your timeline. It will also need to replicate all the changes to those VMs between your backup and the point in time you run the replication. If it’s been a few days then it shouldn’t be bad, but if it’s been weeks it may take longer. You can either have the replication run on a schedule or just run it manually yourself, say when you get into the office in the morning.
Now that we’re replicating, it’s time for us to failover our VMs to our destination vCenter. In the Veeam console, under “Replicas” we want to find our VMs to failover under the “Ready” section. Make sure to do a planned failover, and don’t select failover now.

Planned failover runs through a few extra steps such as shutting down the source VM and doing a final replication before powering on the VM on the destination side. Here’s a quick breakdown of what happens during the planned failover:
- Perform a replication of the VM.
- Shut down source VM.
- Perform a final replication of the VM.
- Change IP address of VM (if you are doing this).
- Change portgroup of VM (if you are doing network mapping).
- Power on VM in destination vCenter.
Once this is done for your VMs you’ll probably want to run a quick smoke test and verify it booted properly and you can access the machine. Then there may be some quick maintenance tasks to do like upgrade VMware Tools if you’re running a new version on the destination. You may also need to change the IP or portgroup if you’re not doing the IP change or network mapping.
Should any issues arise, you have the option to undo failover. This powers off the machine in the destination and powers your original source VM back on. Any changes that were done on the destination VM are lost during this process. You can find all your new VMs under the “Replicas” and then you’ll see an “Active” category underneath.
If everything is successful then your final step is to do a permanent failover. This removes the VM from the replication job and from your active replicas menu. Once you do a permanent failover, it makes failing back much more difficult so be sure you’re ready to perform this step.
And our datacenter migration is done!
And then that’s it — you’ve successfully moved a datacenter using Veeam! Way to go! The process is rather straightforward and involves a lot of “watching paint dry” steps. If you run into issues outside of this article, the Veeam forums are a great resource to use for a lot of common errors for backups or replications. As always, if you have any questions about the process or you’re running through this and feel I missed something, please leave a comment and I’ll do my best to get back to you.
Featured image: Freepik


Hi, thx for this blog !
Near the same case, but luckily we can move data by WAN (private clouds).
I trying a POC first in v9.5, and not sure on 3 Steps :
– install of remote proxy : does i need to install a full Veeam B&R server on target and then add it as proxy on the source server ? or is there really a remote push possible from source B&R to a remote Windows server possible ?
– could the proxy have locally access by itself on the datacenter ? or must the source B&R server need remote access ?
– In a simple case like ours : *one* VM server with all functions on the source side, and only a proxy server on the remote side (if it’s enough), i try to mind the minimal ports to open between them. Official doc give all the possible cases, and not sure which are usefull or not.
Thx for any answer 🙂
Hi David,
Some answers for you:
1. No, you only need a proxy in the remote site as long as the Veeam B&R server can communicate with it.
2. Veeam B&R server will need to be able to at least access the vCenter of the remote site as you will add it into Veeam
3. I don’t know the ports off hand, but here’s a link to Veeam’s site with the ports used: https://helpcenter.veeam.com/docs/backup/vsphere/used_ports.html?ver=100#proxy
If you have any other questions, feel free to ask. Hope that helped and good luck!
My source VM does not shut down. What am I doing wrong?
Can you please explain the process of converting VMware to Hyper-V once data have been migrated from old servers to the new server environment